
Excertos do catálogo
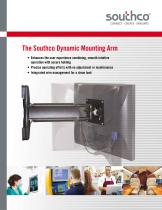
CONNECT • CREATE • INNOVATE The Southco Dynamic Mounting Arm • Enhances the user experience combining, smooth intuitive operation with secure holding • Precise operating efforts with no adjustment or maintenance • Integrated wire management for a clean look
Abrir o catálogo na página 1
AV Series Dynamic Mounting Arm Tilt, Swivel and Swing Product Detail • Intuitive grab and move operation enhances the user experience Wire channel in open position No knobs or tools required to reposition the display Precise control of operating effort ensures ideal “feel” and eliminates “drift” Holds securely, even in applications with dynamic loading • Low profile in the stowed position Folds to within 50 mm of the wall • Snap-open channels simplify wire management Easy display installation and replacement • Factory assembled and ready for use Dimensions in millimeters (inch) unless...
Abrir o catálogo na página 2
AV Series Dynamic Mounting Arm Tilt, Swivel and Swing • Smooth operation enhances the user experience • Adjust the display without knobs or tools • Holds securely in every position Step 1 Determine display weight and distance (d) from mounting surface to center of gravity. Display Weight Aluminum alloy, powder coated Performance Details Cycle performance: 20,000 cycles within ± 20% of static torque specification Max. dynamic working load: Model 101: 66N (15 lbf) Model 102: 98N (22 lbf) Average ultimate load: See table Part Number Part Number Example Display mounting surface to CG distance...
Abrir o catálogo na página 3
AV Series Dynamic Mounting Arm Tilt, Swivel and Swing • Smooth operation enhances the user experience • Adjust the display without knobs or tools • Holds securely in every position Installation 1. Determine desired mounting location 2. Mark upper and lower mounting holes. For ideal hole location, mark upper hole first, then use a plumb line to ensure vertical orientation between the upper and lower holes a. For thru-bolt installation, drill or punch holes as indicated on trade drawing and install using 1/4-20 or M6 screws. b. For installation in wood studs, drill a 3/16 inch pilot hole and...
Abrir o catálogo na página 4Todos os catálogos e folhetos Southco
-
 MR Omni Cabin & Cockpit Door Lock
3 Páginas
-
 M1 Push-to-Close Latch
4 Páginas
-
 R4 - Rotary Latches
12 Páginas
-
 R4-EM 9 Series
4 Páginas
-
 E8 - Adjustable Style Draw Latches
1 Páginas
-
 H3 Swinghandle System
5 Páginas
-
 ST series
7 Páginas
-
 37 - Lever-Assisted Latches
1 Páginas
-
 AC - Cables
4 Páginas
-
 C2 - Lever Latches
1 Páginas
-
 C7 Draw Latch
1 Páginas
-
 C3 Push-to-Close Latch
3 Páginas
-
 A7 Compression Latch
2 Páginas
-
 M5 Lever Compression Latch
1 Páginas
-
 E3 VISE ACTION
28 Páginas
-
 AV - Tilt Mount (T Series)
4 Páginas
-
 MP - Pulls
1 Páginas
-
 P8 - Wire Pull Handles
1 Páginas
-
 B8 - Grab Handles
2 Páginas
-
 M5 - Lift Handles
1 Páginas
-
 B4 - Lightweight Handles
1 Páginas
-
 MP - Coat Hook
1 Páginas
-
 P1 - Flush Pull
1 Páginas
-
 67 - Concealed Pulls
2 Páginas
-
 PT - Tubular Key Cam Lock
2 Páginas
-
 PK - Lock Plugs
2 Páginas
-
 CM - Cam Lock Latches
8 Páginas
-
 DM - Monosert & Duosert Inserts
2 Páginas
-
 NY/CC - Nylatch Cable Clamps
1 Páginas
-
 10/38 - Drive Rivets
3 Páginas
-
 GA - Gaskets
1 Páginas
-
 MT
MT1 Páginas
-
 DRAINS
4 Páginas
-
 THRU HU LLS
5 Páginas
-
 DECK FILLS & TANK VENTS
6 Páginas
-
 Rod holder
3 Páginas
-
 Other Deck Hardware
8 Páginas
-
 Eyes
Eyes5 Páginas


Catálogos arquivados
-
 TruHulls
7 Páginas
-
 Lighting electrical
2 Páginas
-
 Drains
10 Páginas
-
 Deckfills TankVents
10 Páginas
-
 Cleats chocks
8 Páginas
-
 MP Polar Magnetic deadbolt Latch
1 Páginas
-
 E5 TROLLER Cam LATCH
1 Páginas
-
 Push-to-Close Latch
4 Páginas
-
 Snappy MT Push-to-Close Latch
1 Páginas
-
 Deck Hardware
138 Páginas
-
 Access Hardware
84 Páginas