
Excertos do catálogo

Tiller Pilots Owner's handbook NNOVATION • QUALITY • TRUST
Abrir o catálogo na página 1
Your Raymarine tiller pilot is a totally self-contained autopilot designed for tiller steered sailboats. The autopilot is mounted between the tiller and a single attachment point on the boat’s structure. It is designed for owner installation and is ready for use after connection to the boat’s 12 V electrical system. Operating modes The tiller pilot has four basic operating modes: • Standby mode: autopilot off • Auto mode: autopilot engaged and locked onto a heading • Track mode: autopilot on and maintaining a track between two waypoints created on a navigation system • WindTrim mode:...
Abrir o catálogo na página 5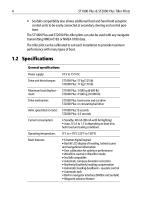
ST1000 Plus & ST2000 Plus Tiller Pilots • SeaTalk compatibility also allows additional fixed and hand-held autopilot control units to be easily connected at secondary steering and control positions The ST1000 Plus and ST2000 Plus tiller pilots can also be used with any navigator transmitting NMEA 0183 or NMEA 0180 data. The tiller pilot can be calibrated to suit each installation to provide maximum performance with many types of boat. 1.2 Specifications General specifications Power supply: Drive unit thrust torque: Maximum boat displacement: Drive mechanism: ST1000 Plus: lead-screw and nut...
Abrir o catálogo na página 6
EMC conformance All Raymarine equipment and accessories are designed to the best industry standards for use in the recreational marine environment. The design and manufacture of Raymarine equipment and accessories conform to the appropriate Electromagnetic Compatibility (EMC) standards, but correct installation is required to ensure that performance is not compromised. 1.3 About this handbook This handbook contains important information about installing, using and maintaining your new Raymarine product. To get the best from the product, please read this handbook thoroughly. Important...
Abrir o catálogo na página 7
ST1000 Plus & ST2000 Plus Tiller Pilots Safety notices WARNING: Product installation This equipment must be installed and operated in accordance with the instructions contained in this handbook. Failure to do so could result in poor product performance, personal injury and/or damage to your boat. WARNING: Electrical safety Make sure the power supply is switched off before you make any electrical connections. WARNING: Navigation aid Although we have designed this product to be accurate and reliable, many factors can affect its performance. As a result, it should only be used as an aid to...
Abrir o catálogo na página 8
Chapter 2: Using the Tiller Pilot Chapter 2: Using the Tiller Pilot 2.1 Overview WARNING: Passage making under autopilot control is an enjoyable experience that can, if you are not careful, lead to the relaxation of the permanent watch. Always maintain a permanent watch no matter how clear the sea may appear to be. • The tiller pilot always powers up in Standby mode (indicated by a flashing ‘C’ alongside the boat’s current compass heading). • The tiller pilot is controlled using simple push-button operations, all of which are confirmed with a short beep. In addition to the main single key...
Abrir o catálogo na página 9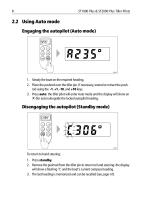
ST1000 Plus & ST2000 Plus Tiller Pilots 2.2 Using Auto mode Engaging the autopilot (Auto mode) 1. Steady the boat on the required heading. 2. Place the pushrod over the tiller pin. If necessary, extend or retract the pushrod using the -1, +1, -10, and +10 keys. 3. Press auto: the tiller pilot will enter Auto mode and the display will show an ‘A’ (for auto) alongside the locked autopilot heading. Disengaging the autopilot (Standby mode) To return to hand steering: 1. Press standby. 2. Remove the pushrod from the tiller pin to return to hand steering: the display will show a flashing ‘C’ and...
Abrir o catálogo na página 10
Chapter 2: Using the Tiller Pilot Changing course In Auto mode, use the -1 and -10 (port) and +1 and +10 (starboard) keys to change course in steps of 1° and 10°. For example: press -10 three times for a 30° course change to port: Automatic tack feature (AutoTack) The autopilot has a built-in automatic tack facility (in Auto, Track and WindTrim modes) that turns the boat through 100°: • to AutoTack 100° to port, press -1 and -10 together • to AutoTack 100° to starboard, press +1 and +10 together
Abrir o catálogo na página 11
ST1000 Plus & ST2000 Plus Tiller Pilots AutoTack - Starboard AutoTack - Port AutoTack angle AutoTack angle Dodging obstacles 1. To avoid an obstacle when you boat is under autopilot control, select a course change in the appropriate direction. For example, press -10 three times for a 30°dodge to port. 2. When safely clear of the obstacle, you can either: • reverse the previous course change (for example, by pressing +10 three times), or • return to the previous heading (see below) Returning to the previous heading 1. Press auto for 1 second: the previous heading will flash for 10 seconds....
Abrir o catálogo na página 12
Chapter 2: Using the Tiller Pilot Resumed course Original course Note: If you do not press auto while the display is flashing, the autopilot will maintain the current heading. Off course alarm The off course alarm sounds if the locked autopilot heading and the boat’s current heading differ by more than the value set in calibration level 6 (see page 62) for 20 seconds. Cancelling the off course alarm To cancel the off course alarm, press standby to return to manual steering. Note: If the off course alarm sounds, this is usually an indication that the boat is carrying too much sail, or that...
Abrir o catálogo na página 13
ST1000 Plus & ST2000 Plus Tiller Pilots Locked heading Distance to waypoint (if available) Bearing to waypoint (if available) Cross track error D178-2 You can revert to normal operation by pressing either -1 and +10 or +1 and -10 together again. Automatic deadband control (Auto Seastate) In Auto, WindTrim or Track modes, the tiller pilot is set to AutoSeastate (automatic deadband control) as a default. This causes the pilot to gradually ignore repetitive movements of the boat and respond only to true course variations. By preventing unnecessary rudder movement, AutoSeastate provides the...
Abrir o catálogo na página 14Todos os catálogos e folhetos Raymarine
-
 2023 PRODUCT GUIDE
100 Páginas
-
 2022 PRODUCT GUIDE
100 Páginas
-
 Axiom
Axiom16 Páginas
-
 MARINE ELECTRONICS FOR FISHING 2019
36 Páginas
-
 Product Guide 2018
80 Páginas
-
 PRIJSLIJST 2018
28 Páginas
-
 2017 Product Guide
104 Páginas
-
 Raymarine
89 Páginas
-
 MV-Series
3 Páginas
-
 Raymarine_eS_Series_brochure
8 Páginas
-
 CP370-470-570 Sonar Modules
8 Páginas
-
 Ray50, Ray60, Ray70
4 Páginas
-
 April 2015 Pricebook (UK Euro) Final
48 Páginas
-
 UK_Product_Guide_2015_LOW
36 Páginas
-
 FLIR MV-/MU-Series
24 Páginas
-
 FLIR AX8 ™
4 Páginas
-
 Digital Switching
12 Páginas
-
 Dragonfly Product Guide (Sonar/GPS)
2 Páginas
-
 Product Guide 2015
68 Páginas
-
 VHF Radios
4 Páginas
-
 aSeries Multifunction Displays
8 Páginas
-
 CP200 CHIRP SideVision Sonar
4 Páginas
-
 LightHouse II User Interface
4 Páginas


Catálogos arquivados
-
 Go Hunting Underwater: CP200
1 Páginas
-
 Hunting Saltwater
1 Páginas
-
 Hunting power
1 Páginas
-
 NEW a Series Multifunction Display
8 Páginas
-
 Raymarine Product Guide 2014
56 Páginas
-
 Instruments - i40/i50/i60/Wireless
8 Páginas
-
 Thermal Cameras
8 Páginas
-
 a Series Multifunction Displays
8 Páginas
-
 Evolution Autopilot
8 Páginas
-
 gS Series Multifunction Displays
8 Páginas
-
 Sonar
Sonar8 Páginas
-
 Radar
Radar8 Páginas
-
 Instruments i40 / i50 / i60 / i70
8 Páginas
-
 Autopilots
8 Páginas
-
 Accessories
8 Páginas
-
 Instruments Catalogue
2 Páginas
-
 e Series e165 multifunction display
2 Páginas
-
 Raymane brochure 2012
24 Páginas
-
 COMMUNICATIONS & ACCESSORIES
18 Páginas
-
 Instruments ST 40
18 Páginas
-
 AUTOPILOT SYSTEM GUIDE
18 Páginas
-
 RayTechRNS 6.1
2 Páginas
-
 D I G I TA L R A D A R
12 Páginas
-
 H D D I G I T A L F I S H F I N D E R S
12 Páginas
-
 G series
14 Páginas
-
 E series catalogue
14 Páginas
-
 C series catalogue
10 Páginas
-
 Multifunction Displays
24 Páginas
-
 serie A catalogue
6 Páginas


