- Catalogs
- Tides Marine
- Tides Marine Catalogue
Tides Marine Catalogue
1 /90Pages

Tides Marine Catalogue
1 /90Pages
Catalog excerpts
Providing the marine industry new technology for improved performance and reliability Quality Marine Systems at a fair price. It's just the beginning of your Tides Marine experience. Boat Builders • Each time you introduce a new vessel model (or change an old one), a Tides Marine technical specialist will be available to discuss installation techniques and guidelines with production personnel. No charge. • A Tides Marine technical specialist will conduct regular "on-site" training sessions as requested by your production supervisors. No charge. • A Tides Marine representative will visit any dealer...
Open the catalog to page 2
Limited Warranty Policy Unless covered by a unique product-specific warranty, merchandise is guaranteed for two years or 2500 engine hours (whichever comes first) against defects in material or workmanship. Tides Marine is not liable for part failure due to improper installation or misuse. If parts appear to be defective, call Tides to obtain a Warranty Return Authorization (WRA) Number. Then, return the parts for full credit or replace- ment. Any alteration to Tides Marine products automatically voids this warranty. For a complete limited warranty statement, visit our website at www.tidesmarine.com....
Open the catalog to page 3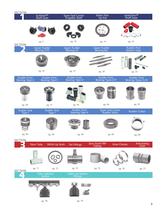
Shaft Seals Spare Seal Carrier Propeller Shaft Water Pick- Shaft Seals Upper Rudder Upper Rudder Upper Rudder Rudder Port Rudder Port/ Rudder Port/ Rudder Port/ Rudder Port/ Rudder Port/ Rudder Seal Rudder Seal Rudder Port/ Spare Seal Carrier Rudder Stock Rudder Collars Stern Tube Nitrile Lip Seals Tee Fittings Hose Clamps Tides Sailtrack
Open the catalog to page 4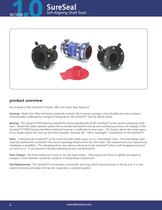
Self-Aligning Shaft Seals product overview Key features of the SureSeal™ include: ABS and Lloyds Type Approval. Housing: Made from fiber-reinforced composite material, the housing is stronger, more durable and more compact. Dimensionally unaffected by changes in temperature, the SureSeal™ will not absorb water. Bearing: The integral PTFE® bearing extends the useful operating life of the SureSeal™ under normal operating condi- tions. Should the water injection system fail to provide lubrication to the lip seal and bearing surface, the integrity of the SureSeal™ PTFE® bearing and fiber-reinforced...
Open the catalog to page 5
Water Injection Fittings Hose from Water Pick-Up Point Articulating Hose Crossover Hose to Second Stern Tube installation overview The following is a brief description of a typical SureSeal™ installation. Remove shaft from transmission coupling. existing shaft sealing Remove the hose clamps shaft log (stern tube). RE-USE these compo- nents as they will not function correctly with Draw the shaft back up against the coupling. This will expose that portion SureSeal™ unit into the articulating hose and push shown next to the stern seal will ride on the shaft. Examine this area care- fully. Be sure...
Open the catalog to page 6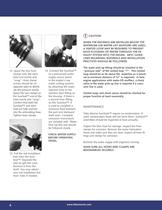
clamps over the stern "snug". Hose clamp opposite sides to distrib- hose evenly and "snug". Confirm that both the tube are fully inserted into the articulating hose. Tighten hose clamps. hats from the Sure- tabs to split the cone. from Tides if needed. supply source (point water cooling system) stainless steel fitting on a second hose fitting crossover feed between shaft seals. Complete crossover instructions are included with Water Pick-Up Kits and should CHECK WATER SUPPLY BEFORE OPERATING WHEN THE ENGINE(S) ARE INSTALLED BELOW THE WATERLINE (OR WATER-LIFT MUFFLERS ARE USED), A VENTED LOOP...
Open the catalog to page 7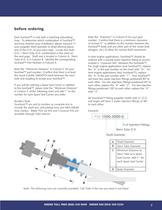
before ordering Each SureSeal™ is sold with a matching articulating hose. To determine which combination of SureSeal™ and hose matches your installation, please measure 1) your propeller shaft diameter to three decimal places and 2) the O.D. of your stern tube. Locate this shaft O.D. / Stern Tube O.D. combination in the chart on the next page. Shaft size is located in Column A. Stern Tube O.D. is in Column B. Identify the corresponding SureSeal™ Part Number in Column E. Note the "Minimum Distance" in Column C for your SureSeal™ part number. Confirm that there is at least this much CLEAN, SMOOTH...
Open the catalog to page 8
Specifications (d imensions in inches)_ SHAFT HOSE MINIMUM PART SureSeal™ SIZE ID DISTANCE DIAMETER KIT NUMBER
Open the catalog to page 9
ifications (d imensions in inches) SHAFT HOSE MINIMUM PART SureSeal™ SIZE ID DISTANCE DIAMETER KIT NUMBER
Open the catalog to page 10
Metric Specifications (d imensions in millimeters) SHAFT HOSE MINIMUM PART SureSeal™ SIZE ID DISTANCE DIAMETER KIT NUMBER
Open the catalog to page 11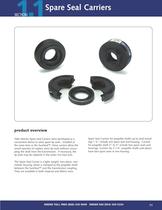
Spare Seal Carriers product overview Tides Marine Spare Seal Carriers were developed as a convenient device to store spare lip seals. Installed at the same time as the SureSeal™, these carriers allow the vessel operator to replace worn lip seals without uncou- pling the shaft from the transmission. If necessary, the lip seals may be replaced in the water (no haul out). Spare Seal Carriers for propeller shafts up to (and includ- ing) 1 3A" include one spare seal and housing. Carriers for propeller shaft 2" to 3" include two spare seals and housings. Carriers for 3 1/4" propeller shafts and above...
Open the catalog to page 12
installation overview Spare Seal Carrier will there are no keyways, nicks or corrosion in this area. Carefully press each spare lip seal onto the side (with part number imprint) first. 5. Remove the red installa- 7. Check to be sure that the tion hat and confirm that each seal is facing the Carrier is at least 1 " from Carrier should grip the shaft tightly and turn with it during operation. shaft (seal side first). Seal Carrier over the lip with diagonal pliers. The rier should face away from Mounting Screw
Open the catalog to page 13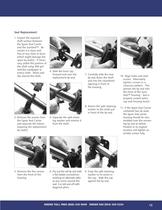
Seal Replacement shaft surface between the Spare Seal Carrier free of any nicks or burrs which might damage the spare lip seal(s). If neces- sary, polish this portion of the shaft using 300 grit emery cloth. Work radi- ally around the shaft. lip seal down the shaft 8. Return the split retaining washer to the shaft just Remove the screws from the Spare Seal Carrier 5. Separate the split retain- 3. Remove the five screws working on alternate sides seal. Cut old seal off with diagonal pliers. 9. Snap the split retaining 10. Align holes and start screws. Alternately crisscross pattern. This presses...
Open the catalog to page 14All Tides Marine catalogs and brochures
 Replace Rudder Lip Seal
2 Pages
 TIDES CATALOG
88 Pages
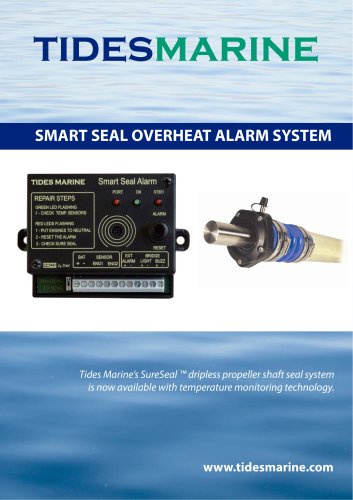 SMART SEAL ALARM SYSTEM
4 Pages

Archived catalogs
 SureSeal Installation File
2 Pages
 SureSeal INSTALLATION MANUAL
16 Pages
 SAIL TRACK SYSTEM
2 Pages
 SHAFT SEAL BROCHURE
12 Pages