
- Catalogs
- Tides Marine
- SureSeal Installation File

SureSeal Installation File

SureSeal Installation File
- Position the SureSeal™ assembly next to the stern tube to determine the lip seal's position on the shaft.
- Place hose clamps over each end of the articulating hose and insert the SureSeal™ into the hose, tightening the clamps.
- Press the red installation hat into the front of the SureSeal™ to cover the lip portion of the seal.
- Slide the assembly onto the shaft and stern tube without using grease.
- Push the articulating hose over the stern tube and evenly space the hose clamps, ensuring they fully engage the SureSeal™ and stern tube before tightening.
- Remove the red installation hat and retain it for future use.
Catalog excerpts
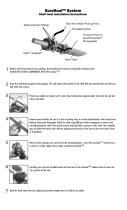
SureSeal™ System Shaft Seal Installation Instructions Water Injection Fittings Tides® SureSeal Hose from Water Pick-up Point Articulating Hose second SureSeal™ Stern Tube 1 Remove shaft from transmission coupling. Disassemble and remove existing shaft sealing system. DO NOT RE-USE THESE COMPONENTS WITH THE SureSeal™. 2 Draw the shaft back up against the coupling. This will expose that portion of the shaft that was located under the old hose and shaft seal system. Position assembly (as shown) next to stern tube to determine approximately where the lip seal will Examine area carefully. Be sure it is free of pitting, nicks or surface imperfections which could cause leaking. Clean area thoroughly. Polish the shaft using 300 grit wet/dry sandpaper or emery cloth, working around the shaft. Fore and aft actions could put flats or grooves in the shaft. The assembly may be shifted forward on the shaft by adjusting the position of the hose on the stern tube at time Place two hose clamps over each end of the articulating hose. Insert the SureSeal™ into the hose as far as it will go. Tighten hose clamps around the SureSeal™. Carefully press the red installation hat into the front of the SureSeal™. Make certain it covers the 7 Back the shaft away from the coupling to provide enough room to install the assembly.
Open the catalog to page 1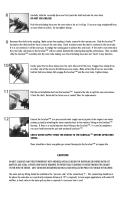
Carefully slide the assembly (hose end first) onto the shaft and onto the stern tube. DO NOT USE GREASE! Push the articulating hose over the stern tube as far as it will go. If you are using straightwall hose, no more than two inches. Do not tighten clamps. Reconnect the shaft to the coupling. Make certain the coupling is firmly secured to the transmission. Slide the SureSeal™ forward on the shaft until the hose is clear of the stern tube. Check to make certain the shaft is centered in the stern tube. If it is not centered, it will be necessary to realign the running gear to achieve this end...
Open the catalog to page 2All Tides Marine catalogs and brochures
 Replace Rudder Lip Seal
2 Pages
 TIDES CATALOG
88 Pages
 SMART SEAL ALARM SYSTEM
4 Pages

Archived catalogs
 Tides Marine Catalogue
90 Pages
 SureSeal INSTALLATION MANUAL
16 Pages
 SAIL TRACK SYSTEM
2 Pages
 SHAFT SEAL BROCHURE
12 Pages