- Catalogs
- Tides Marine
- Spare Seal Carrier Kit Installation
Spare Seal Carrier Kit Installation

Spare Seal Carrier Kit Installation
- Separate the carrier kit by removing the Phillips head screws.
- Remove the spare lip seal(s).
- Ensure the carrier kit is at least 1 inch from the SureSeal™ and tighten the assembly screws.
- Slide the red installation hat and seal(s) onto the shaft, ensuring the seal side is first.
- Reassemble the spare seal carrier over the lip seal(s) and around the propeller shaft, ensuring the long shoulder faces away from the SureSeal™.
- Inspect and clean the exposed shaft surface between the spare seal carrier and the SureSeal™.
- Remove the screw from the spare seal carrier and separate the halves to expose the spare lip seal(s).
- Remove the five screws from the front of the SureSeal™ housing.
- Carefully slide the new lip seal down the shaft into the chamfered opening in the SureSeal™ housing.
- Align the holes in the cap with those in the collar on the SureSeal™ housing and tighten the screws in a crisscross pattern.
- Ensure the replacement lip seal is properly seated when the cap and housing touch.
Catalog excerpts

SureSeal™ System Spare Seal Carriers Original Installation Lip Seal Replacement Original Installation of the Carrier Determine where the Spare Seal Carrier will be located on the shaft (minimally 1" from Be certain there are no keyways, nicks or corrosion in this area of the propeller shaft. Separate the two halves of the carrier kit by removing the Phillips head screws. Remove the spare lip seal (s).
Open the catalog to page 1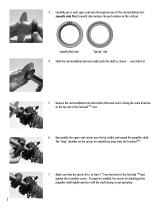
Carefully press each spare seal onto the tapered cone of the red installation hat smooth side first (smooth side contains the part number on the surface) . Smooth (flat) side “Spring” side Remove the red installation hat and confirm that each seal is facing the same direction as the lip seal in the SureSeal™ unit. Reassemble the spare seal carrier over the lip seal(s) and around the propeller shaft. The “long” shoulder on the carrier kit should face away from the SureSeal™. Slide the red installation hat and seal(s) onto the shaft as shown − seal side first. Make sure that the carrier kit is...
Open the catalog to page 2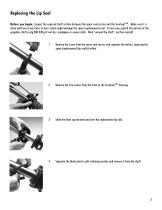
Replacing the Lip Seal Before you begin: Inspect the exposed shaft surface between the spare seal carrier and the SureSeal™. Make sure it is clean and free of any nicks or burrs which might damage the spare (replacement) seal. If necessary, polish this portion of the propeller shaft using 300-330 grit wet-dry sandpaper or emery cloth. Work “around the shaft”, not fore and aft. 1 Remove the screw from the spare seal carrier and separate the halves, exposing the spare (replacement) lip seal(s) within. Remove the five screws from the front of the SureSeal™ housing. Slide the front cap forward and...
Open the catalog to page 3
Using a flat blade screwdriver, pry out the old lip seal from the SureSeal™ housing. Work on alternate sides of the worn lip seal as you move your way around the outside diameter of the worn lip seal. When it is out of the housing, use diagonal pliers and cut it off the shaft. Carefully slide the new lip seal down the shaft and into the chamfered opening in the front of the SureSeal™ housing. Return the split retaining washer to the shaft just in front of the lip seal. Snap the split retaining washer into its recess in the cap. Slide the cap against the replacement seal. Align the holes in the...
Open the catalog to page 4All Tides Marine catalogs and brochures
 Replace Rudder Lip Seal
2 Pages
 TIDES CATALOG
88 Pages
 SMART SEAL ALARM SYSTEM
4 Pages
Archived catalogs
 Tides Marine Catalogue
90 Pages
 SureSeal Installation File
2 Pages
 SureSeal INSTALLATION MANUAL
16 Pages
 SAIL TRACK SYSTEM
2 Pages
 SHAFT SEAL BROCHURE
12 Pages