- Catalogs
- Star kites
- User guide
User guide

User guide
The user guide for the Starkites S-Bow kite focuses on safety, performance, and usability. Key features include complete de-power capability, a reliable safety system, and durable construction. Users are encouraged to read the guide thoroughly before use.
Users should receive lessons from certified instructors, wear safety gear, and adhere to safety rules. The kite should not be used in crowded areas or near obstacles, and the location should be assessed for wind conditions and potential hazards.
This section details the kite's components, such as the leading and trailing edges, struts, lines, and power adjustment straps. Proper setup and handling are essential to prevent accidents.
Down-wind: Position the kite safely with correctly attached lines. Expert assistance is recommended for first-time setup.
Up-wind: Ensure bridles are untangled and lines are attached according to the diagram. Expert guidance is advised for proper setup.
Adjust the power and lines to match riding style and conditions. Rear lines can be adjusted to prevent over-sheeting. Instructions are provided for standard and pulley bars.
Safety Leash: Instructions for attaching the safety leash to the harness and kite are provided, along with the quick-release system for emergencies.
Emergency Release: Detailed procedure for using the emergency release on the chicken loop to safely disconnect from the kite.
Assisted Launching: Recommended to launch with an assistant, following standard procedures for C-shaped kites.
Self-Launching: Detailed steps for self-launching, emphasizing safety and proper line setup.
Water Re-launching: Explains re-launching the kite from water, noting differences from C-shaped kites and advising against swimming towards the kite.
Instructions for self-rescue and pack down in water are provided, crucial for situations where the wind dies or a line breaks.
The guide stresses the importance of safety and proper training for a safe and enjoyable kiteboarding experience.
Outlines the self-rescue procedure for kiteboarding, applicable to both 4 and 5 line kites, including Bow and Arc kites. Recommended after training in light winds and when no boat recovery is available. Key steps include stabilizing the kite, securing lines, and using the kite as a sail to return to shore.
The SLS device adjusts the height on the central line of the kite, designed to self-release under significant tension. Instructions for adjusting, locking, and unlocking are provided.
Emphasizes the importance of safety in kiteboarding, recommending lessons from certified instructors, wearing a helmet and safety gear, and knowing personal limits, equipment, the spot, and the weather.
Starkites offers a warranty for major defects for at least 90 days, covering repair or replacement of defective parts. Limitations include coverage only for defects in material and workmanship, exclusion of damage from misuse, abuse, or natural causes, and voiding of warranty if modifications are made. Claims must be accompanied by the original purchase receipt.
Catalog excerpts
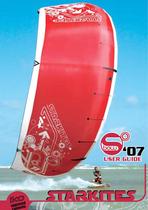
‘07 USER GUIDE ved appro nts nte
Open the catalog to page 1
All content of this document, including text, images and graphics, is the exclusive property of STARKITES and is protected by international copyright and other intellectual property laws. All rights not expressly granted are reserved. You may not reproduce, copy, or redistribute the design or layout.
Open the catalog to page 2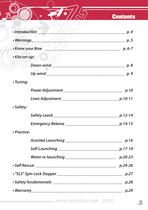
Contents • Introduction _________________________________________ p. 4 • Warnings____________________________________________ p. 5 • Know your Bow ____________________________________ p. 6-7 • Kite set-up: Down-wind __________________________________ p. 8 Up-wind _____________________________________ p. 9 • Tuning: Power Adjustment ____________________________ p.10 Lines Adjustment ___________________________ p.10-11 • Safety: Safety Leash_______________________________ p.12-14 Emergency Release _________________________ p.14-15 • Practice: Assisted Launching ___________________________ p.16...
Open the catalog to page 3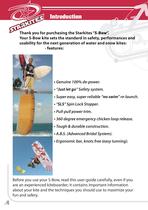
Thank you for purchasing the Starkites"S-Bow". Your S-Bow kite sets the standard in safety, performances and usability for the next generation of water and snow kites: ' "Just let go" Safety system. ' Super easy, super reliable "no swim"re-launch. ' "SLS"Spin Lock Stopper. ' Pull-pull power trim. ' 360 degree emergency chicken loop release. ' Tough & durable construction. 'A.B.S. (Advanced Bridal System). ' Ergonomie bar, knots free (easy tunning). Before you use your S-Bow, read this user-guide carefully, even if you are an experienced kiteboarder; it contains important information about your...
Open the catalog to page 4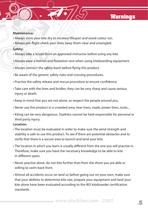
• Always store your kite dry to increase lifespan and avoid colour run. • Always pre-flight check your lines; keep them clear and untangled. • Always take a lesson from an approved instructor before using any kite. • Always wear a helmet and floatation vest when using kiteboarding equipment. • Always connect the safety leash before flying this product. • Be aware of the generic safety rules and crossing procedures. • Practise the safety release and rescue procedure to ensure confidence. • Take care with the lines and bridles; they can be very sharp and cause serious • Keep in mind that you are...
Open the catalog to page 5
5. Back or "steering" lines 7. Power adjustment straps 9. Chicken loop (with quick release).
Open the catalog to page 6
A. Leash part 1 (connects to harness) B. Leash part 2 (connects to kite) C. Dual action pump This image shows the center of the leading edge and the top surface of the To prevent bridles tangling use the inflation valve access to inflate your kite and connect the pump leash to the leading edge. Note: Beneath the circular patch is the leading edge inflation valve. On the underside of the leading edge you will find the leading edge deflation valve. Remember to seel the deflation valve before attempting to pump up the leading edge. Unlike"C'shaped kites, the leading edge should be pumped when the...
Open the catalog to page 7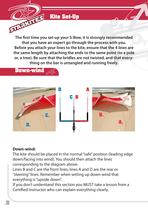
The first time you set-up your S-Bow, it is strongly recommended that you have an expert go through the process with you. Before you attach your lines to the kite, ensure that the 4 lines are the same length by attaching the ends to the same^^^to-a^fflg or, a tree). Be sure that the bridles are not twisted, and that every- thing on the bar is untangled and running freely. The kite should be placed in the normal "safe" position (leading edge down/facing into wind). You should then attach the lines corresponding to the diagram above. Lines B and C are the front lines, lines A and D are the rear...
Open the catalog to page 8
Ensure that the bridles are untangled and running freely, and that nothing on your bar is twisted.Your kite should be secured in the normal "safe" position (leading edge down/facing into wind). Lay out your lines upwind and attach the lines according to the diagram above. Lines B and C are the front lines, lines A and D are the rear or "steering" lines. If you do not understand this section you MUST take a lesson from a Certified Instructor who will explain how to set up your kite correctly.
Open the catalog to page 9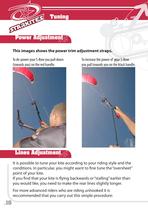
ower Adjustmen This images shows the power trim adjustment straps. To de-power your S-Bow you pull down To increase the power of your S-Bow you pull towards you on the black handle. It is possible to tune your kite according to your riding style and the conditions. In particular, you might want to fine tune the "oversheet" point of your kite. If you find that your kite is flying backwards or"stalling"earlierthan you would like, you need to make the rear lines slightly longer. For more advanced riders who are riding unhooked it is reccommended that you carry out this simple procedure:
Open the catalog to page 10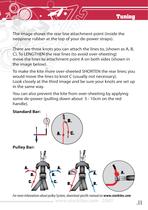
The image shows the rear line attachment point (inside the neoprene rubber at the top of your de-power straps). There are three knots you can attach the lines to, (shown as A, B, C).To LENGTHEN the rear lines (to avoid over-sheeting) ^jj\t^^Mii^^^mJ^j/ment point A on both sides (shown in To make the kite more over-sheeted SHORTEN the rear lines; you would move the lines to knot C (usually not necessary). Look closely at the third image and be sure your knots are set up You can also prevent the kite from over-sheeting by applying some de-power (pulling down about 5 - 10cm on the red For more infomations...
Open the catalog to page 11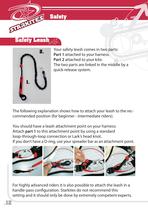
Safety Leash Your safety leash comes in two parts: Part 1 attached to your harnesl^ Part 2 attached to your kite. The two parts are linked in the middle by a quick-release system. The following explanation shows how to attach your leash to the rec- commended position (for beginner - intermediate riders). You should have a leash attachment point on your harness: Attach part 1 to this attachment point by using a standard loop-through-loop connection or Lark's head knot. If you don't have a D-ring, use your spreader bar as an attachment point. For highly advanced riders it is also possible to attach...
Open the catalog to page 12
Attaching parts of the quick-release system: The metal bar at the end of part 2 should be passed through the loop at the end of The bar should be folded back onto part 2. The sleeve should then be pushed firmly Finally, the sleeve is completely pulled over the metal bar and should look like the image Should you need to release the leash in an emergency, the black arrow printed on the sleeve fabric shows the direction to pull. Just like the chicken loop, you pull away from you and the leash will release, completely separating you from the kite.
Open the catalog to page 13Archived catalogs
 3D Class Harness
3 Pages
 PROBAR08
2 Pages
 Sprint 08
3 Pages
 TrainerKite 08
3 Pages
 S-BOW08
3 Pages