- Products
- Catalogs
- News & Trends
- Exhibitions
2007 link manual

2007 link manual
This document provides detailed instructions for setting up and converting kite bridles, specifically focusing on the Red Bridle and conversion from a 5-line to a different line setup.
Specifications and Components
The manual includes components such as LE1, LE2, LE3 bridles, X bridle, 'V' line leader line, and pulleys with pigtail loop/loop. Each component is essential for the proper setup and conversion of the kite.
Red Bridle Setup Procedure
- Step 1: Remove the original front line bridle assembly, starting with the 'V' line.
- Step 2: Attach the Red Bridle starting with LE lines using a Lark's head connection.
- Step 3-5: Continue attaching LE2 and LE3 lines to their respective hang points.
- Step 6-10: Complete the setup by attaching leader lines, threading the Oneline grab line, and adjusting the stopper ball for maximum de-power.
5-Line to Alternative Line Conversion
- Step 1: Remove the front line bridle assembly for the 5-line version.
- Step 2: Keep all rear line bridles attached.
- Step 3-6: Attach LE1, LE2, and LE3 lines using Lark's head knots.
- Step 7-10: Attach the 'V' line, thread the pulley, and adjust the Powerball as per specifications.
Tuning and Maintenance
Regular tuning and maintenance are recommended to ensure optimal performance and safety. Adjustments should be made according to the kite specifications provided in the manual.
Safety and Performance
Ensure all connections are secure and follow the setup instructions carefully to maintain safety and enhance performance during kiteboarding.
Catalog excerpts
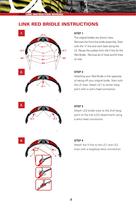
LINK INSTRUCTION MANUAL LINK RED BRIDLE INSTRUCTIONS The original bridles are shown here. Remove the front line bridle assembly. Start with the V' line and work back along the LE 3 LE. Reuse the pulleys from the V line for the Red Bridle. Remove all LE lines and W lines Attaching your Red Bridle is the opposite of taking off your original bridle. Start with the LE lines. Attach LE1 to center hang point with a Lark's head connection. Attach LE2 bridle lines to the 2nd hang point of the kite (LE2 attachment) using a larks head connection. lines with a loop/loop larks connection.
Open the catalog to page 2
Attach the LE3 line to the 3rd attach- ment on the leading edge (LE3 attach- ment) with a larks head connection. Attach the front leader lines to the hang point knot ('V' line attachment) with a larks head knot. Pull tight. Attach the Oneline cleat to your chicken loop unit with screws (shown in red for clarity). Thread the Oneline grab line through the active stopper ball, down through the bar and into the Oneline cleat. Attach Unwind the 20 m fly line and attach it with a larks head knot to the Oneline grab the yellow stopper ball to a further posi- tion about 10 cm from the ring. This will...
Open the catalog to page 3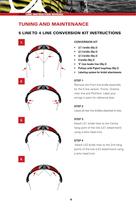
LINK INSTRUCTION MANUAL 5 LINE TO 4 LINE CONVERSION KIT INSTRUCTIONS V Line leader line (Qty 2) Pulleys with Pigtail loop/loop (Qty 2) Labeling system for bridal attachments Remove the Front line bridle assembly for the 5 line version: Fronts, Oneline main line and Pitchfork. Label your strings in pairs for reference later. Leave all rear line bridles attached to kite. Attach LE1 bridle lines to the Centre hang point of the kite (LE1 attachment) using a larks head knot Attach LE2 bridle lines to the 2nd hang points of the kite (LE2 attachment) using a larks head knot.
Open the catalog to page 4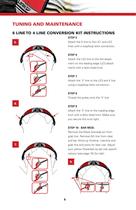
lines with a loop/loop larks connection. Attach the LE3 line to the 3rd attach- ment on the leading edge (LE3 attach- ment) with a larks head knot. Attach the 'V' line to the LE3 and X line using a loop/loop larks connection. Thread the pulley onto the 'V' line Attach the 'V' line to the Leading edge knot with a larks head knot. Make sure you secure this knot tight. Remove the Wave Grenade pin from grab line. Remove 5th line from cleat and bar. Wind up Oneline, mainline and grab line and store for later use. Adjust your yellow Powerball as per kite specifi- cations (see page 10) Go ride!
Open the catalog to page 5All SlingShot catalogs and brochures

Archived catalogs
 07 Innovations
3 Pages
 07 SX Tech
2 Pages
 07 Misfit Tech
2 Pages
- SUP
- Nautical paddle
- Adult stand-up paddle-board
- Inflatable stand-up paddle-board
- Recreational paddle
- Composite paddle
- Windsurf board
- Symmetrical paddle
- Adjustable paddle
- Single paddle
- Carbon fiber paddle
- Nautical mast
- Kiteboard
- Fiberglass paddle
- Speed windsurf board
- Travel bag
- Kitesurf kite
- Twin-tip kiteboard
- Wave windsurf board
- Freeride kiteboard