Torch

Torch
The SHOT 6 W torch by SEAC SUB is a technologically advanced diving torch known for its simplicity, reliability, and high-quality light output. It is designed for both sports and professional divers, featuring a high light-output bulb, user-friendly battery compartment, and a smooth-surface reflector.
- Power: 6 W
- Voltage: 5.0 V
- Batteries: 4 or 8 AA alkaline or rechargeable
- Amperes: 1.2
- Bulb: 6 W Xenon
- Body Material: Shock-resistant ABS
- Reflector Material: Thermoresistant PBT resin
- Lens: Polycarbonate
- O-Ring: NBR
- Weight: 310 g in air with 8 batteries, 180 g underwater
- Dimensions: Length 150 mm, Diameter 55 mm
- Switch: Mechanical microswitch with lock
- Color Temperature: 3100°K
- Light Beam: Narrow
- Burntime: Up to 250 minutes
- Maximum Depth: 100 m
- Do not operate the torch out of water.
- Avoid shining the light into eyes.
- Do not unscrew the lens ring nut during a dive or if wet.
- Keep away from extreme heat sources.
- Use only original spare parts.
- Batteries must be purchased separately and should not have different charge states.
1. Unscrew the lens ring nut anticlockwise.
2. Insert batteries with correct polarity.
3. Lubricate the O-ring with silicone grease.
4. Screw the lens ring nut clockwise and test the torch.
- Ensure the torch is sealed properly.
- Check for air bubbles underwater.
If water enters the torch, remove batteries, rinse with fresh water, dry, and check for functionality. For significant water ingress, contact a service center.
- Maximum depth: 100 m.
- Use only underwater due to high bulb temperatures.
1. Unscrew the lens ring nut.
2. Replace the bulb following the indicated arrows.
3. Lubricate and screw the lens ring nut.
- Transport in a protective bag.
- Avoid sun exposure.
- Rinse after each dive.
- Check and lubricate O-rings regularly.
- Annual inspection recommended at authorized centers.
The product is guaranteed for two years from purchase. The warranty excludes consumables like O-rings, batteries, and bulbs. It does not cover damage from mechanical shocks, chlorinated water, or heat exposure above 70°C. Warranty is void if the product is misused or tampered with by unauthorized personnel.
Catalog excerpts
ISTRUZIONI INSTRUCTIONS I UK INSTRUCTIONS w w . s e a c s u b E ANWEISUNGEN w F INSTRUCCIONES D . c o m
Open the catalog to page 1
ITALIANO Congratulazioni Grazie per aver scelto un prodotto tecnologicamente avanzato della SEAC SUB. I processi di lavorazione, le materie prime utilizzate e la cura dei particolari rendono tutti i nostri prodotti affidabili sia dal punto di vista della qualità che di durata nel tempo. La continua crescita tecnologica della Seac Diving pro offre costantemente garanzia di continua innovazione. Buon divertimento con i prodotti SEAC SUB…….. INDEX Introduzione ITALIANO ENGLISH pag. 11 FRANÇAIS pag. 19 ESPANOL pag. 27 DEUTSCH 2 pag. 03 pag. 35 SHOT 6 W è frutto di una ricerca avanzata in collaborazione...
Open the catalog to page 2
ITALIANO ITALIANO CARATTERISTICHE TECNICHE AVVERTENZE GENERALI ATTENZIONE!! Prima di utilizzare la torcia Shot siate sicuri di aver letto completamente questo manuale. ATTENZIONE! Non puntare la torcia verso i propri occhi o verso gli occhi di altre persone, sia questo in ambiente aereo che durante l’utilizzo in immersione. ATTENZIONE! Accettarsi di posizionare l’interruttore nella posizione di blocco durante tutte le fasi di trasporto in modo da impedire accensioni involontarie. ATTENZIONE! Assicurarsi di togliere le batterie durante il trasporto in aereo della torcia. ATTENZIONE! Durante la...
Open the catalog to page 3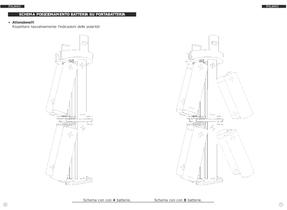
ITALIANO ITALIANO SCHEMA POSIZIONAMENTO BATTERIA SU PORTABATTERIA • Attenzione!!! Rispettare tassativamente l'indicazioni delle polarità! Schema con con 4 batterie. 6 Schema con con 8 batterie. 7
Open the catalog to page 4
ITALIANO ITALIANO INSERIMENTO BATTERIE: • Svitare in senso antiorario la ghiera oblò della torcia. • Togliere il cestello porta batterie. • Inserire le batterie seguendo le indicazioni di polarità ( + o -) indicate sul cestello. • Inserire il cestello porta batterie nel corpo torcia. • Lubrificare le o-ring di tenuta con un velo di grasso al silicone. • Avvitare la ghiera oblò in senso orario. • Verificare l’accensione della torcia tramite l’apposito interruttore. MODALITA' DI CONTROLLO PRIMA DELL'IMMERSIONE: • Se non utilizzata recentemente,verificare lo stato delle batterie della torcia SHOT...
Open the catalog to page 5
ENGLISH ITALIANO CONDIZIONI DI GARANZIA La SEAC DIVING PRO s.r.l garantisce il prodotto per anni due dal momento dell’acquisto. Si consiglia vivamente di conservare lo scontrino fiscale comprovante la data di acquisto. La garanzia non include le normali parti di comune consumo o usura quali: Congratulations! SEAC SUB thanks you for choosing one of our high-tech products. Our manufacturing techniques, selection of raw materials and care for details make all our products reliable both in terms of quality and long life. Seac Diving Pro's continuous technological growth is a constant guarantee of...
Open the catalog to page 6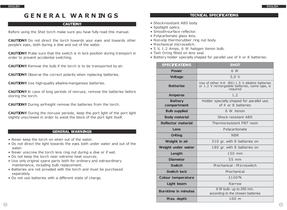
ENGLISH ENGLISH GENERAL WARNINGS CAUTION!! Before using the Shot torch make sure you have fully read this manual. CAUTION!! Do not direct the torch towards your eyes and towards other people’s eyes, both during a dive and out of the water. CAUTION!! Make sure that the switch is in lock position during transport in order to prevent accidental switching. CAUTION!! Remove the bulb if the torch is to be transported by air. TECNICAL SPECIFICATIONS • • • • • • • • • Shock-resistant ABS body. Spotlight optics. Smooth-surface reflector. Polycarbonate glass lens. Non-slip thermorubber ring nut body. Mechanical...
Open the catalog to page 7
ENGLISH ENGLISH BATTERY POSITIONING ON THE BATTERY HOLDER • Warning!!! Always observe the polarity indication! Battery holder with 4 batteries. 14 Battery holder with 8 batteries. 15
Open the catalog to page 8
ENGLISH ENGLISH BATTERY REPLACEMENT: LIMITS OF USE: • Unscrew the lens ring nut anticlockwise. • Remove the battery holder. • Make sure to insert the batteries observing the correct polarity marks (+ or -) shown on the holder. • Insert the battery holder into the body of the torch. • Lubricate the O-ring seal with a silicone grease film. • Screw the lens ring nut clockwise. • Switch on the torch to test. • The maximum operating depth is 100 m. • Owing to the high temperatures reached by the bulb, the lamp should be used only under water. CHECKS BEFORE DIVING: • If the torch has not been recently...
Open the catalog to page 9
FRANÇAIS ENGLISH WARRANTY CONDITIONS: SEAC DIVING PRO s.r.l guarantees the product for a period of two years from the date of purchase. You are strongly advised to keep the fiscal slip supplying evidence of the date of purchase. The warranty does not include standard consumption or wear parts, such as: Nos compliments! Merci d’avoir choisi un produit SEAC SUB de nouvelle technologie. Les processus de fabrication, les matières premières utilisées et le soin des détails assurent à nos produits une bonne fiabilité aussi bien du point de vue de la qualité que de leur durée de vie. L’évolution technologique...
Open the catalog to page 10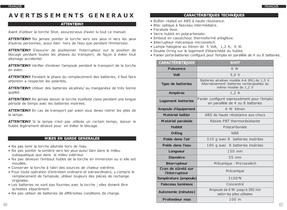
FRANÇAIS FRANÇAIS AVERTISSEMENTS GENERAUX ATTENTION!! Avant d’utiliser la torche Shot, assurez-vous d’avoir lu tout ce manuel. ATTENTION!! Ne jamais pointer la torche vers ses yeux ni vers les yeux d’autres personnes, aussi bien hors de l’eau que pendant l’immersion. ATTENTION!! S’assurer de positionner l’interrupteur sur la position de blocage pendant toutes les phases du transport, de façon à éviter tout allumage accidentel. ATTENTION!! Vérifier d’enlever l’ampoule pendant le transport de la torche en avion. ATTENTION!! Pendant la phase du remplacement des batteries, il faut faire attention...
Open the catalog to page 11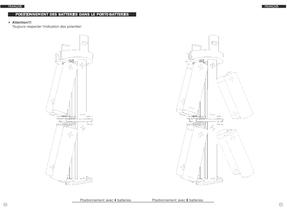
FRANÇAIS FRANÇAIS POSITIONNEMENT DES BATTERIES DANS LE PORTE-BATTERIES • Attention!!! Toujours respecter l'indication des polarités! Positionnement avec 4 batteries 22 Positionnement avec 8 batteries 23
Open the catalog to page 12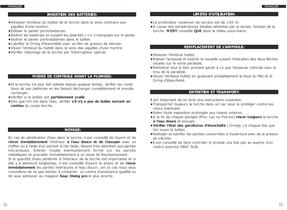
FRANÇAIS FRANÇAIS INSERTION DES BATTERIES: • Dévisser l’embout du hublot de la torche dans le sens contraire aux aiguilles d’une montre. • Enlever le panier porte-batteries. • Insérer les batteries en suivant les polarités ( + o -) marquées sur le panier. • Insérer le panier porte-batteries dans le boîtier. • Lubrifier le O-ring d’étanchéité avec un film de graisse de silicone. • Visser l’embout du hublot dans le sens des aiguilles d’une montre. • Vérifier l’allumage de la torche par l’interrupteur spécial. MODES DE CONTROLE AVANT LA PLONGEE: • Si la torche n’a plus été utilisée depuis quelque...
Open the catalog to page 13All Seac sub catalogs and brochures
 SEAC_2021_Catalogue
226 Pages
 SNORKELING collection
120 Pages
 APNEA collection
124 Pages
 SCUBA collection
156 Pages
 APNEA collection 2018
116 Pages
 SCUBA collection 2018
136 Pages
 SNORKELING SWIMMING collection 2018
108 Pages
 2016 COLLECTION
164 Pages
 X-FIRE & THUNDER
100 Pages
 X-fire reel
4 Pages
 X-fire speargun
100 Pages
 Bolt_special_combat
1 Page
 SEAC_GP100_4X4_ENG_snz
1 Page
 SEAC_SCUBA_2013_ENGESP
114 Pages
 SYNCHRO
70 Pages
 Q3-Q1
Q3-Q144 Pages
 R5-R3
R5-R328 Pages

Archived catalogs
 Catalog Collection 2015
214 Pages
 SEAC_APNEA_2013_ENGESP
60 Pages
 SEACSUB_CAT_USA_2013
116 Pages
 SEAC_BEACH_2013
28 Pages
 Size chart
80 Pages
 Arrow speargun
40 Pages
 Lighthouse
17 Pages
 Tank
Tank2 Pages
 DIOMOND
52 Pages
 Stabilizing Jackets
129 Pages
 Compensators PRO
8 Pages