R5-R3

R5-R3
SEAC products are renowned for their quality and reliability, crafted from selected materials and subjected to rigorous testing. Users are advised to thoroughly read the manual before use and retain it for future reference.
General Warnings
Users must adhere to all safety regulations and instructions provided in the manual to avoid potential dangers associated with improper use of underwater equipment. SEAC disclaims responsibility for issues arising from non-compliance. Repairs should only be conducted by authorized SEAC centers.
Surface Use
Before using the R3-R5 illuminator, ensure the manual is read in full. Check battery status and avoid using damaged batteries. The illuminator should not be used out of water for extended periods and should be stored in a temperate environment. Batteries should be removed if the device is not used for a long time.
Underwater Use
Do not direct the light at eyes during immersion. The illuminator has negative buoyancy and will sink if lost. Users should be familiar with international light signals and ensure the device is securely attached to the diver.
Technical Features
The R3-R5 illuminator, developed with professional divers, offers high performance and reliability. It features an LED system with high luminous efficiency and a lifespan of 50,000 hours. Its ergonomic design facilitates easy handling and storage.
Battery Replacement
To replace batteries, unscrew the body, remove the battery holder, replace the batteries, and reassemble, ensuring correct polarity.
Maintenance and Transport
After each dive, rinse the illuminator with fresh water. An annual inspection by an authorized SEAC center is recommended. Batteries should be removed if not used for over 30 days, and the device should be transported in a protective bag.
Warranty Certificate
SEAC offers a 2-year warranty covering defects due to material or manufacturing errors. The warranty is void if unauthorized repairs are made and does not cover consumable parts like O-rings or batteries. Proof of purchase is required for warranty claims.
Catalog excerpts

Illuminatori a led • Led torches • Lampes a Led • Linternas Led • Led-Brenners R5-R3 Istruzioni Instructions Instructions Intrucciones Anweisungen italiano 1 8596-Seac manuale torcia R5-R3.indd 1 31/10/2012 16:59:39
Open the catalog to page 1
Introduzione Congratulazione per aver scelto la qualità e l’affidabilità di un prodotto Seac. L’attrezzatura da lei acquistata è stata realizzata con materiali selezionati e collaudati. Lo sviluppo e la continua ricerca ci permettono di essere in continua evoluzione. Processi innovativi di fabbricazione, continui test e prove reali di funzionalità sviluppati nei nostri centri di ricerca garantiscono l’affidabilità che contraddistingue tutti i prodotti SEAC. ATTENZIONE Leggere l’intero manuale d’uso prima di utilizzare questa attrezzatura! Il manuale d’uso deve essere conservato per tutto il periodo...
Open the catalog to page 2
ATTENZIONE Sulla versione R5 è stato previsto un intelligente sistema di segnalazione usura batterie: per avvertire l'utente del prossimo esaurimento delle batterie, solo due dei cinque LED rimarranno accesi alla massima potenza. Questo permetterà di proseguire e terminare con tranquillità anche l'immersione più lunga, sapendo che poi le batterie andranno sostituite. CARATTERISTICHE R5 R3 Batterie 8 batterie stilo AA/LR6 alcaline 1.5v Potenza luminosa 750 lumen (5 LED) 450 lumen (3 LED) Angolazione fascio luminoso 30° 10° Temperatura colore 4.500°K 4.500°K Autonomia *) 4h al 100% potenza Oltre...
Open the catalog to page 3
Una volta terminato il completo inserimento (Fig. 7) inserire la testa del cestello porta batterie nell’apposito spazio ricavato nella testa dell’illuminatore (Fig. 8 - 9). Fig. 3 - Illustrazione Illuminatore aperto Fig. 7 - Corretto inserimento delle nuove batterie Fig. 4 - Estrazione del cestello porta batterie Fig. 8 - Corretto inserimento del cestello porta batterie Fig. 5 - Operazione di sostituzione batterie esaurite Inseriamo quindi le nuove batterie seguendo le indicazioni di polarità poste sul cestello (Fig. 6). Fig. 9 - Alloggiamento del cestello porta batterie nel gruppo oblò (testa...
Open the catalog to page 4
Fig. 10 - Corretto inserimento della ghiera d’accensione Fig. 13 - Operazione di chiusura dell’illuminatore avvitando in senso orario Manutenzione e trasporto Fig. 11 - Verifica del corretto funzionamento della ghiera d’accensione Sarà nostra cura adesso posizionare il corpo torcia pronto per essere di nuovo avvitato (Fig. 12). Avvitare con cura in senso orario fino al serraggio finale. (Fig. 13) Fig. 12 - Inserimento del corpo torcia sul cestello porta batterie - Alla fine di ogni immersione (Mare, Lago o Piscina) sciacquare sempre con acqua dolce ed asciugare. - Si consiglia di far ispezionare...
Open the catalog to page 5
Certificato di Garanzia SEAC garantisce il buon funzionamento del prodotto cui il presente manuale è allegato. La garanzia ha durata di anni 2 (due) in relazione alle vigenti normative europee. La garanzia ivi contenuta può essere esercitata esclusivamente alle condizioni ed entro i limiti di seguito indicati: 1. La garanzia ha durata di anni 2 (due) a partire dal momento in cui il prodotto viene acquistato presso un rivenditore autorizzato SEAC e non necessita di alcuna formalità di preventiva o successiva convalida. 2. La garanzia è riconosciuta esclusivamente al primo acquirente del prodotto...
Open the catalog to page 6
Introduction Congratulations for having chosen the quality and reliability of a SEAC product. The equipment you have purchased was made with selected and tested materials. Development and constant research allow us to evolve continually. Innovative manufacturing processes, constant controls and testing, as well as testing under real conditions guarantee the reliability that all SEAC products are known for. WARNING Read this entire manual before using this equipment! This manual must be retained for as long as you own the product! General information. - Before using the Led torch you must be familiar...
Open the catalog to page 7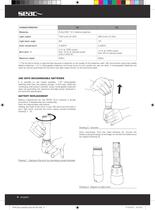
CHARACTERISTICS R5 R3 Batteries 8 AA/LR6 1.5 V alkaline batteries Light output 750 lumen (5 LED) 450 lumen (3 LED) Light beam angle 30° 10° Color temperature 4,500°K 4,500°K Burn-time *) 4 hr at 100% power Over 10 hr at reduced power (only 2 LEDs lit) 14 hr at 100% power Over 25 at reduced power Maximum depth 200m 200m *) The burntime shown is approximate because it depends on the quality of the batteries used. We recommend using high quality alkaline batteries. 1.2 V rechargeable batteries commonly found on the market can also be used. If rechargeable batteries are used we cannot guarantee the...
Open the catalog to page 8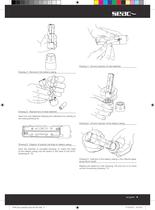
Drawing 7 - Correct insertion of new batteries Drawing 4 - Removal of the battery casing Drawing 5 - Replacement of dead batteries Insert the new batteries following the indications for polarity on the casing (drawing 6). Drawing 8 - Correct insertion of the battery casing Drawing 6 - Diagram of polarity markings on battery casing Once the insertion is complete (drawing 7), insert the head of the battery casing into the space in the head of the torch. (drawings 8 - 9). Drawing 9 - Insertion of the battery casing in the reflector-glass group (torch head) Replace the switch-on knob (drawing 10)...
Open the catalog to page 9
Drawing 10 - Correct insertion of the switch-on knob Drawing 13 - Closure of the torch by screwing clockwise Maintenance and transport Drawing 11 - Checking the functioning of the switch-on knob - At the end of every dive (sea, lake, pool), always rinse with fresh water and dry. - It is advisable to have the product inspected annually by an authorized SEAC center. - In case of prolonged disuse, we advise replacing the old batteries. If the torch will most likely not be used for a period of more than 30 days, it is advisable to remove the batteries from the battery casing. - Never insert batteries...
Open the catalog to page 10
Certificate of Warranty SEAC guarantees the correct functioning of the product to which this document is attached. This guarantee has a duration of two (2) years in accordance with current European regulations. The warranty herein can be enacted according to the conditions and limits expressly indicated below: 1. The warranty will have a duration of 2 (two) years, beginning from the moment the product is acquired from an authorized SEAC dealer and does not require any preventive formality or subsequent validation. 2. This warranty is valid only for the first purchaser of the product from an authorized...
Open the catalog to page 11All Seac sub catalogs and brochures
 SEAC_2021_Catalogue
226 Pages
 SNORKELING collection
120 Pages
 APNEA collection
124 Pages
 SCUBA collection
156 Pages
 APNEA collection 2018
116 Pages
 SCUBA collection 2018
136 Pages
 SNORKELING SWIMMING collection 2018
108 Pages
 2016 COLLECTION
164 Pages
 X-FIRE & THUNDER
100 Pages
 X-fire reel
4 Pages
 X-fire speargun
100 Pages
 Bolt_special_combat
1 Page
 SEAC_GP100_4X4_ENG_snz
1 Page
 SEAC_SCUBA_2013_ENGESP
114 Pages
 SYNCHRO
70 Pages
 Q3-Q1
Q3-Q144 Pages

Archived catalogs
 Catalog Collection 2015
214 Pages
 SEAC_APNEA_2013_ENGESP
60 Pages
 SEACSUB_CAT_USA_2013
116 Pages
 SEAC_BEACH_2013
28 Pages
 Size chart
80 Pages
 Arrow speargun
40 Pages
 Lighthouse
17 Pages
 Torch
Torch23 Pages
 Tank
Tank2 Pages
 DIOMOND
52 Pages
 Stabilizing Jackets
129 Pages
 Compensators PRO
8 Pages