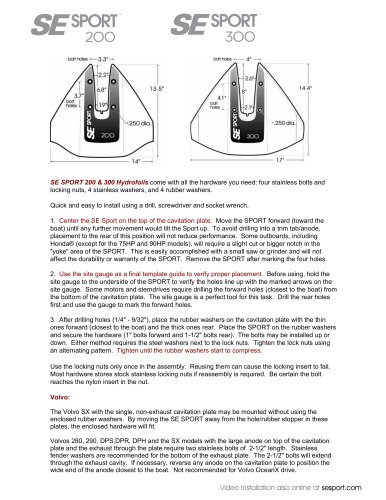
SE-Sport-400-Installation-Instructions
1 /2Pages
SE-Sport-400-Installation-Instructions
1 /2Pages
Catalog excerpts
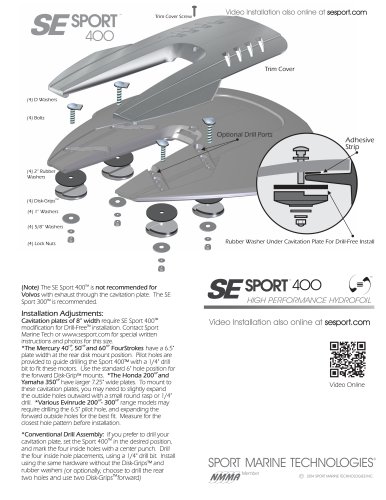
Trim Cover Screw Video Installation also online at sesport.com Trim Cover Optional Drill Ports Adhesive Strip Rubber Washer Under Cavitation Plate For Drill-Free Install (Note) The SE Sport 400TM is not recommended for Volvos with exhaust through the cavitation plate. The SE Sport 300TM is recommended. HIGH PERFORMANCE HYDROFOIL Installation Adjustments: Cavitation plates of 8” width require SE Sport 400TM modification for Drill-FreeTM installation. Contact Sport Marine Tech or www.sesport.com for special written instructions and photos for this size. *The Mercury 40HP, 50HP and 60HP FourStrokes have a 6.5" plate width at the rear disk mount position. Pilot holes are provided to guide drilling the Sport 400™ with a 1/4" drill bit to fit these motors. Use the standard 6" hole position for the forward Disk-Grip™ mounts. *The Honda 200HP and Yamaha 350HP have larger 7.25" wide plates. To mount to these cavitation plates, you may need to slightly expand the outside holes outward with a small round rasp or 1/4" drill. *Various Evinrude 200HP- 300HP range models may require drilling the 6.5" pilot hole, and expanding the forward outside holes for the best fit. Measure for the closest hole pattern before installation. *Conventional Drill Assembly: If you prefer to drill your cavitation plate, set the Sport 400TM in the desired position, and mark the four inside holes with a center punch. Drill the four inside hole placements, using a 1/4" drill bit. Install using the same hardware without the Disk-Grips™ and rubber washers (or optionally, choose to drill the rear two holes and use two Disk-GripsTM forward) Video Installation also online at sesport.com Video Online SPORT MARINE TECHNOLOGIES NMMA 2014 SPORT MARINE TECHNOLOG
Open the catalog to page 1
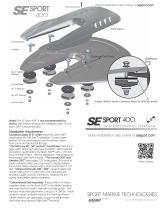
Video online at sesport.com Drill-Free Installation: 1 Remove Trim Cover: Gently move the cover forward to release 2 Strips on cavitation plate edge close to estimated Disk positions Thoroughly clean the cavitation plate. Place the adhesive strips on top side as shown. 3 Center the foil and insert bolts & D washers in the closest holes to the cavitation plate 4 Tip: Rubber presses bottom of Cavitation Plate Assemble Disk-Grips with 2” rubber washers, 1” & 5/8” washers and nuts hand tightened Tighten lock nuts slowly with a 7/16” socket wrench using an alternating torque pattern 6 Place cover...
Open the catalog to page 2