SE-Sport-200.300-Installation-Instructions
SE-Sport-200.300-Installation-Instructions
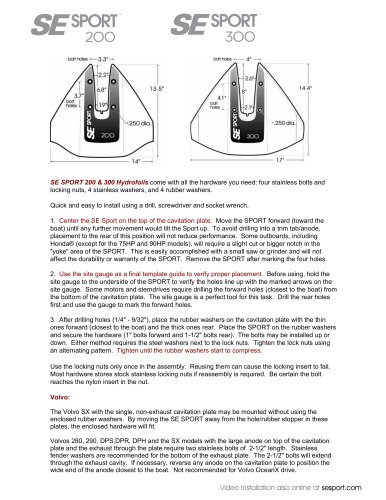
The SE Sport 200 & 300 Hydrofoils come with all necessary hardware, including stainless bolts, locking nuts, and washers. Installation requires basic tools: a drill, screwdriver, and socket wrench.
Installation Steps:
- Positioning: Center the hydrofoil on the cavitation plate, moving it forward until further movement would tilt it up. Ensure placement avoids drilling into trim tabs or anodes. Some outboards may require a slight modification in the 'yoke' area.
- Template Verification: Use the site gauge to confirm proper placement. Drill the rear holes first, then use the gauge to mark and drill the forward holes.
- Assembly: After drilling, place rubber washers on the cavitation plate, with thin washers forward and thick washers rear. Secure the hydrofoil with bolts and lock nuts, ensuring the steel washers are next to the lock nuts. Tighten nuts until rubber washers compress slightly.
Hardware Reuse: Locking nuts should only be used once to prevent failure. Replacement nuts are available at hardware stores.
Volvo Specific Instructions:
- Volvo SX: Can be mounted without rubber washers by adjusting the hydrofoil position.
- Volvo 280, 290, DPS, DPR, DPH, and SX: Require 2-1/2" stainless bolts and fender washers for the exhaust plate. Adjust anode position if necessary. Not recommended for Volvo OceanX drive.
Additional Resources: Video installation guides are available at sesport.com.
Catalog excerpts
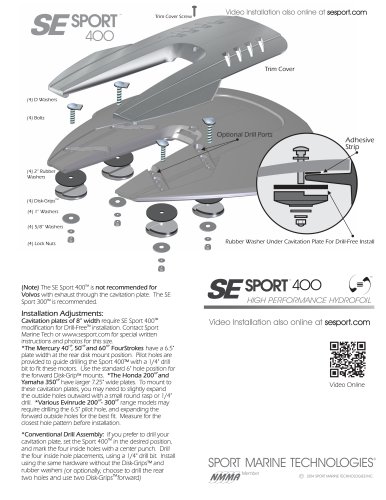
SE SPORT 200 & 300 Hydrofoils come with all the hardware you need: four stainless bolts and locking nuts, 4 stainless washers, and 4 rubber washers. Quick and easy to install using a drill, screwdriver and socket wrench. 1. Center the SE Sport on the top of the cavitation plate. Move the SPORT forward (toward the boat) until any further movement would tilt the Sport up. To avoid drilling into a trim tab/anode, placement to the rear of this position will not reduce performance. Some outboards, including Honda® (except for the 75HP and 90HP models), will require a slight cut or bigger notch in the "yoke" area of the SPORT. This is easily accomplished with a small saw or grinder and will not affect the durability or warranty of the SPORT. Remove the SPORT after marking the four holes. 2. Use the site gauge as a final template guide to verify proper placement. Before using, hold the site gauge to the underside of the SPORT to verify the holes line up with the marked arrows on the site gauge. Some motors and sterndrives require drilling the forward holes (closest to the boat) from the bottom of the cavitation plate. The site gauge is a perfect tool for this task. Drill the rear holes first and use the gauge to mark the forward holes. 3. After drilling holes (1/4" - 9/32"), place the rubber washers on the cavitation plate with the thin ones forward (closest to the boat) and the thick ones rear. Place the SPORT on the rubber washers and secure the hardware (1" bolts forward and 1-1/2" bolts rear). The bolts may be installed up or down. Either method requires the steel washers next to the lock nuts. Tighten the lock nuts using an alternating pattern. Tighten until the rubber washers start to compress. Use the locking nuts only once in the assembly. Reusing them can cause the locking insert to fail. Most hardware stores stock stainless locking nuts if reassembly is required. Be certain the bolt reaches the nylon insert in the nut. Volvo: The Volvo SX with the single, non-exhaust cavitation plate may be mounted without using the enclosed rubber washers. By moving the SE SPORT away from the hole/rubber stopper in these plates, the enclosed hardware will fit. Volvos 280, 290, DPS,DPR, DPH and the SX models with the large anode on top of the cavitation plate and the exhaust through the plate require two stainless bolts of 2-1/2" length. Stainless fender washers are recommended for the bottom of the exhaust plate. The 2-1/2" bolts will extend through the exhaust cavity. If necessary, reverse any anode on the cavitation plate to position the wide end of the anode closest to the boat. Not recommended for Volvo OceanX drive. Video Installation also online at sesport.com
Open the catalog to page 1