Catalog excerpts

TenderConnect Installation- and Usersguide ®
Open the catalog to page 1
Dieter Radler - inventor. foreword Thank you for choosing TenderConnect®. This manual shall help to get TenderConnect® installed quickly and easily. As soon as you will have installed TenderConnect you won`t want to miss it ever again. If you have any questions or remarks for improvement, we are more than happy for contacting us. We will support you as best as possible. Important: Please read this manual completely and thoroughly before you start with the installation. Make sure that the length of the screws we delivered fits for your yacht and tender. And once again – ask us if you are...
Open the catalog to page 2
Package Content Please check if you have received everything you can see on the picture on the right. Please also check wheather anything is broken. If that happens to be the case please contact us. The following pages explain what you have received and how to install TenderConnect correctly.
Open the catalog to page 4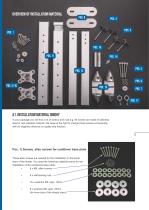
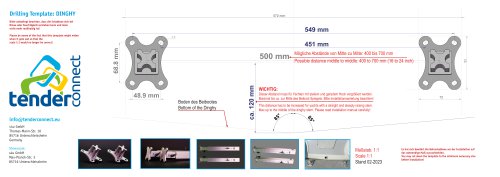
Overview of installation material A1. Installation material dinghy In your package you will find a lot of screws and nuts e.g. All screws are made of stainless steel or rust resistent material. We reserve the right to change those screws occasionally with no negative influence on quality and function. Pos. 1) Screws, allen screws for cantilever base plate These allen screws are needed for the installation on the back/ stern of the tender. You need the following material/screws for the installation of the cantilevers base plate: ▪ 8 x M6, allen screws ▪ 8 x self-locking nuts 16 x washers M6,...
Open the catalog to page 5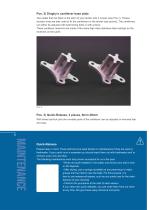
Pos. 2) Dinghy’s cantilever base plate Two plates that are fixed on the stern of your tender with 4 screws (see Pos.1). Theses stumps/ ends are later used to fix the cantilevers to the tender (see picture). The cantilevers can either be adjusted with ball locking bolts or with screws. These cantilever receivers are made of the same high class stainless steel castings as the receivers on the yacht. Pos. 3) Quick-Release, 2 pieces, 6mm 40mm With these ball lock pins the movable parts of the cantilever can be adjusted or removed fast and easy. maintenance maintenance Quick-Release Please keep...
Open the catalog to page 6
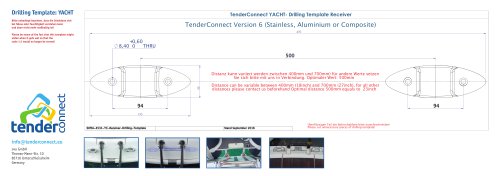
Pos. 4) Quick-Release, 2 pieces, 6mm, 50mm With these ball lock pins the distance between tender and yacht can be adjusted. A2. Installation material yacht Pos. 5) Allen screws, 4 x M8 x 70mm These screws should be used for the installation of the receivers on your yacht. The 70 mm length should fit all types of boats. Alternatively we may deliver screws with a continous thread. This depends on the supplier of these screws but does not make a difference in functionality. Pos. 6) Self locking nuts M8, 4 pieces These nuts are used for the screws (Pos 5) to fix the receivers to your yacht....
Open the catalog to page 7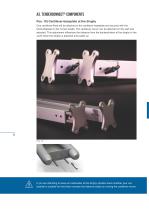
A3. TenderConnect® Components Pos. 10) Cantilever-baseplate at the dinghy One cantilever-fixed will be attached to the cantilever baseplate and secured with the Quick-Release in the correct length. The cantilever mover can be attached on this part and adjusted. This adjustment influences the distance from the backend/stern of the dinghy to the yacht when the dinghy is attached and pulled up. If you are intending to leave an outboarder at the dinghy (double check whether your outboarder is suitable for that) than increase the distance easily by moving the cantilever-mover.
Open the catalog to page 8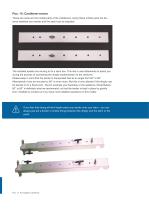
Pos. 11) Cantilever-mover These two parts are the mobile parts of the cantilevers. Using these mobile parts the distance between your tender and the yacht can be adjusted. The installed eyelets are serving to fix a stern line. This line is used afterwards to assist you during the process of connecting the dinghy backend/stern to the receivers. Please keep in mind that the tender is transported best at an angle from 60° to 80° . Alternatively it can be mounted to 90° or even more. But this is only allowed if the dinghy can be leaned on to a fixed point - like for example your backstay or the...
Open the catalog to page 9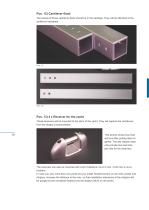
Pos. 12) Cantilever-fixed Two pieces of those cantilever-fixed should be in the package. They will be attached at the cantilever baseplate. Pos. 13) 4 x Receiver for the yacht These receivers will be mounted to the stern of the yacht. They will capture the cantilevers from the dinghy’s backend/stern. This picture shows how they will look after putting them together. The last release does only provide two lead pins per side for the receivers. The receivers can also be mounted with a bit of distance. Up to 5 mm / 0.04 inch is not a problem. In case you own more than one yacht and you install...
Open the catalog to page 10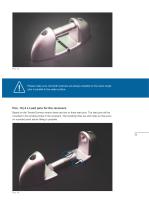
Please make sure, that both receivers are always installed on the same single plan in parallel to the water surface. Pos. 14) 4 x Lead pins for the receivers Based on the TenderConnect version there are two or three lead pins. The lead pins will be mounted in the locating holes in the receivers. The locating holes are slot holes so that even on rounded yacht sterns fitting is possible.
Open the catalog to page 11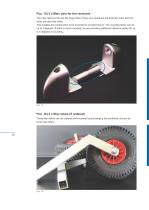
Pos. 15) 2 x Main pins for the receivers The main lead pin fits into the huge holes. There is a clearance because the main lead pin holes are also slot holes. This enables the construction to be mounted to rounded sterns. The rounding factor can be up to 2 degrees. If there is more rounding, we are providing additional distance plates for up to 5 degrees of rounding. Pos. 16) 2 x Slip rollers (if ordered) Those slip-rollers can be ordered and mounted by exchanging the cantilever movers by those slip rollers.
Open the catalog to page 12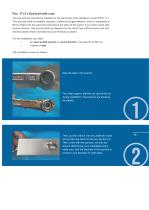
Pos. 17) 2 x Eye-bolt with nuts The eye-bolt will normally be installed on the last whole of the cantilever mover (POS. 11). This eye-bolt shall be installed, because it takes the dinghy-afterline, which is necessary to lift the dinghy into the receivers (standing at the stern of the yacht). If you have a boat with reverse transom, this eye-bolt shall be replaced by one which has a 60mm screw part and shall be placed where normally the Quick-Release is placed. For the installation you need: • An open ended wrench or round wrench in the size for an M6 nut • A piece of tape The installation...
Open the catalog to page 13