Splicing Instructions
1 /16Pages

Splicing Instructions
1 /16Pages
Catalog excerpts

Splicing Instructions
Open the catalog to page 1
Long Splice Double Braided Ropes Splice CAUTION The use of our products can be dangerous. Our products may only be used for their intended purpose. They must particularly not be used for lifting as specified in EU directive 2006/42/EC. The customer is responsible that the user has been trained in the safe use of the product and in accompanying safety precautions. Be aware of the fact that the product can cause damage if wrongly used, stored, cleaned or overloaded. Check national safety regulations, industry recommendations and standards for local requirements.
Open the catalog to page 2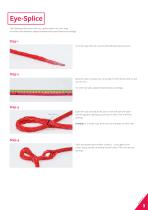
Eye-Splice The following information refers to a splice made in a 10 mm rope. For other rope diameters, adapt the dimensional specifications accordingly. Step 1 Form the rope end into a tip and wind adhesive tape around it. Step 2 Mark the rope in locations 30 cm and 46 cm from the tip (with an eye size of 5 cm). For other eye sizes, adapt the dimensions accordingly. Open the rope centrally at the 46 cm mark and stick the rope‘s end through this opening up to the 30 cm mark. That is the first opening. Example: In a 12-plait rope, there must be 6 strands on either side. Open the tipped rope end...
Open the catalog to page 3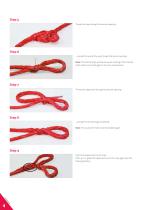
Step 5 Thread the loop through the second opening ... Step 6 ... and pull the eye all the way through the second opening. twist Note: This pull-through procedure causes twisting of the strands, which will be corrected again in the next work process. Step 7 Thread the tipped end through the second opening ... Step 8 ... and pull the end through completely. Note: This causes the twist to be neutralized again. Step 9 Insert the tipped end into the rope. After 30 cm, guide the tipped end out of the rope again (see the following photo).
Open the catalog to page 4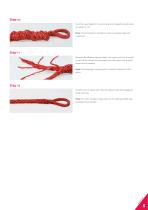
Step 10 Push the rope together to a point where the tipped end will stand out about 15 cm. Note: This procedure is needed in order to properly taper the rope‘s end. Step 11 Remove the adhesive tape and taper the rope‘s end such that 30% to 50% of the strands are extracted from the rope‘s end at equal distances and severed. Note: This tapering is necessary for a smooth transition of the splice. Step 12 Smooth out the splice such that the tapered rope end disappears inside the rope. Note: For more compact ropes, the use of a splicing needle may facilitate this procedure.
Open the catalog to page 5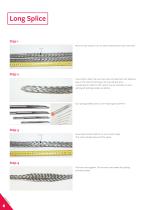
Long Splice Step 1 Mark the two ropes at 100 cm, each measured from one of its ends. mark 1 Step 2 Use a knife to taper the two rope ends, and tape them with adhesive tape. In the case of hard ropes, the rope will also serve as splicing tool, while for soft ropes it may be necessary to use a splicing aid (splicing needle, see photo). Our splicing needles and our new “Splicing Set USA Pro”. Now, make another mark at 120 cm, on both ropes. This mark indicates the end of the splice. Step 4 Push the rope together. This loosens it and makes the splicing procedure easier.
Open the catalog to page 6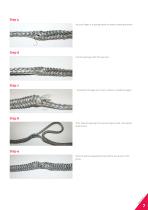
Step 5 Use your finger or a splicing needle to make an opening at mark 1. Step 6 Into this opening, insert the rope end ... Step 7 ... and push it through, up to mark 2, where it is pulled out again. Step 8 Then, make an opening in the second rope at mark 1 and repeat steps 6 and 7. Now, the splice is supposed to look like the one shown in this photo.
Open the catalog to page 7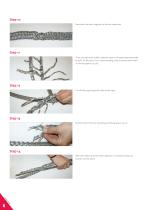
Step 10 Now, push the splice together at the two rope ends. Step 11 Then, the rope ends pulled outwards need to be tapered symmetrically by 50%. (In the case of a 12-strand braiding, only six strands will remain on the last approx. 25 cm) Step 12 Cut off the projecting ends close to the rope. Step 13 Shorten three of the six remaining strands by about 3-4 cm. Step 14 After both splice ends have been tapered, it is necessary that you smooth out the splice.
Open the catalog to page 8
Step 15 Once the splicing procedure has been completed, no rope end should be projecting at mark 2, on either side. Note: Inspect the spliced section at regular intervals, as this splice is not secured. Even though the splice length guarantees full tensile strength, the splice should nonetheless be inspected in order to detect possible changes. Where appropriate, the splice can also be secured by applying a whipping. spliced section
Open the catalog to page 9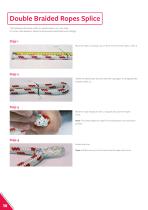
Double Braided Ropes Splice The following information refers to a splice made in a 10 mm rope. For other rope diameters, adapt the dimensional specifications accordingly. Mark the rope in a location 20 cm from the end of the rope (= mark 1) Step 2 Define the desired eye size and mark the rope again in the appropriate location (mark 2).. Step 3 Bend the rope sharply at mark 2. Using an awl, open the rope‘s cover. Note: This step readies the rope for the subsequent core extraction process. Step 4 Extract the core. Note: Pull the core out of the cover from the rope‘s short end.
Open the catalog to page 10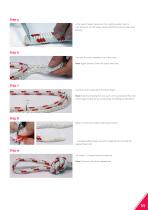
Step 5 In the case of sealed rope ends, this is latest possible time for such end to be cut off using a sharp knife (if this had not been done before). Step 6 Now pull the core completely out of the cover. Note: Again, extract it from the rope‘s short end. Core and cover should be of the same length. Note: If, when extracting the core, such core was extracted from the rope‘s long end, this can be corrected by smoothing out the sleeve. Step 8 Make core and cover taper using sharp scissors ... ... and apply adhesive tape around the tapered core end and the tapered cover end. Step 9 Tie a knot 2...
Open the catalog to page 11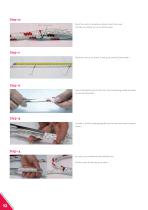
Step 10 Mark the core in the location where it exits the cover. Pull the core about 75 cm out of the cover. mark 1 core exit point Step 11 Mark the core 13 cm (mark 2) and 33 cm (mark 3) from mark 1 Step 12 Insert the taped up tip of the cover into the splicing needle as shown on the left-hand side. Step 13 At mark 2, stick the splicing needle into the core and move it toward mark 3. Step 14 At mark 3, the needle exits the braided core. Pull the cover all the way up to mark 1.
Open the catalog to page 12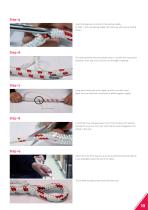
Step 15 Insert the taped up core tip into the splicing needle. At mark 1, stick the splicing needle into the cover and move it toward mark 2. Step 16 The splicing needle exits the braided cover 3 cm after the intersection (between cover and core). Pull the core through completely. Step 17 Using both hands, pull at the taped up ends (core and cover). Make sure that the point of transition is pulled together tightly. Step 16 point of transition Step 18 Cut off the cover obliquely about 15 cm from the point of transition and slip the core over the cover such that the cover disappears completely...
Open the catalog to page 13All Robline catalogs and brochures
 SUSTAINABILITY STATUS REPORT
56 Pages
 Yachting Ropes and Kite Lines
52 Pages

Archived catalogs
 Robline Catalog 2019/20
52 Pages
 Kite Lines
12 Pages
 FSE Robline catalog
19 Pages
 Button Soft Shackle
4 Pages
 FSE Robline Catalog 2015/16
30 Pages
 Racing.Tool.Box
6 Pages
 FSE Robline Catalogue 2014/15
78 Pages

- Marine rope
- Double-braid line
- Single braid line
- Marine sailboat rope
- Polyester core line
- Multipurpose cordage
- Mooring cordage
- Polyester sheath cordage
- Dyneema® core cordage
- Nautical shackle
- White cordage
- Black cordage
- Sheet cordage
- Halyard rope
- Twisted rope
- Shackle for sailboats
- Blue cordage
- Yacht cordage
- Floating line
- Racing sailboat cordage