

S1000+, S2000+

S1000+, S2000+
- Overview: The Raymarine tiller pilot is an autopilot system for tiller-steered sailboats, designed for easy installation and operation with a 12 V electrical system. It features four operating modes: Standby, Auto, Track, and WindTrim.
- Specifications: Operates on 10-15 V DC with thrust torque of 57 kg for ST1000 Plus and 77 kg for ST2000 Plus. Compatible with SeaTalk and NMEA data systems.
- Important Information: Includes warranty registration, product disposal guidelines, and safety notices emphasizing the importance of maintaining a permanent watch and proper installation.
- Auto Mode: Engage by steadying the boat on the desired heading and pressing 'auto'. Disengage by pressing 'standby' and removing the pushrod.
- Track Mode: Maintains a track between waypoints with features like cross track error compensation and waypoint advance.
- WindTrim Mode: Maintains a course relative to the apparent wind angle.
- General Maintenance: Regular checks and cleaning are recommended for optimal performance.
- Fault Finding: Provides troubleshooting steps for common issues.
- Planning and Installation: Detailed instructions for installing the tiller pin, mounting socket, and cabling, emphasizing critical dimensions and proper power supply connections.
- Functional Tests: Includes switching on, checking navigation and wind instrument interfaces, and conducting an initial sea trial for compass calibration.
- Calibration: Instructions for adjusting calibration values such as rudder gain, cruise speed, and heading error correction to optimize performance.
- Changing Course: Allows course adjustments in 1° and 10° increments using specific keys.
- Automatic Tack Feature (AutoTack): Executes a 100° tack in Auto, Track, and WindTrim modes.
- Dodging Obstacles: Change course using keys and return to the previous heading by pressing auto for 1 second.
- Off Course Alarm: Activates if the boat deviates from the locked heading by more than the set value for 20 seconds.
- Displaying Navigation Information: Displays navigation data like distance to waypoint and cross track error.
- Automatic Deadband Control (AutoSeastate): Minimizes unnecessary rudder movements by ignoring repetitive boat movements.
- Operating Hints: Major course changes should be done manually for safety. Improve sail balance in gusting conditions.
- Display Illumination: Toggle display illumination in Standby mode.
- Maintains a track between waypoints, compensating for tidal streams and leeway.
- Requires cross track error information from a navigation system.
- Track acquisition can be automatic or manual.
- Safety in Track Mode: Skippers must ensure safety through careful navigation and frequent position checks.
The WindTrim mode maintains a course relative to an apparent wind angle, using wind data from SeaTalk or NMEA wind instruments. It adjusts the compass heading to maintain the original wind angle, ignoring short-term wind changes but tracking real shifts.
- Plan installation by checking parts and following cabling and EMC guidelines.
- Ensure separation between electrical equipment for optimal performance.
- Use Raymarine cables and maintain ferrites for EMC compliance.
- Critical dimensions for installation include the distance from the mounting socket to the tiller pin and from the rudder stock to the tiller pin.
- Install the tiller pin and mounting socket using epoxy, ensuring correct dimensions and reinforcement where necessary.
- Perform functional tests including switching on and checking operating sense.
- Verify navigation interface connections and resolve any error messages.
- Ensure all measurements are accurate before cutting or drilling.
- Use appropriate tools and materials for secure installation.
- Follow safety precautions, especially regarding electrical connections.
- Wind Instrument Interface: Ensure the tiller pilot displays a 'W' and locked heading. A flashing 'C' indicates a cabling error.
- SeaTalk Interface: Verify by setting display illumination to 0 on any SeaTalk device; the tiller pilot should respond by turning off its illumination.
Conduct a sea trial in calm conditions to calibrate the compass. Ensure default calibration settings are used initially. The trial involves compass deviation correction by turning the boat in slow circles and heading alignment using the boat's compass.
After calibration, familiarize with autopilot by steering onto a heading and locking it with the autopilot, and adjusting course in 1° and 10° increments.
Test rudder gain by altering course by 40° and observing overshoot. Adjust gain to minimize overshoot and ensure crisp turns.
Adjust settings to match boat characteristics, including rudder gain, cruise speed, off course alarm angle, magnetic variation, heading error correction, and rudder damping. Access to calibration can be restricted to prevent unauthorized changes.
This section outlines the technical specifications of the ST1000 Plus & ST2000 Plus Tiller Pilots, providing essential details for understanding the product's capabilities and limitations.
Detailed instructions are provided for installing the tiller drive, including cabling for NMEA, power, and SeaTalk interfaces. EMC guidelines and parts supplied are also covered, ensuring proper setup and functionality.
The document describes various operating modes such as Auto, Track, and WindTrim modes, each with specific procedures for entering, exiting, and utilizing these modes effectively. Safety considerations and alarm settings are also discussed.
Guidance is provided for troubleshooting and maintaining the tiller pilots, including fault finding procedures and regular maintenance tasks to ensure optimal performance.
Information on interfacing with navigation systems, including SeaTalk and NMEA, is provided. This includes recognized data and cabling instructions to integrate the tiller pilots with other navigation equipment.
Procedures for heading alignment and error correction, including compass deviation and magnetic variation adjustments, are detailed to ensure accurate navigation.
Contact information and support resources are available for users requiring additional assistance or troubleshooting help.
Catalog excerpts

Tiller Pilots Owner's handbook NNOVATION • QUALITY • TRUST
Open the catalog to page 1
Your Raymarine tiller pilot is a totally self-contained autopilot designed for tiller steered sailboats. The autopilot is mounted between the tiller and a single attachment point on the boat’s structure. It is designed for owner installation and is ready for use after connection to the boat’s 12 V electrical system. Operating modes The tiller pilot has four basic operating modes: • Standby mode: autopilot off • Auto mode: autopilot engaged and locked onto a heading • Track mode: autopilot on and maintaining a track between two waypoints created on a navigation system • WindTrim mode: autopilot...
Open the catalog to page 5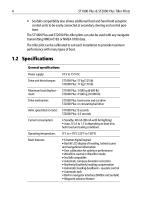
ST1000 Plus & ST2000 Plus Tiller Pilots • SeaTalk compatibility also allows additional fixed and hand-held autopilot control units to be easily connected at secondary steering and control positions The ST1000 Plus and ST2000 Plus tiller pilots can also be used with any navigator transmitting NMEA 0183 or NMEA 0180 data. The tiller pilot can be calibrated to suit each installation to provide maximum performance with many types of boat. 1.2 Specifications General specifications Power supply: Drive unit thrust torque: Maximum boat displacement: Drive mechanism: ST1000 Plus: lead-screw and nut drive...
Open the catalog to page 6
EMC conformance All Raymarine equipment and accessories are designed to the best industry standards for use in the recreational marine environment. The design and manufacture of Raymarine equipment and accessories conform to the appropriate Electromagnetic Compatibility (EMC) standards, but correct installation is required to ensure that performance is not compromised. 1.3 About this handbook This handbook contains important information about installing, using and maintaining your new Raymarine product. To get the best from the product, please read this handbook thoroughly. Important Information...
Open the catalog to page 7
ST1000 Plus & ST2000 Plus Tiller Pilots Safety notices WARNING: Product installation This equipment must be installed and operated in accordance with the instructions contained in this handbook. Failure to do so could result in poor product performance, personal injury and/or damage to your boat. WARNING: Electrical safety Make sure the power supply is switched off before you make any electrical connections. WARNING: Navigation aid Although we have designed this product to be accurate and reliable, many factors can affect its performance. As a result, it should only be used as an aid to navigation...
Open the catalog to page 8
Chapter 2: Using the Tiller Pilot Chapter 2: Using the Tiller Pilot 2.1 Overview WARNING: Passage making under autopilot control is an enjoyable experience that can, if you are not careful, lead to the relaxation of the permanent watch. Always maintain a permanent watch no matter how clear the sea may appear to be. • The tiller pilot always powers up in Standby mode (indicated by a flashing ‘C’ alongside the boat’s current compass heading). • The tiller pilot is controlled using simple push-button operations, all of which are confirmed with a short beep. In addition to the main single key functions,...
Open the catalog to page 9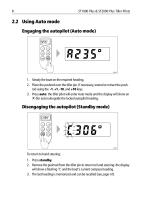
ST1000 Plus & ST2000 Plus Tiller Pilots 2.2 Using Auto mode Engaging the autopilot (Auto mode) 1. Steady the boat on the required heading. 2. Place the pushrod over the tiller pin. If necessary, extend or retract the pushrod using the -1, +1, -10, and +10 keys. 3. Press auto: the tiller pilot will enter Auto mode and the display will show an ‘A’ (for auto) alongside the locked autopilot heading. Disengaging the autopilot (Standby mode) To return to hand steering: 1. Press standby. 2. Remove the pushrod from the tiller pin to return to hand steering: the display will show a flashing ‘C’ and the...
Open the catalog to page 10
Chapter 2: Using the Tiller Pilot Changing course In Auto mode, use the -1 and -10 (port) and +1 and +10 (starboard) keys to change course in steps of 1° and 10°. For example: press -10 three times for a 30° course change to port: Automatic tack feature (AutoTack) The autopilot has a built-in automatic tack facility (in Auto, Track and WindTrim modes) that turns the boat through 100°: • to AutoTack 100° to port, press -1 and -10 together • to AutoTack 100° to starboard, press +1 and +10 together
Open the catalog to page 11
ST1000 Plus & ST2000 Plus Tiller Pilots AutoTack - Starboard AutoTack - Port AutoTack angle AutoTack angle Dodging obstacles 1. To avoid an obstacle when you boat is under autopilot control, select a course change in the appropriate direction. For example, press -10 three times for a 30°dodge to port. 2. When safely clear of the obstacle, you can either: • reverse the previous course change (for example, by pressing +10 three times), or • return to the previous heading (see below) Returning to the previous heading 1. Press auto for 1 second: the previous heading will flash for 10 seconds. 2....
Open the catalog to page 12
Chapter 2: Using the Tiller Pilot Resumed course Original course Note: If you do not press auto while the display is flashing, the autopilot will maintain the current heading. Off course alarm The off course alarm sounds if the locked autopilot heading and the boat’s current heading differ by more than the value set in calibration level 6 (see page 62) for 20 seconds. Cancelling the off course alarm To cancel the off course alarm, press standby to return to manual steering. Note: If the off course alarm sounds, this is usually an indication that the boat is carrying too much sail, or that the...
Open the catalog to page 13
ST1000 Plus & ST2000 Plus Tiller Pilots Locked heading Distance to waypoint (if available) Bearing to waypoint (if available) Cross track error D178-2 You can revert to normal operation by pressing either -1 and +10 or +1 and -10 together again. Automatic deadband control (Auto Seastate) In Auto, WindTrim or Track modes, the tiller pilot is set to AutoSeastate (automatic deadband control) as a default. This causes the pilot to gradually ignore repetitive movements of the boat and respond only to true course variations. By preventing unnecessary rudder movement, AutoSeastate provides the best...
Open the catalog to page 14All Raymarine catalogs and brochures
 2023 PRODUCT GUIDE
100 Pages
 2022 PRODUCT GUIDE
100 Pages
 Axiom
Axiom16 Pages
 Product Guide 2018
80 Pages
 PRIJSLIJST 2018
28 Pages
 2017 Product Guide
104 Pages
 Raymarine
89 Pages
 MV-Series
3 Pages
 Raymarine_eS_Series_brochure
8 Pages
 CP370-470-570 Sonar Modules
8 Pages
 Ray50, Ray60, Ray70
4 Pages
 UK_Product_Guide_2015_LOW
36 Pages
 FLIR MV-/MU-Series
24 Pages
 FLIR AX8 ™
4 Pages
 Digital Switching
12 Pages
 Product Guide 2015
68 Pages
 VHF Radios
4 Pages
 CP200 CHIRP SideVision Sonar
4 Pages
 LightHouse II User Interface
4 Pages


Archived catalogs
 Hunting power
1 Page
 Hunting Saltwater
1 Page
 Raymarine Product Guide 2014
56 Pages
 Evolution Autopilot
8 Pages
 Thermal Cameras
8 Pages
 Accessories
8 Pages
 Autopilots
8 Pages
 Radar
Radar8 Pages
 Sonar
Sonar8 Pages
 Instruments Catalogue
2 Pages
 Raymane brochure 2012
24 Pages
 serie A catalogue
6 Pages
 Multifunction Displays
24 Pages
 C series catalogue
10 Pages
 E series catalogue
14 Pages
 G series
14 Pages
 D I G I TA L R A D A R
12 Pages
 RayTechRNS 6.1
2 Pages
 AUTOPILOT SYSTEM GUIDE
18 Pages
 Instruments ST 40
18 Pages
 COMMUNICATIONS & ACCESSORIES
18 Pages


- Boat antenna
- Boat sensor
- Radome antenna
- Control lever
- Radio
- Nautical sonar
- Nautical boat radio
- Nautical VHF radio
- CCTV video camera
- Boat control lever
- Multi-purpose instrument
- Fixed multi-purpose instrument
- Boat remote control
- Boat combo
- Boat display
- Mechanical control lever
- Single-lever control lever
- Yacht antenna
- Fixed video camera