
Catalog excerpts
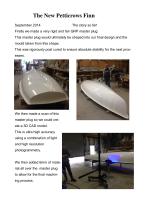
The New Petticrows Finn September 2014 Firstly we made a very rigid and fair GRP master plug. This master plug would ultimately be shaped into our final design and the mould taken from this shape. This was rigorously post cured to ensure absolute stability for the next processes. We then made a scan of this master plug so we could create a 3D CAD model. This is ultra high accuracy using a combination of light and high resolution photogrammetry. We then added 6mm of material all over the master plug to allow for the final machining process.
Open the catalog to page 1
Next we needed to decide which shape to create onto our new master production plug. We did this by studying many known and existing hulls using the scanning technique. The picture below show Ben Ainslie's boat “ R ITA ” being fully scanned at the National Maritime museum so that her shape amongst others could be fully analysed.
Open the catalog to page 2
After scanning many boats we used a technique of overlaying the scans to indicate differences between the scanned boats and our premade master plug. This is brilliant because it shows a very easy to understand picture, like a heat map. The comparison between MASTER hull and the another hull shows as follows: Yellow colour indicates the Master is bigger, blue the master is smaller, green it is within a certain tolerance. It very quickly shows any lack of symmetry, unfairness and/or conceptual shape differences.
Open the catalog to page 3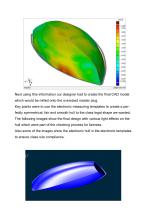
Aligned 1 Length unit: nun Next using this information our designer had to create the final CAD model which would be milled onto the oversized master plug. Key points were to use the electronic measuring templates to create a per- fectly symmetrical, fair and smooth hull to the class legal shape we wanted. The following images show the final design with various light effects on the hull which were part of the checking process for fairness. Also some of the images show the electronic hull in the electronic templates to ensure class rule compliance.
Open the catalog to page 4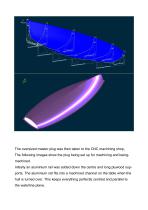
The oversized master plug was then taken to the CNC machining shop, The following images show the plug being set up for machining and beingmachined. Initially an aluminium rail was added down the centre and long plywood supports. The aluminium rail fits into a machined channel on the table when the hull is turned over. This keeps everything perfectly centred and parallel to the waterline plane.
Open the catalog to page 6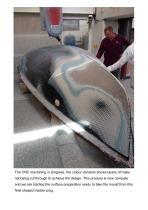
The CNC machining in progress, the colour variation shows layers of material being cut through to achieve the design. This process is now compete and we are starting the surface preparation ready to take the mould from this final shaped master plug.
Open the catalog to page 8
In parallel to the hull plug creation we have been preparing the deck. No huge changes here, but just careful to get everything symmetrical. Also we have been working on the Harken fit out, custom fittings etc.. The most complicated and difficult work is now complete. The mould is being created now so within a few weeks we should have our first Petticrows Finn available to trial.
Open the catalog to page 9All Petticrows catalogs and brochures
-
 2018 Dragon prices
2 Pages
-
 Liberty 25 Convertible
2 Pages
-
 Magic Dragon
2 Pages

