

- Products
- Catalogs
- News & Trends
- Exhibitions
40hp

40hp
This manual provides essential guidelines for the operation, maintenance, and care of the PowertecOutBoards 40HP outboard motor. It emphasizes the importance of understanding the instructions for safety and optimal performance. Users are advised to keep the manual onboard and consult a dealer for any queries.
Key safety instructions include avoiding overpowering the boat, not modifying the outboard, and ensuring proper propeller selection. Users are warned against operating under the influence of alcohol or drugs and are advised to have personal flotation devices for all occupants. The manual highlights the dangers of gasoline and carbon monoxide, urging proper ventilation and caution.
The manual specifies the use of regular unleaded gasoline and Powertec 2-stroke outboard motor oil. It outlines battery specifications for electric start models, emphasizing the importance of using a battery that meets the specified capacity to avoid system damage.
Details on the main components such as the fuel tank, remote control, and throttle are provided. The manual explains the procedures for starting, warming up, and stopping the engine, as well as shifting gears and adjusting trim angles.
Regular maintenance is crucial for the longevity of the outboard motor. The manual includes a maintenance chart and instructions for tasks such as greasing, cleaning the spark plug, and checking the fuel system. It also covers the inspection and replacement of anodes and the importance of proper storage.
Common issues and their solutions are addressed, including troubleshooting steps for when the power trim and tilt do not operate or the starter fails. Emergency procedures for starting the engine and handling a submerged motor are also included.
The manual concludes with a reminder to consult the dealer for any uncertainties and to adhere to local marine laws and regulations. It stresses the importance of using common sense and good judgment while boating.
Ensure the shift control is in neutral before starting the engine. Avoid touching or removing electrical parts during operation. Keep hands, hair, and clothes away from rotating parts. The engine is equipped with a neutral starting device, preventing start unless in neutral.
Gasoline and its vapors are highly flammable and explosive. Do not smoke or expose to sparks/flames during refueling. Refuel in a well-ventilated area and avoid overfilling the tank. In case of gasoline contact with skin or ingestion, seek immediate medical attention.
Start-in-gear protection ensures the engine starts only in neutral. Propeller selection affects engine performance; consult dealers for appropriate propeller choice.
Key components include the fuel tank, remote control, throttle grip, and engine stop lanyard switch. The fuel tank should not be used as a storage container. Remote control lever manages gear shifting and throttle. The engine stop lanyard switch is a safety feature to stop the engine if the operator falls overboard.
Correct engine height and smooth water flow are crucial to avoid engine damage. Overpowering a boat can cause instability; adhere to the boat's capacity plate ratings. Proper mounting is essential for safety and performance; consult experienced personnel for guidance. Mounting height affects water resistance and engine efficiency; ensure the anti-cavitation plate is positioned correctly.
The mounting height of the outboard motor affects performance and should be optimized through test runs. Consult a dealer for guidance. When clamping the motor, ensure it is centered on the transom and the clamp screws are tightened securely. Regularly check the screws during operation to prevent the motor from falling off. If available, use an engine restraint cable to secure the motor.
A proper break-in period is crucial for engine longevity. For the first 10 minutes, run the engine at low speed. For the next 50 minutes, do not exceed half throttle and vary the speed. During the second hour, use full throttle briefly, then reduce to three-quarter throttle. From the third to tenth hour, avoid full throttle for more than 5 minutes. After 10 hours, operate normally using the standard fuel-oil mix.
Ensure adequate fuel and oil for trips, checking for leaks and secure connections. For portable tanks, fill carefully and mix thoroughly. For built-in tanks, add oil gradually while filling with gasoline. Use only specified oil types to avoid engine issues.
For manual start models, ensure the gear shift is in neutral and attach the engine stop switch lanyard securely. Use the choke knob for cold starts and pull the starter handle firmly. For electric start models, follow similar steps, ensuring not to crank the starter for more than 5 seconds to avoid battery drain.
Check for a steady water flow from the cooling pilot hole to prevent overheating. Before shifting gears, ensure no obstacles are nearby. For forward and reverse operations, close the throttle and shift quickly and firmly. In reverse, do not exceed half throttle to maintain stability.
- Allow the engine to cool at idle or low speed before stopping.
- Press and hold the engine stop button or turn the main switch to off.
- Disconnect the fuel line if there is a fuel joint on the outboard motor.
- Tighten the air vent screw on the fuel tank cap if equipped.
- Remove the key if the boat will be left unattended.
Note: The engine can also be stopped by pulling the lanyard and removing the lock plate from the engine stop switch.
- The trim angle affects the boat's bow position, performance, and fuel economy.
- Adjust the trim angle based on boat, engine, propeller, load, sea conditions, and speed.
- Excessive trim can cause instability and steering difficulty.
- Adjust the trim using the trim stick or power trim and tilt switch.
- Test different trim angles to find the best position for your boat.
Warning: Ensure all people are clear of the outboard motor when adjusting the tilt angle.
- Tilt the outboard motor up to protect the propeller and casing from damage and reduce salt corrosion.
- Disconnect the fuel line or close the fuel cock if the engine will be tilted for more than a few minutes.
- Follow specific procedures for hydro tilt models and power trim and tilt models.
Warning: Do not tilt the outboard motor while the engine is running.
- Partially tilt the outboard motor to operate in shallow water.
- Run the boat at the lowest possible speed and use extra care when operating in reverse.
- Return the outboard motor to its normal position in deeper water.
Warning: Do not tilt the outboard motor up so that the cooling water inlet is above the water surface.
- Overall dimensions and weight are specified for different transom heights.
- Performance includes a full throttle operating range of 4500–5500 r/min and a maximum output of 29.4 kW at 5000 r/min.
- Engine type is 2-stroke with a displacement of 703.0 cm³.
- Fuel and oil recommendations include regular unleaded gasoline and a 50:1 fuel to oil ratio.
- Transport and store the outboard motor in a safe manner to prevent fuel leakage and damage.
- Perform necessary procedures before long-term storage to prevent damage.
- Flush the cooling system with fresh water after operating in salt water.
Warning: Do not run the engine without cooling water supply.
1. Gear Oil Maintenance Use Hypoid gear oil SAE#90 with a quantity of 430.0 cm3. Ensure the outboard motor is in a vertical position when filling.
2. Battery Maintenance Regularly check the battery's electrolytic fluid level and charge. Use only distilled water for topping up. Store the battery in a cool, dry place if not in use for extended periods.
3. Fuel System Maintenance Empty and clean the fuel tank with a suitable solvent. Replace the gasket and ensure the fuel joint assembly is secure.
1. Anode Inspection Regularly inspect and clean external anodes. Do not paint them as it reduces effectiveness.
2. Top Cowling Check Ensure the top cowling is secure. If loose, consult a dealer.
1. Engine Starting Issues Check battery condition, fuel quality, and spark plug condition. Ensure all connections are secure.
2. Engine Power Loss Inspect the propeller, fuel system, and spark plugs. Adjust trim angle and ensure the motor is mounted correctly.
3. Excessive Vibration Check for damaged propeller or shaft, and ensure motor mounting bolts are tight.
1. Impact Damage Stop the engine immediately after a collision. Inspect for damage and return to harbor cautiously.
2. Manual Engine Tilt If power tilt fails, manually adjust the engine position by loosening the manual valve screw.
1. Battery Safety Avoid contact with electrolytic fluid and ensure proper ventilation when charging.
2. Emergency Starter Rope Use only in emergencies and ensure the remote control lever is in neutral to prevent accidents.
1. Boat Maintenance Keep the hull clean and use approved anti-fouling paint to prevent marine growth.
2. Regular Dealer Consultation For any persistent issues or maintenance, consult a PowertecOutBoards dealer.
Catalog excerpts
Owner’s Manual del Manual Usuario 40Hp
Open the catalog to page 1
Read this manual carefully before operating this outboard motor. Keep this manual onboard in a waterproof bag when boating. This manual should stay with the ouboard motor if it is sold. .
Open the catalog to page 2
Thank you for choosing a PowertecOut-Boards outboard motor. This Owner’s Manual contains information needed for proper operation, maintenance and care. A thorough understanding of these simple instructions will help you obtain maximum enjoyment from your new PowertecOutBoards. If you have any question about the operation or maintenance of your outboard motor, please consult a PowertecOutBoards dealer. In this Owner’s Manual particularly important information is distinguished in the following ways. The Safety Alert Symbol means ATTENTION! BECOME ALERT! YOUR SAFETY IS INVOLVED! Failure to follow...
Open the catalog to page 3
40HP OWNER’S MANUAL ©2009 PowerTec Outboards 1st Edition, Marzo 2011 All rights reserved. Any reprinting or unauthorized use without the written permission of PowerTec Outboards is expressly prohibited.
Open the catalog to page 4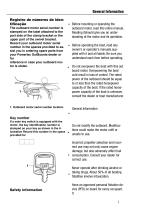
General Information Registro de números de identificação The outboard motor serial number is stamped on the label attached to the port side of the clamp bracket or the upper part of the swivel bracket. Record your outboard motor serial number in the spaces provided to assist you in ordering spare parts from your Powertec OutBoards dealer or for reference in case your outboard motor is stolen. 1. Outboard motor serial number location Before mounting or operating the outboard motor, read this entire manual. Reading itshould give you an understanding of the motor and its operation. Before operating...
Open the catalog to page 7
is a good idea to wear a PFD whenever boating. At a minimum, children and nonswimmers should always wear PFDs, and everyone should wear PFDs when there are potentially hazardous boating conditions. Gasoline is highly flammable, and its vapors are flammable and explosive. Handle and store gasoline carefully. Make sure there are no gas fumes or leaking fuel before starting the engine. This product emits exhaust gases which contain carbon monoxide, a colorless, odorless gas which may cause brain damage or death when inhaled. Symptoms include nausea, dizziness, and drowsiness. Keep cockpit and cabin...
Open the catalog to page 8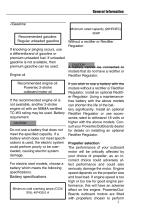
General Information Recommended gasoline: Regular unleaded gasoline Recommended engine oil: Powertec 2-stroke outboard motor oil Minimum cold cranking amps (CCA/ EN): 40a430.0 A Minimum rated capacity (20HR/IEC) 40HP If knocking or pinging occurs, use a differentbrand of gasoline or premium unleaded fuel. If unleaded gasoline is not available, then premium gasoline can be used. Engine oil If the recommended engine oil is not available, another 2-stroke engine oil with an NMMA-certified TC-W3 rating may be used. Battery requirement CAUTION Do not use a battery that does not meet the specified...
Open the catalog to page 9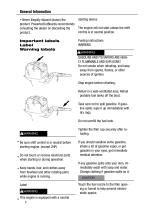
• Never illegally discard (dump) the starting device. product. PowertecOutBoards recommends consulting the dealer on discarding the The engine will not start unless the shift product. control is in neutral position. Important labels Label Warning labels Fueling instructions WARNING GASOLINE AND ITS VAPORS ARE HIGHLY FLAMMABLE AND EXPLOSIVE! Do not smoke when refueling, and keep away from sparks, flames, or other sources of ignition. Stop engine before refueling. Refuel in a well-ventilated area. Refuel portable fuel tanks off the boat. Take care not to spill gasoline. If gasoline spills, wipe...
Open the catalog to page 10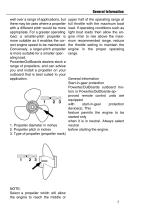
General Information well over a range of applications, but there may be uses where a propeller with a different pitch would be more appropriate. For a greater operating load, a smaller-pitch propeller is more suitable as it enables the correct engine speed to be maintained. Conversely, a larger-pitch propeller is more suitable for a smaller operating load. PowertecOutBoards dealers stock a range of propellers, and can advise you and install a propeller on your outboard that is best suited to your application. 1. Propeller diameter in inches 2. Propeller pitch in inches 3. Type of propeller (propeller...
Open the catalog to page 11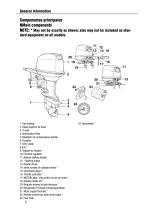
General Information Componentes principaies NMain components NOTE: * May not be exactly as shown; also may not be included as standard equipment on all models. 1. Top cowling 2. Dated superior da hood 3. Á node 4. Anticavation Plate 5. Nadadeira of compensaçao (anode) 6. Propeller 7. Entry water 8.trim * 9. Support for fixation 10. Fricction regulator 11. Manual starting handle 12. * Starting button 13. Handle choke 14. serial number of outboard motor * 15. Command poppy * 16. Throttle controller * 17. MOTORr stop / stop switch out do do motor * 18. fixation handle aft * 19. BloqueIo levered...
Open the catalog to page 12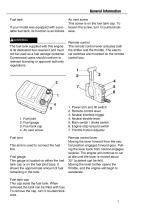
General Information Fuel tank Air vent screw This screw is on the fuel tank cap. To If your model was equipped with a por- loosen the screw, turn it counterclocktable fuel tank, its function is as follows. wise. WARNING The fuel tank supplied with this engine is its dedicated fuel reservoir and must not be used as a fuel storage container. Commercial users should conform to relevant licensing or approval authority regulations. 1. Fuel joint 2. Fuel gauge 3. Fuel tank cap 4. Air vent screw Fuel joint This joint is used to connect the fuel line. Fuel gauge This gauge is located on either the fuel...
Open the catalog to page 13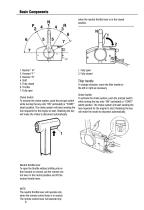
7. Fully open Choke Switch To activate the choke system, push the pricipal switch while turning the key onto “ON” (activated) or “START” (start) position. The choke system will start sending the fuel requiered for the engine to start. Realising the key will make the choke to disconect automatically. when the neutral throttle lever is in the closed position. 2. Fully closed Tiller handle To change direction, move the tiller handle to the left or right as necessary Choke Switch To activate the choke system, push the pricipal switch while turning the key onto “ON” (activated) or “START” (start)...
Open the catalog to page 14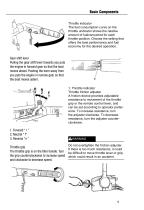
Basic Components Basic Components Throttle indicator The fuel consumption curve on the throttle undicator shows the relative amount of fuelconsumed for each throttle position. Choose the setting that offers the best performance and fuel economy for the desired operation. Gear shift lever Pulling the gear shift lever towards you puts the engine in forward gear so that the boat moves ahead. Pushing the lever away from you puts the engine in reverse gear so that the boat moves astern. 1. Throttle indicator Throttle friction adjuster A friction device provides adjustable resistance to movement of...
Open the catalog to page 15

- Nautical motor-boat
- Inflatable boat
- Outboard inflatable boat
- Inboard engine
- Outboard engine
- 4-stroke engine
- Electric engine
- Gasoline engine
- Boat generator set
- Radome antenna
- Ship antenna
- Aluminum floor inflatable boat
- Boat filter
- GPS antenna
- Water filter
- Nautical jet-ski
- Boat air conditioner
- Boat heater
- Three-seater jet-ski