
Catalog excerpts
OWNER’S MANUAL
Open the catalog to page 1
Read this owner’s manual carefully before operating your outboard motor.
Open the catalog to page 2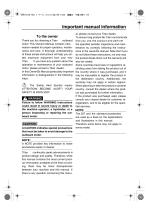
To the owner Thank you for choosing a Titan outboard motor. This Owners Manual contains information needed for proper operation, maintenance and care. A thorough understanding of these simple instructions will help you obtain maximum enjoyment from your new Titan. If you have any question about the operation or maintenance of your outboard motor, please consult a Titan dealer. In this OwnerOs Manual particularly important information is distinguished in the following ways. ds The Safety Alert Symbol means ATTENTION! BECOME ALERT! YOUR SAFETY IS INVOLVED! Failure to follow WARNING...
Open the catalog to page 3
25A,30 OWNER’S MANUAL ©2008 by Powertec Motor Co., Ltd. 1st Edition, March 2008 All rights reserved. Any reprinting or unauthorized use without the written permission of Powertec Motor Co., Ltd. is expressly prohibited. Printed in China
Open the catalog to page 4
General information reference in case you need a new key. Outboard motor serial number The outboard motor serial number is stamped on the label attached to the port side of the clamp bracket or the upper part of the swivel bracket. Record your outboard motor serial number in the spaces provided to assist you in ordering spare parts from your Powertec dealer or for reference in case your outboard motor is stolen. Key number If a main key switch is equipped with the motor, the key identification number is stamped on your key as shown in the illustration. Record this number in the space...
Open the catalog to page 7
Consult your dealer for correct use. • Never operate after drinking alcohol or taking drugs. About 50% of all boating fatalities involve intoxication. • Have an approved personal flotation device (PFD) on board for every occupant. It is a good idea to wear a PFD whenever boating. At a minimum, children and nonswimmers should always wear PFDs, and everyone should wear PFDs when there are potentially hazardous boating conditions. • Gasoline is highly flammable, and its vapors are flammable and explosive. Handle and store gasoline carefully. Make sure there are no gas fumes or leaking fuel...
Open the catalog to page 8
General information • Be sure shift control is in neutral before starting engine. (except 2HP) • Do not touch or remove electrical parts when starting or during operation. • Keep hands, hair, and clothes away from flywheel and other rotating parts while engine is running. • This engine is equipped with a neutral starting device. • The engine will not start unless the shift control is in neutral position. GASOLINE AND ITS VAPORS ARE HIGHLY FLAMMABLE AND EXPLOSIVE! • Do not smoke when refueling, and keep away from sparks, flames, or other sources of ignition. • Stop engine before refueling. •...
Open the catalog to page 9
General information NMMA-certified TC-W3 rating may be used. Battery requirement CAUTION: Do not use a battery that does not meet the specified capacity. If a battery which does not meet specifications is used, the electric system could perform poorly or be overloaded, causing electric system damage. For electric start models, choose a battery which meets the following specifications. Battery specifications Minimum cold cranking amps (CCA/EN): 25A 347.0 A 30A 347.0 A 30A 347.0 A Minimum rated capacity (20HR/IEC): 25A 40.0 Ah 30A 40.0 Ah 30A 40.0 Ah Without a rectifier or Rectifier Regulator...
Open the catalog to page 10
General information NOTE: Select a propeller which will allow the engine to reach the middle or upper half of the operating range at full throttle with the maximum boat load. If operating conditions such as light boat loads then allow the engine r/min to rise above the maximum recommended range, reduce the throttle setting to maintain the engine in the proper operating range. For instructions on propeller removal and installation, see page 47. Start-in-gear protection Powertec outboard motors or Powertec-ap-proved remote control units are equipped with start-in-gear protection device(s)....
Open the catalog to page 11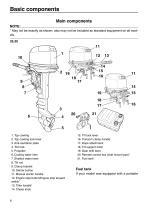
Basic components Main components * May not be exactly as shown; also may not be included as standard equipment on all models. 25,30 5 1. Top cowling 2. Top cowling lock lever 3. Anti-cavitation plate 4. Trim tab 5. Propeller 6. Cooling water inlet 7. Shallow water lever 8. Tilt rod 9. Clamp bracket 10. Starter button 11. Manual starter handle 12. Engine stop button/Engine stop lanyard switch* 13. Tiller handle* 14. Choke knob 6 15. Tilt lock lever 16. Transom clamp handle 17. Rope attachment 18. Tilt support knob 19. Gear shift lever 20. Remote control box (side mount type)* 21. Fuel tank*...
Open the catalog to page 12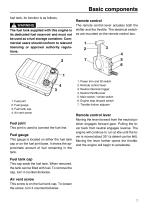
Basic components fuel tank, its function is as follows. Remote control The fuel tank supplied with this engine is its dedicated fuel reservoir and must not be used as a fuel storage container. Commercial users should conform to relevant licensing or approval authority regulations. The remote control lever actuates both the shifter and the throttle. The electrical switches are mounted on the remote control box. 1. Fuel joint 2. Fuel gauge 3. Fuel tank cap 4. Air vent screw Fuel joint This joint is used to connect the fuel line. Fuel gauge This gauge is located on either the fuel tank cap or...
Open the catalog to page 13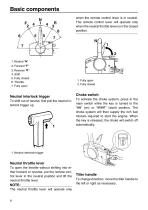
Basic components when the remote control lever is in neutral. The remote control lever will operate only when the neutral throttle lever is in the closed position. 3. Reverse “ ” 4. Shift 5. Fully closed 6. Throttle 7. Fully open Neutral interlock trigger To shift out of neutral, first pull the neutral interlock trigger up. 1. Fully open 2. Fully closed Choke switch To activate the choke system, press in the main switch while the key is turned to the “ ” (on) or “ ” (start) position. The choke system will then supply the rich fuel mixture required to start the engine. When the key is...
Open the catalog to page 14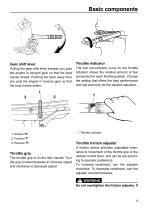
Basic components Gear shift lever Pulling the gear shift lever towards you puts the engine in forward gear so that the boat moves ahead. Pushing the lever away from you puts the engine in reverse gear so that the boat moves astern. Throttle grip The throttle grip is on the tiller handle. Turn the grip counterclockwise to increase speed and clockwise to decrease speed. Throttle indicator The fuel consumption curve on the throttle indicator shows the relative amount of fuel consumed for each throttle position. Choose the setting that offers the best performance and fuel economy for the...
Open the catalog to page 15


