
Catalog excerpts
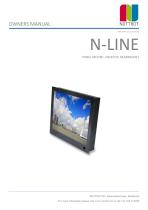
OWNERS MANUAL (Ref. N-line manual V3.06) N-LINE PANEL MOUNT, DESKTOP, REARMOUNT NOTTROT BV, Raamsdonksveer, Nederland For more information please visit www.nottrot.nl or call +31-162-515458
Open the catalog to page 1
N-LINE OWNERS MANUAL
Open the catalog to page 2
N-LINE OWNERS MANUAL 10.6
Open the catalog to page 3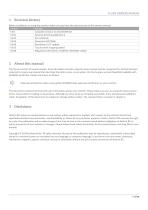
N-LINE OWNERS MANUAL 1 Revision history Before installation or using the monitor make sure you have the latest version of this owners manual. Version Remark V3.0 Complete revision to new NCOM-AD V3.01 External dimming added 8.2.2 V3.02 IEC certificate V3.03 Dimension N270KGE V3.04 Resolution 15.6” update V3.05 Touch screen mapping added V3.06 Regulatory information modified: IEC62368-1:2018 2 About this manual The N-Line consists of several models. Since all models are built using the same concept (similar components), all data has been collected to create one manual that describes the...
Open the catalog to page 4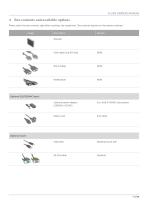
N-LINE OWNERS MANUAL 4 Box contents and available options Please check the box contents right after receiving the equipment. The contents depend on the options ordered. Image DVI-D Cable HDMI Cable External power adapter (230VAC<>12VDC) N.a. with 9~36VDC input option Mains cord Euro Style Optional touch:
Open the catalog to page 5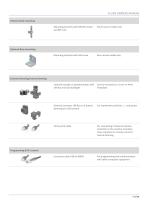
N-LINE OWNERS MANUAL Otional Kiosk mounting: Mounting brackets with M5x50 screws and M5 nuts Panel mount model only Mounting brackets with M4 screw Rear mount model only External encoder or potentiometer with LIN-Bus and LED-backlight External converter LIN-Bus to 3-button dimming ans OSD control For momentary switches +, - and power For connecting of external LIN-bus controller to the monitor and daisy chain monitors for remote control / central dimming For programming and communication with other computer equipment Optional Rear mounting: External dimming/central dimming: Programming &...
Open the catalog to page 6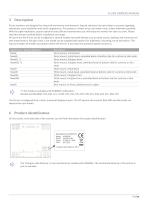
N-LINE OWNERS MANUAL 5 Description N-Line monitors are designed for industrial and marine environments. Special attention has been taken in account regarding robustness, easy installation and stylish appearance. This product is meant to be used indoor only, unless otherwise specified. With the right installation, proper operation and sufficient maintenance you will enjoy the monitor for years to come. Please read this manual carefully before installation and usage. All sizes from the N-Line can be configured in several models (see table below) such as panel mount, desktop and rearmount all...
Open the catalog to page 7
N-LINE OWNERS MANUAL Remove power if the monitor is not used for a longer period. This will also result in a longer lifetime of the backlight lamps. The cover glass or touch sensor is made of regular (or hardened) glass. This can be scratched or even broken in pieces by hitting it Remove power before servicing the monitor In case of trouble contact your supplier. Service should only be done by qualified personal Never open the chassis. There are no user-serviceable parts inside. Never place the display or power supply near warm objects like heaters. Never place the display of power supply...
Open the catalog to page 8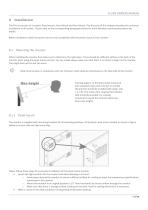
N-LINE OWNERS MANUAL 8 Installation The N-Line consists of 3 models: Panel mount, Vesa Mount and Rear Mount. The first part of this chapter describes the universal installation of all models. Please refer to the corresponding paragraphs below for more detailed mounting description per model. Before installation check the power source to be compatible with the power input of your monitor. 8.1 Mounting the monitor When installing the monitor first make sure to determine the right place. There should be sufficient airflow at the back of the monitor when using the panel mount version. For any...
Open the catalog to page 9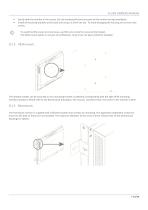
N-LINE OWNERS MANUAL • • Gently slide the monitor in the cutout. Do not mechanically force any part of the monitor during installation. Install all mounting brackets at the back side using a 2,5mm hex key. To avoid damaging the housing, do not force the screws. To avoid the M5 screws to come loose, use M5 nuts to lock the screw to the bracket. The VESA-mount option is not part of certification, since it has not been tested for vibration. The desktop models can be mounted on any mounting bracket or pedestal corresponding with the right VESA mounting interface standard. Please refer to the...
Open the catalog to page 10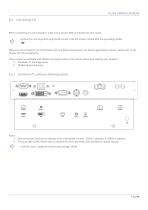
N-LINE OWNERS MANUAL Before connecting any I/O and power, make sure a correct GND connection has been made: Connect the unit to ground using the M4 screw in the I/O section marked with the grounding symbol: IEC Make sure all connections are firmly fixed to the unit before powering up. For details regarding pin layouts, please refer to the chapter 10.7 Pin assignments. Three version are available with different I/O layout. Refer to the section below that matches your situation: 1. Standard I/O, dimming option 2. NCOM-AD with dimming 8.2.1 Standard I/O, without dimming option Notes: 1- Only...
Open the catalog to page 11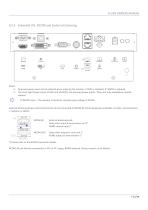
N-LINE OWNERS MANUAL 8.2.2 Extended I/O, NCOM and (external) dimming Notes: 1- Only one power input can be selected when ordering the monitor. 12VDC is standard, 9~34VDC is optional. 2- The most right Power inputs 12VDC and 12VDC(F) are reserved power inputs. These are only available on special request IEC 9~36VDC input – The monitor is tested at nominal input voltage of 24VDC External dimming devices with LIN protocol can be connected to NCOM-IN. Dimming devices available: encoder, potentiometer, +- buttons, 0-10VDC. External dimming knob Daisy chain input from previous unit (* RS485...
Open the catalog to page 12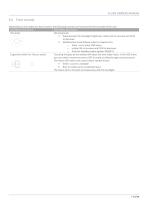
N-LINE OWNERS MANUAL 8.3 Front controls Depending on the model you have chosen, the following controls can be found at the front side of the unit: OSD MENU Description OSD MENU Description Dim knob Dimming knob 1. Potentiometer for backlight brightness: rotate CW to increase and CCW to decrease 2. Multifunction knob (Please refere to chapter 8.5): o Press > 6s to enter OSD menu o rotate CW to increase and CCW to decrease o Push for standby-modus (power ON/OFF) Capacitive switch for ‘Source select’ Touching the glass at the symbol will select the next video-input. In the OSD menu you can...
Open the catalog to page 13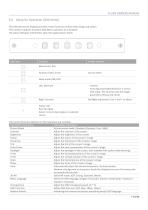
N-LINE OWNERS MANUAL 8.4 Setup for Operation (OSD-menu) The OSD (On Screen Display) provides certain functions to have clear image and others. This monitor supports 5 buttons OSD Menu operation as a standard. The status-LED gives information about the signal status: Green Hotkey function Menu Enter, Exit Function select, Enter Source select Sleep mode (ON/OFF) Left, Decrease Right, Increase - Volume - Auto adjust press&hold key for 1 sec for VGA input. This function sets the image parameters (Phase and clock) Backlight adjustment. Use < and > to adjust Status LED: Red: No signal Green:...
Open the catalog to page 14All Nottrot BV - Marine monitors catalogs and brochures
-
 N-Line - Quick Setup Guide
2 Pages
-
 N-COM Setup manual
32 Pages
-
 VARICAP SYSTEM QUICK START
5 Pages
-
 VariCap system
20 Pages
-
 N150V Industry Monitor
2 Pages
-
 N150V Marine Monitor
2 Pages
-
 N170V Industry Monitor
2 Pages
-
 N170V Marine Monitor
2 Pages
-
 N190V Industry Monitor
2 Pages
-
 N190V Marine Monitor
2 Pages
-
 N420D Industry Monitor
2 Pages
-
 N170K
N170K2 Pages
-
 N150KE
2 Pages
-
 N150K
N150K2 Pages
-
 N104KE
2 Pages
-
 N104K
N104K2 Pages
