
Catalog excerpts
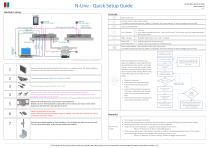
N-Line - Quick Setup Guide Hardware setup: Controls: Menu Enter, Exit Function select, Enter / Source select To disable unused input sources: [Menu] [Option] [Source setting] Select to toggle source on/off) Sleep mode (ON/OFF) Left, Decrease Right, Increase O Volume Auto adjust press&hold key for 1 sec for VGA input. This function sets the image parameters (Phase and clock) Backlight adjustment. Use < and > to adjust Status LED: Front/back side Red: No signal (on selected source) Green: Correct input signal on selected source Source select button. Press shortly to select next input source. To disable unused input sources: [Menu] [Option] [Source setting] Select to toggle source on/off Press knob for ≤ 1 sec for standby mode (ON/OFF) Turn knob for dimming (Connections depending on your configuration ) With the multifunction knob you can adjust the brightness by turning the knob. By pushing the knob a switch is activated. You can use the switch for standby-mode and when using an encoder knob, you can also control the OSD settings. When using central dimming, this can only be done locally. Remove all packing materials and place the monitor on a stable surface. The final installation should be carried out after all functions have been checked. Connect all video inputs (HDMI, DVI, VGA and or CVBS). Connect the touch screen cable (RS-232 or USB). Connect N-COM cables (RJ45 and RJ10) for external/central dimming & control. When using standard central dimming configuration, the master dimming knob should be located on / connected to the 1st unit. Select (with small pin) touch screen power internal/external. Default it is set to internal (switch to right). When set to external, the touch screen will be powered by the 5VDC from the USB port of the PC. Attach a ground-wire to the screw Prepare power the connection (Power supply or 24VDC) to the unit. Do not power up until all connections have been made!! Rotate for dimming Press shortly for power (stand-by) Press & hold 3 seconds for source select Press & hold 6 seconds to enter the OSD-menu. Rotate the knob to scroll, press once to enter selected menu item. Press & hold 6 seconds to go back one menu level and finally to exit OSD. Used the mounting hardware for final installation. Do not tighten the (hex-)screws too much. This can cause deformation of the monitor chassis and the desk. Press knob for 2 sec to select next input source. Then press shortly to scroll through the sources. Wait 2 sec to exit select mode Press knob for ≥6 sec to enter OSD Turn knob to scroll through the menu items Desired item? Yes Press knob to select menu item No Repeat until desired parameter is active Yes Adjust another parameter? Turn knob to adjust parameter No Press knob for ≥6 sec to previous OSD level Press knob for ≥6 sec for previous OSD level until dimming mode is active again or wait OSD-timeout to exit OSD-menu automatically Check power and video connections External dimming knob not connected. Disconnect power, connect RJ10 plug and connect power again. Dimming knob at 0%. Turn knob to the right to increase brightness Image not full screen (zoomed or cropped). Check settings in OSD-menu: o [Menu] [Function] [Zoom mode] OR [Aspect] When using a device like a video splitter, extender or HUB, first check bypassing this device. If the image is correct reconnect the device and disable other input sources not in use. o [Menu] [Option] [Source setting] Select to toggle source on/off This guide can be used to make a basic setup quickly, but always refere to the user ma
Open the catalog to page 1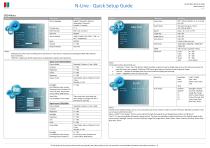
N-Line - Quick Setup Guide OSD-Menu: Symbol Main menu Menu Language English / Pусский / Italiano / Nederlands / Deutsch / Español / Française Main menu Power Save Zoom Mode Normal / OverScan / Zoom (for CVBS & HDMI ) Image Flip Source Setting CVBS / HDMI / DVI / RGB : “ ON ” or “ OFF ” respectively Image Mirror Auto Source ON / OFF (check enable sources) Restore Default Off / Strong / Standard / Weak H-pos V-pos Clock Phase Auto Notes: Enabled sources from Source Setting can be searched via “Auto Source” mode.Source Setting does NOT affect Manual Source Selection. “OSD Info” suppresses all...
Open the catalog to page 2All Nottrot BV - Marine monitors catalogs and brochures
-
 N-COM Setup manual
32 Pages
-
 VARICAP SYSTEM QUICK START
5 Pages
-
 VariCap system
20 Pages
-
 N150V Industry Monitor
2 Pages
-
 N150V Marine Monitor
2 Pages
-
 N170V Industry Monitor
2 Pages
-
 N170V Marine Monitor
2 Pages
-
 N190V Industry Monitor
2 Pages
-
 N190V Marine Monitor
2 Pages
-
 N420D Industry Monitor
2 Pages
-
 N-LINE
38 Pages
-
 N170K
N170K2 Pages
-
 N150KE
2 Pages
-
 N150K
N150K2 Pages
-
 N104KE
2 Pages
-
 N104K
N104K2 Pages
