
Catalog excerpts

1. Twin Mount Bracket 2. Locking screw knob 3. Axel screw 4. Ejector knife 5. Forward rope wheel 6. Stainless sheaves 9. 7. Press arm 8. Rope pulley 9. On/Off-switch 10. Rotating axel 11. Electric socket 12. Electric plug
Open the catalog to page 3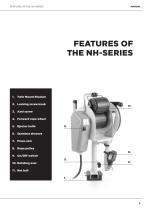
1. Twin Mount Bracket 2. Locking screw knob 3. Axel screw 4. Forward rope wheel 5. Ejector knife 6. Stainless sheaves 7. Press-arm 8. Rope pulley 8. 9. On/Off-switch 3. 10. Rotating axel
Open the catalog to page 5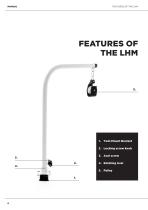
1. Twin Mount Bracket 2. Locking screw knob 3. Axel screw 4. Rotating Axel 5. Pulley
Open the catalog to page 6
MANUAL - ENGLISH Safety instructions Operating Instructions NorthLift haulers are designed to operate safely and reliably as long as they are used according to the operation manual. Please read this manual carefully before you install or start the hauler. Ignoring these instructions can cause property damage or worse – personal injury. NorthLift accepts no liability for damages caused by actions that are not in compliance with this operation manual. The following are the most important operating instructions for NorthLift haulers. Apart from these instructions, please review the complete...
Open the catalog to page 8
MANUAL - ENGLISH Twin Mount Bracket When deciding where on the boat the Twin Mount Bracket shall be bolted down - consider the following parameters: • Find the optimal operating location on the boat for hauling traps and nets. • Ensure that the deck of the boat is strong enough to withstand the forces generated by the hauler. If necessary the deck can be reinforced with NorthLift stainless Reinforcement plates. • Make sure that there is enough space for extending and retracting the hauler arm. • Can the electric cables easily be drawn to this location from the electrical power source? •...
Open the catalog to page 9
MANUAL - ENGLISH Electric socket, wirering etc. Battery requirement Install the electric socket, if possible, in an area naturally protected from spray and swell water. Use a marine grade cable to connect the electric socket to the 12V battery. Wire it through a master switch so that the connection between the electric socket and battery can be isolated. This completely cuts the power supply to the socket and prevents the battery from discharging during the stoppage time due to current leakage. The plus (+) pole of the battery connects with the socket contact marked with a (+) of the...
Open the catalog to page 10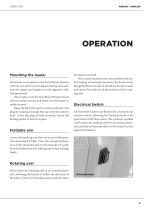
MANUAL - ENGLISH Mounting the hauler The hauler is mounted on the Twin Mount Bracket with the two vertical axel supports facing outwards, and the single axel support on the opposite side, facing inwards. Once in place over the Twin Mount Bracket insert the twin drop nose pin and make sure the hauler is safely secured. Open the lid of the electric socket and insert the plug by making its bulge line up with the socket’s dent. Once the plug is fully inserted, rotate the locking-wheel to lock it in place. locking screw knob. The second stainless screw, located above the nylon locking screw...
Open the catalog to page 11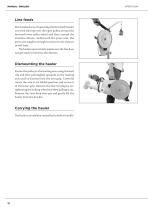
MANUAL - ENGLISH Line feeds The standard way of operating the NorthLift hauler is to feed the rope over the open pulley, around the forward lower nylon wheel and then around the stainless sheave, underneath the press arm. The press arm supplies enough traction for the sheaves to self-haul. The haulers ejector knife makes sure the line does not get stuck in between the sheaves. Dismounting the hauler Fasten the pulley to the hauling arm using the back clip and then pull slightly upwards on the hauling arm until it loosens from the arm grip. Carefully rotate the arm to its folded position and...
Open the catalog to page 12
MANUAL - ENGLISH Maintenance etc. • After use in salt or brackish water, rinse off the hauler quickly with fresh water. • Occasionally use contact spray to care for the electric plug and socket. • Expose the axel once or twice per year by removing the top locking bolt and apply some water resistant grease. • When necessary use a degreaser spray on the stainless sheaves to achieve better traction between the rope and sheaves. • Store the hauler in dry conditions. EU Declaration of Conformity NorthLift AB, with sole responsibility, declares the conformity of all NorthLift haulers with all...
Open the catalog to page 13
MANUAL - ENGLISH WARRANTY CONDITIONS WARRANTY CONDITIONS NorthLift AB guarantees the final purchaser of a NorthLift Hauler that this product is free from material and manufacturing faults during the period stated below. NorthLift will indemnify the final purchaser for any expenses for the repair of a material or manufacturing fault. This indemnification obligation does not cover the consequential costs of a warranty claim or any other financial losses (e.g. loss of earnings, loss of time, costs for telecommunications etc.) The warranty ends two years after the date on which the product was...
Open the catalog to page 14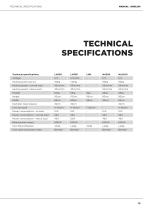
MANUAL - ENGLISH TECHNICAL SPECIFICATIONS TECHNICAL SPECIFICATIONS Technical specifications LH200 Hauling speed - normal load Hauling speed - heavy load Diameter rope sheaves Line size span Power consumption - no load 12 A Power consumption - normal load Power consumption - heavy load 45 A Rated power output Twin Mount Bracket Small Fuse type (automatic reset) Bimetal
Open the catalog to page 15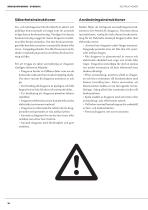
BRUKSANVISNING - SVENSKA Lin- och nätdragarna från NorthLift är säkert och pålitligt konstruerade så länge som de används enligt denna bruksanvisning. Vänligen läs denna bruksanvisning noggrant innan dragaren installeras eller börjar användas. Om inte bruksanvisningen följs kan detta resultera i materiella skador eller värre – kroppsliga skador. NorthLift ansvarar ej för skador orsakade på grund av att denna bruksanvisning ej följts. Nedan följer de viktigaste användningsinstruktionerna för NorthLift dragarna. Förutom dessa instruktioner, vänlig läs hela denna bruksanvisning för att...
Open the catalog to page 16
BRUKSANVISNING - SVENSKA Twin Mount Bracket Inför val av plats för installation av lindragaren samt monteringar av Twin Mount Bracket beakta följande aspekter: • Försök hitta den optimala användarplatsen på båten för enkel hantering av tinor och burar samt nät. • Försäkra dig om att båtens däck är starkt nog och kommer att tåla de krafter som användandet av lindragaren utsätter det för. Vid behov kan däckets undersida förstärkas med NorthLifts förstärkningsplattor. • Säkerställ att det finns tillräckligt med rum runt användarplatsen för ut- och infällning av lindragararmen. • Kan...
Open the catalog to page 17All NorthLift AB catalogs and brochures
-
NorthLift Brochure
32 Pages
-
LH200
8 Pages


