Catalog excerpts

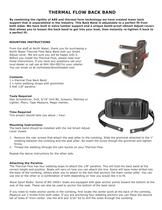
THERMAL FLOW BACK BAND By combining the rigidity of ABS and thermal form technology we have created lower back support that is unparalleled in the industry. This Back Band is adjustable to a perfect fit from both sides. We have built in extra lumbar support and a unique bomb-proof ASmart Adjust Lever@ that allows you to loosen the back band to get into your boat, then instantly re-tighten it back to a perfect fit. MOUNTING INSTRUCTIONS From the staff at North Water, thank you for purchasing a North Water Thermal Flow Back Band with our Smart Adjust Lever. We are sure you will be happy with it. Before you install the Thermal Flow, please read over these instructions. If you have any questions call your local dealer or call use at 604 264-0827or your retailer. You can email us at northwater@northwater.com Contents 1 x thermal Flow Back Band 2 x nylon webbing straps with grommets 5 feet 1/8" paraline Tools Required Star Screwdriver, Drill, 5/16" Drill Bit, Scissors, Matches or Lighter, Pliers, Tape Measure, Magic marker, Time Required This project should take you about 2 hour. Mounting Instructions The back band should be installed with the red Smart Adjust Lever closed. 1. Remove the rear screws that attach the seat pillar to the combing. Slide the grommet attached to the 1" webbing between the combing and the seat pillar. Re-insert the screw though the grommet and tighten firmly. 2. Thread the webbing through the cam buckle on your Thermal Flow. Repeat the above instructions for the other side. Attaching the Paraline The Thermal Flow has four webbing loops to attach the 1/8" paraline. This will hold the back band at the correct height and position. Boats will vary on how you can attach the line. Some will have holes drilled into the back of the combing, others allow you to attach to the bolt that anchors the foam center pillar. You can use one or the other or a combination of both depending on how you would like it to fit. Wave Sport Boats: Some of WS 2000+ boats are equipped with gear anchor points toward the bottom at the rear of the seat. These can also be used to anchor the bottom of the back band. If you need to make anchor points in the combing, first locate the center point at the back of the combing. Measure out 3 inches from both sides. If you are anchoring four webbing anchors you can Place the second set of holes 4" from center. Use the drill and 3/16" bit to drill the holes through the combing.
Open the catalog to page 1
Final adjustments First make sure the Smart Adjust Lever is released. Get into your boat. Snug the back band up by pulling even amounts of webbing through the cam buckles. Do not over tighten it as once you close the Smart Adjust Lever the back band will cinch down another 3 1/4". Care Instructions Clean salt, sand and grit after use with fresh water Do not store the product in damp conditions Inspect the product for damage both before and after use Do not abuse or apply undue stress to the product Periodically coat Smart Adjust Lever with light oil Do not expose the product to long hours...
Open the catalog to page 2All North Water catalogs and brochures
-
SeaTec_Coaming_TowLine
1 Pages
-
SK_Coaming_TowLine
1 Pages
-
SK_Waistheld_TowLine
1 Pages
-
SeaTec_QR_Rescue_TowLine
1 Pages
-
SK_Quick_Release_TowLine
1 Pages
-
guide vest
1 Pages
-
Counter_Balance
1 Pages


