
- Catalogs
- Naish Kiteboarding
- SLE Kite user's guide


SLE Kite user's guide

SLE Kite user's guide
This section details the user's agreement to waive any claims against Naish International and its agents due to product use. It includes a release of liability for any loss or injury, even if caused by negligence or breach of contract. Users agree to binding arbitration for any claims, which must be initiated within one year and held in Maui, Hawaii.
The agreement remains effective and binding upon the user's heirs and representatives in the event of death or incapacity.
The user acknowledges reliance solely on this agreement and the User’s Guide.
Users accept all risks associated with the product, which can result in serious injury or death. Risks can be minimized by following the User’s Guide and using common sense.
This section provides guidelines for safe use, including choosing a safe location, using caution with flying lines, and adhering to important safety rules. It emphasizes the dangers of kite flying and the user's responsibility for safety.
Users are advised to wear safety gear, use a leash system, and take lessons from a reputable school. The document stresses the importance of understanding and maintaining quick release devices.
Guidelines are provided for safe weather conditions, including avoiding high winds and thunderstorms.
This section includes a table of contents for assembling the SLE Control System and kite, safety procedures, tuning, relaunching, disassembling, and warranty policy.
Instructions are provided for setting up the control system, attaching lines, and ensuring all components are free of tangles and knots.
Details on inflating and deflating the kite, including the use of the Octopus System, are provided. The importance of proper inflation pressure is emphasized.
Instructions for releasing power, using the quick release trim loop, and handling emergency situations are detailed. The section warns about the risks of using stopper balls and the importance of understanding quick release mechanisms.
Users are advised to regularly test quick release mechanisms to ensure familiarity and proper functioning.
Quick Release devices have a limited lifetime of 250 hours of kiting and are designed for riders weighing 80kg or less. Proper usage involves releasing and reloading the Quick Release Trim Loop by following specific steps.
Advanced tuning involves adjusting knot positions on the outside leader lines to control depower and ergonomics. Knot A offers more depower, Knot B balances power and comfort, and Knot C is suitable for powered riding with less depower. Turning speed and bar pressure can be adjusted using three knots on the rear bridle line, with Knot 1 providing the most bar pressure and fastest turning.
To relaunch, pull on one of the back leader lines to roll the kite on its side. Avoid wrapping lines around your hand and ensure no slack line entanglement.
Regular maintenance includes checking pulleys, avoiding excessive sun exposure, managing heat and sand, and careful storage. Folding the kite involves deflating struts, opening valves, and folding from the wingtip towards the center.
The product has a 90-day warranty against major defects, valid only if registered within 7 days of purchase. The warranty covers repair or replacement but excludes damage from misuse, normal wear, or unauthorized modifications. Warranty claims require the original purchase receipt.
Catalog excerpts

USER'S GUIDE SLE KITE USER'S GUIDE—■»« MANUAL DEL USUARIO COMETA SLE—"o-" GUIDA ALL'UTILIZZO DEL SLE KITE—
Open the catalog to page 1
RELEASES & AGREEMENTS Release of Liability, Claim Waiver and Assumption of Risk Agreement By inflating the leading edge and assembling this product, to the terms set forth below; and 2) require anyone using this product to be bound by such terms. If you are unwilling to be bound by these terms; return this product (before use) for a full refund. components Involves certain In- herent risks, dangers and haz- ards, which can result in serious personal injury and death. In using this product you freely agree to assume and accept any and all known and unknown risks of Injury while us- ing this equipment....
Open the catalog to page 2
WARNING & SAFETY PRECAUTIONS Read the following points before assembling your kite: • Kite flying can be dangerous. • Always use extreme caution when using this product. • Misuse of this product can cause serious Injury or death. • Only use this product if you are In good physical health. • Never act In a careless manner when using this product (such as jumping in the air, or tying yourself down). • You are responsible for your own safety, and the safety of others around you when using this product. Important Safety Rules • This product Is not a personal flotation device. Always wear a Coast...
Open the catalog to page 3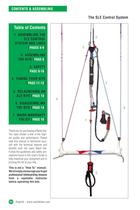
CONTENTS & ASSEMBLING 4. TUNING YOUR KITE Thank you for purchasing a Naish kite. You have chosen a kite of the high- est quality and performance. Please read this manual to familiarize your- self with the technical features and benefits built into every Naish kite. Follow the guidelines and safety pre- cautions found in this User's Guide to help maximize your enjoyment and to prolong the life of your kite. professional kiteboarding lessons from a reputable instructor before operating this kite. English - www.naishkites.com
Open the catalog to page 4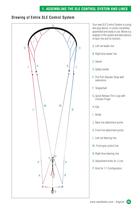
1. ASSEMBLING THE SLE CONTROL SYSTEM AND LINES Drawing of Entire SLE Control System Your new SLE Control System is a plug and play device; It comes completely assembled and ready to use. Below Is a diagram of the system and descriptions of each line and Its function. A. Left red leader line B. Right blue leader line Safety handle E. Pull Pull Adjuster Strap with G. Quick Release Trim Loop with Chicken Finger J. Back line attachment points K. Frontline attachment points L. Left red Steering line M. Front grey control line N. Right blue steering line 0. Adjustment knots for J Line
Open the catalog to page 5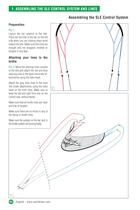
1. ASSEMBLING THE SLE CONTROL SYSTEM AND LINES Assembling the SLE Control System Layout the bar upwind of the kite. Place the red side of the bar on the left side when you are looking down wind toward the kite. Make sure the lines are straight and not wrapped, knotted or Attaching your lines to the Pic 2 Move the steering lines outside of the kite and attach the red and blue steering lines to the back line bridle at- tachments using the larks head. Attach the grey front lines to the front line bridle attachments using the larks head on the front lines. Make sure to keep the left and right front...
Open the catalog to page 6
1. ASSEMBLING THE SLE CONTROL SYSTEM AND LINES Chicken Finger into your harness hook: The SLE Control System is designed with a Chicken Finger to help you stay locked Into your QRTL. Before you connect the finger to your harness hook make sure that your lines without any tangles or twists. 1 - First hook into the loop. 2 - Next, push the finger Into the center of the harness hook. 3 - Make sure that It is below the trim loop and that the Chicken If you want to disconnect from the trim loop, you can grab the finger and pull It out of the harness hook, and then unhook the loop. Or, you can release...
Open the catalog to page 7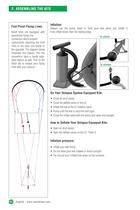
Fool Proof Flying Lines: Naish kites are equipped with specialized flying line connectors which prevent inadvertently attaching the front lines to the back line bridle or the opposite. The diagram below illustrates this feature. The line connectors have a handy easy- open feature as well. Pull on the black tab to release your flying lines after your session. Always use the pump leash to hold your kite while you Inflate It. First Inflate struts, then the leading edge. On Your Octopus System Equipped Kite: • Close all strut valves. • Close the deflate valve on the LE. • Inflate the kite at the...
Open the catalog to page 8
If the wind picks up dramatically the first thing you should do Is push your bar past the stopper ball to access more depower. When you are ready to go again pull the bar back down and reload the stopper. If you need to release yourself from your kite, your first option Is to unhook from your trim loop and let go of the bar. If you can not unhook immediately then you need to release your QRTL. Your kite comes with a leash that connects from one of the front lines (above the adjuster strap) to your harness. If you need to release your kite, this will keep you attached to your kite and the kite...
Open the catalog to page 9
Quick Release Features Operating the Quick Release Trim Loop: To activate the Quick Release Trim Loop: Grasp the handle of the quick release trim loop and force it up the QRTL line, away from your body. Important: It is your responsibility to maintain the proper working order of the quick release mechanism. Always inspect this piece prior to launching your kite. Make sure the trigger mechanism Is properly seated before you ride, and occasionally while on the water. There are two ways to 1. Grasp the handle and pull it towards your body. 2. Briefly unhook from the loop, and then hook back in....
Open the catalog to page 10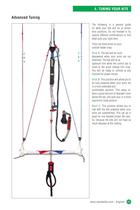
4. TUNING YOUR KITE Advanced Tuning The following Is a general guide for what your kite will do at certain knot positions. Do not hesitate to try several different combinations to find what suits your style best. There are three knots on your outside leader lines: Knot A: The kite will be more depowered when your arms are out stretched. The kite will fly at optimum trim while the control bar Is close to the quick release trim loop. You will be ready to unhook at any moment for power moves. Knot B: This position will allow you to be fully powered when your arms are comfortable position. This setup...
Open the catalog to page 11All Naish Kiteboarding catalogs and brochures
 2020 KITEBOARDING
67 Pages
 2016 Catalog
116 Pages
 2015 catalog
67 Pages
 2014 Catalog
67 Pages
Archived catalogs
 2012 Full NaishKite_Catalog
124 Pages
 2011 NaishKites_Catalog_ENG
78 Pages
 2011NaishKiteManual
53 Pages
 Helix
Helix2 Pages
 Torch
Torch2 Pages
 Cult
Cult2 Pages
 Custom
2 Pages
 Haze
Haze2 Pages
 Sol
Sol2 Pages
 Thorn
Thorn2 Pages
 2008 ALLIANCE
2 Pages
 SIGM/SLE KIT USER'S GUIDE
74 Pages
 2008 CULT
2 Pages
 2008 HELIX
2 Pages
 2008 Custom Wave
2 Pages
 2008 Haze
2 Pages
 2008 Sol
2 Pages
 2008 Thorn
2 Pages
 2008 TORCH
2 Pages
 2008 CODE
2 Pages
 C-Shape Kite user's guide
15 Pages
 Naish Boxer Sle
1 Page
 Naish Shock Wave
1 Page
 Naish Raven
1 Page
- Windsurf board
- Nautical mast
- Kiteboard
- Kitesurf kite
- Carbon mast
- Twin-tip kiteboard
- Freeride kiteboard
- C-shape kitesurf kite
- Freeride windsurf board
- Freestyle kiteboard
- Windsurf mast
- Freeride kitesurf kite
- Wave kiteboard
- Aluminum mast
- Hand air pump
- Kitesurf bar
- Freestyle kitesurf kite
- Wave kitesurf kite
- All-around kiteboard