- Catalogs
- MEIKO Maschinenbau
- MODEL CS 70

MODEL CS 70

MODEL CS 70
The MEIKO Model CS 70 is a commercial dishwasher designed for use in institutional settings, featuring advanced microprocessor technology, automatic operations, and a delime cycle. It includes a control keypad and digital display for ease of use.
Upon receipt, inspect the equipment for freight damage. If damage is found, refuse the shipment and contact MEIKO Customer Service immediately.
- Overview: Installation must be done by qualified personnel, adhering to local and national codes. The warranty is valid only after a startup and demonstration by a MEIKO Authorized Service Agent.
- Requirements: The installation area should be frost-free, with a firm floor and away from water-sensitive items. Utility connections must comply with all codes.
- Uncrating and Positioning: Remove packaging, check for damage, and level the appliance.
- Utility Connections: Access water and drain connections from the lower right side; electrical supply enters through the back of the control box.
- Electrical Connection: Ensure the circuit breaker is off before connecting, using appropriate power leads and following the wiring diagram.
- Dispensing System: Connect detergent, rinse aid, and sanitizer pumps to containers using provided tubes.
- Fresh Water Connection: Connect to the fill assembly using sealing compound, ensuring clean water lines and acceptable pressure.
- Drain Connection: Use a drain with a minimum diameter of 2 inches, ensuring no part is higher than 10.5 inches above the floor.
Details the location and description of controls, startup, loading, operation, between cycles, and shutdown procedures.
Includes daily, weekly, and exterior cleaning procedures, along with deliming instructions.
Guidance on resolving common issues with the machine.
Provides detailed parts lists and wiring diagrams for maintenance and repair.
Ensure the drain line is correctly routed, with no part higher than 10.5 inches above the floor. Reverse the drain pan direction if necessary.
The CS 70 can be installed in straight-through or corner configurations. For corner installations, position the machine with the left rear corner facing the wall for control panel access. Align table centerlines with the machine's rack track and secure tables with silicone sealant.
Check and tighten all electrical terminal screws, replace the control box cover, and switch the circuit breaker to ON. Prime chemical pumps and check chemical concentrations before operation.
Prime detergent, rinse aid, and sanitizer lines using control panel keys, with specific durations for each pump.
Verify factory settings for chemical injection by running three empty loads and adjust if necessary.
Access programming mode to adjust settings such as fill time, drain time, and chemical pump run times.
Controls are on the front panel. The machine fills automatically and is ready when the display reads READY. Load dishware efficiently for effective cleaning.
Press the OFF/DRAIN key to drain and turn off the machine. Open the door slowly to avoid hot water spray and leave it open overnight for airing.
- Daily Cleaning: Turn off and drain the machine, clean screens, and leave the door open overnight.
- Weekly Cleaning: Disassemble and clean wash/rinse arms, ensuring nozzles are clear.
- Exterior Cleaning: Use detergent instead of stainless steel cleaners to avoid damage.
- Deliming: Use deliming agents for hard water deposits, following the automatic deliming cycle.
- Machine Issues: Steps for when the machine will not turn on, fill, wash, drain, or stay filled.
- Dispensing Problems: Solutions for issues with detergent, rinse aid, and sanitizer dispensing.
- Poor Wash Results: Ensure water levels, clean strainers, and wash/rinse arms are free of debris.
- Control Box: Lists components such as timers, sensors, solenoids, and contactors with part numbers.
- Peristaltic Pump: Details parts for detergent and rinse aid pumps.
- Hood Assembly: Includes parts like screws, supports, and door guides.
- Wash Motor Assembly: Describes components like motors, seals, and impellers.
This document provides a detailed parts listing for various assemblies related to a wash motor system.
Lists components necessary for the fill assembly.
Components for the tub assembly include weldments, splash shields, strainers, and stoppers.
Includes frame legs, rails, nuts, plugs, bolts, and feet for the interior tub structure.
Details parts like scrap screens, shields, weldments, clamps, bolts, washers, and locknuts.
Lists components for the rack guide assembly.
Includes parts for the wash assembly.
Components for the door assembly include weldments, supports, rollers, and guides.
Details parts for the cantilever arm assembly.
Includes components for the fill valve.
Wiring Diagrams
Section 9 provides wiring diagrams, emphasizing the importance of contacting MEIKO Authorized Service Agents for service needs.
Catalog excerpts

MODEL CS 70 Door-Type Low Temperature Chemical Sanitizing Dishwasher OWNER’S INSTALLATION, OPERATION MAINTENANCE MANUAL MEIKO • 1349 Heil Quaker Blvd. • La Vergne, TN 37086 • Phone: (615) 399-6600 • (800) 55-MEIKO • Fax: (615) 399-6620
Open the catalog to page 1
AN ELECTRICAL WIRING DIAGRAM IS LOCATED INSIDE THE COVER OF THE CONTROL BOX OF THIS MACHINE. THE MEIKO MODEL CS 70 DISHWASHER HAS BEEN DESIGNED EXCLUSIVELY FOR THE WASHING OF DISHES, GLASSWARE, CUTLERY AND KITCHEN UTENSILS IN A COMMERCIAL OR INSTITUTIONAL SETTING AND MUST NOT BE USED FOR ANY OTHER PURPOSE. MEIKO ACCEPTS NO RESPONSIBILITY FOR DAMAGE TO THE APPLIANCE, SURROUNDING EQUIPMENT OR ENVIRONMENT THAT IS CAUSED BY INAPPROPRIATE INSTALLATION OR OPERATION, OR FROM ANY SERVICE THAT IS UNDERTAKEN BY NON-AUTHORIZED PERSONNEL, OR FROM THE USE OF ANY PARTS EXCEPT THOSE THAT ARE APPROVED BY THE MANUFACTURER....
Open the catalog to page 2
1.1 Overview of Equipment The MEIKO Model CS 70 kube is a commercial dishwasher designed for cleaning dishes, glassware, trays, cutlery and kitchen utensils with a minimum of employee intervention or supervision. A control keypad allows easy selection of On/ Fill and Off/Drain cycles. A digital display permits easy monitoring of operation. Other features of the unit that affect operation include: CS 70 - advanced microprocessor technology for maintenance and end user dishmachine settings Auto Prime - Timed priming function on all chemical pumps Temp Safe - User-selectable temperature-based automatic...
Open the catalog to page 3
3 Installation 3.1 Overview of Installation The owner should contract with qualified personnel to move the appliance to the installation location, unpack it, and prepare it for final utility connections. In most cases, local codes prevent the final utility connections from being made by any party other than a licensed electrician and/or plumber. IMPORTANT It is the responsibility of the owner to ensure that all aspects of the installation comply with all applicable local and national codes. IMPORTANT The appliance’s warranty is not valid until a MEIKO Authorized Service Agent performs a Startup...
Open the catalog to page 4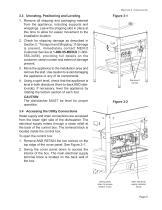
3.3 Uncrating, Positioning and Leveling 1. Remove all shipping and packaging material from the appliance, including supports and wrappings. Leave the shipping skid in place at this time to allow for easier movement to the installation location. 2. Check for shipping damage as described in Section 2, “Transport and Shipping.” If damage is present, immediately contact MEIKO Customer Service at 1-800-55-MEIKO (1-800556-3456), providing full details on the customer, serial number and extent of damage present. 3. Move the appliance to the installation area and remove the skid. Use caution to avoid...
Open the catalog to page 5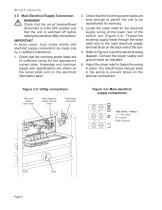
3.5 Main Electrical Supply Connection WARNING! Check that the circuit breaker/fused disconnect is in the OFF position and that the unit is switched off before making the electrical utility connections. IMPORTANT In some cases, local codes dictate that electrical supply connections be made only by a certified professional. 1. Check that the incoming power leads are of sufficient rating for the appliance’s current draw. Amperage and minimum supply wire specifications are shown on the serial plate and on the electrical information label. 2. Check that the incoming power leads are long enough to...
Open the catalog to page 6
3.6 Dispensing system overview Figure 3-5: Dispensing system components The CS 70 is equipped with liquid detergent, rinse aid and sanitizer pumps. Each pump is equipped with a supply tube that exits the rear of the machine. A stiffener tube is also provided for the ends of each tube. The end of the tube with the stiffener should be inserted and fastened into appropriate liquid chemical containers (supplied by others). During operation, chemicals are automatically dispensed according to the timed settings for each pump, which can be individually configured as required. A proof of delivery window...
Open the catalog to page 7
3.8 Fresh Water Supply Connection CAUTION Before connecting the water supply, the line MUST be flushed clean of all debris, including (but not limited to) pipe sealant, metal particles, solder, etc. This debris can damage the appliance. IMPORTANT In some cases, local codes dictate that water supply connections be made only by a certified professional. 1. Check that iron or other metal particles cannot contaminate the fresh water supplied to the dishwasher. 2. Check that the incoming water pressure is within the acceptable range for the appliance (maximum 100 psi, 6.89 bars). 3. Check the incoming...
Open the catalog to page 8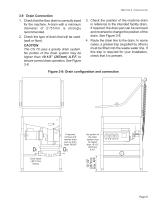
3.9 Drain Connection 1. Check that the floor drain is correctly sized for the machine. A drain with a minimum diameter of 2”/51mm is strongly recommended. 2. Check the type of drain that will be used. (wall or floor). CAUTION The CS 70 uses a gravity drain system. No portion of the drain system may be higher than 10-1/2” (267mm) A.F.F. to ensure correct drain operation. See Figure 3-8. 3. Check the position of the machine drain in reference to the intended facility drain. If required, the drain pan can be removed and reversed to change the position of the drain. See Figure 3-8. 4. Route the drain...
Open the catalog to page 9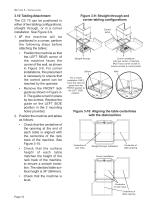
3.10 Tabling Attachment The CS 70 can be positioned in either of two tabling configurations; straight through, or in a corner installation. See Figure 3-9. 1. IF the machine will be positioned in a corner, perform the following steps before attaching the tables: • Position the machine so that the LEFT REAR corner of the machine faces the corner of the wall, as shown in Figure 3-9. For corner installations, this placement is necessary to ensure that the control panel can be reached by the operator. • Remove the FRONT rack guide as shown in Figure 39. The guide is held in place by two screws. Replace...
Open the catalog to page 10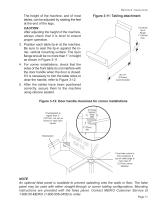
The height of the machine, and of most tables, can be adjusted by rotating the feet at the end of the legs. CAUTION After adjusting the height of the machine, always check that it is level to ensure proper operation. 3. Position each table lip-in at the machine. Be sure to seat the lip-in against the inner, vertical mounting surface. The lip-in flange should be no more than 1” in height as shown in Figure 3-11. 4. For corner installations, check that the sides of the front table do not interfere with the door handle when the door is closed. If it is necessary to trim the table sides to clear...
Open the catalog to page 11All MEIKO Maschinenbau catalogs and brochures
 DV SERIES
1 Page
 DV 120.2 T
4 Pages
 FV 40.2 G
2 Pages
 M-iClean UM
2 Pages
 FV 250.2
4 Pages
 FV 130.2
4 Pages
 DV 120.2
4 Pages
 Catalogue M-iQ Green Eye
20 Pages


Archived catalogs
 DV 200.2
4 Pages
 UPster U + H
12 Pages
 WS 125
5 Pages
 AZP 80
4 Pages
 UPster
12 Pages
 KA SERIES
8 Pages
 Catalogue TopLine Product range
12 Pages