

ML150LR
ML150LR
This document provides comprehensive instructions for the ML150LR™/ML150LRS™ LED Rechargeable Flashlight System, covering safety, installation, operation, and maintenance to ensure optimal performance and longevity.
Safety instructions are categorized into warnings, cautions, and notices. Warnings address risks of death or serious injury, such as using the flashlight in explosive environments. Cautions cover minor injury risks, like burns from the LED. Notices provide information to prevent damage to the flashlight or property.
The system includes a flashlight, charging cradle, rechargeable battery, and various adapters. Not all components are included in every package.
The flashlight features a removable face cap, adjustable beam, sealed electronic switch with multiple functions, unique serial number, and a tail cap housing the rechargeable battery.
Made of thermoplastics, the cradle can be powered by 12-14 volts (automotive) or 120-240 volts AC. It includes a quick-release button and an LED charging indicator.
Instructions are provided for mounting the charging cradle and connecting it to power sources. A 10 AMP slow blow fuse is recommended for vehicle installations.
The battery requires an initial 6-hour charge. Subsequent charges take 2.5 hours for ML150LR™ and 1.5 hours for ML150LRS™. The charging cradle's LED indicates the battery's charge status.
The flashlight offers five functions: Full Power, Low Power, Strobe, Eco, and Momentary On/Off. Users can configure the flashlight to prioritize frequently used functions.
Regular inspection and maintenance are advised. Proper disposal and recycling of the battery are emphasized to prevent environmental harm.
The flashlight offers multiple function sets, selectable via the 'Quick Click' method. Different function sets like Outdoor, Law Enforcement, and Tactical can be selected by following specific click patterns.
Two methods are provided: unscrewing the tail cap and counting blinks, or holding the button in High mode and counting blinks after the light cycles.
Common issues like the flashlight not lighting or working intermittently are addressed with step-by-step solutions, including checking battery installation and ensuring clean contacts.
The flashlight features a tempered aluminum alloy body, adjustable beam, and a rechargeable lithium iron phosphate battery. It includes a charging cradle with a solid-state charging circuit and a 120-240 volt converter.
The flashlight system has a ten-year limited warranty, while the battery pack has a one-year warranty. The warranty covers defects in parts and workmanship but excludes LED burnout and misuse-related damages.
Keep the power cord away from feet and other sources of abrasion. Use only MAG® rechargeable batteries. For long-term storage, remove the battery and store it separately. Follow inspection and maintenance steps as outlined in the manual.
This product is not a toy and is not intended for use by children. Keep the flashlight and all accessories out of reach of small children.
Cover metal terminals with insulating tape before disposal to prevent accidental short circuits. Recycle or dispose of the lithium iron phosphate (LiFePO4) battery properly.
Catalog excerpts
0LR/ML150LRSROFESSIONAL FLASHLIGHT® Rechargeable Flashlight System LED oplaadbaar zaklampsysteem Systeme de Torche Rechargeable LED aufladbares LED-Taschenlampen-System Sistema torcia ricaricabile LED Sistema de linterna LED recargable Owner's Manual • Gebruiksaanwijzing • Guide d'Utilisation Handbuch • Manuale d'uso • Manual del Propietario
Open the catalog to page 1
For Your Safety Please Read For Your Safety Please Read Read all safety instructions in this manual before attempting to use the ML150LR™/ML150LRS™ LED Rechargeable Flashlight System. Keep this manual for future reference. It contains important information about safe operation and maintenance of the product. The safety instructions in this manual have been classified according to the seriousness of the risk, as follows: “Warning" indicates a hazardous situation that, if not avoided, could result in death or serious injury. “Caution" indicates a hazardous situation that, if not avoided, could...
Open the catalog to page 2
• Do not use non-rechargeable batteries in your Rechargeable Flashlight System. Use only a MAG® rechargeable battery pack (ML150LR™ • For prolonged storage, remove the battery pack and store it separately in a non-conductive wrapping, such as a plastic bag. • Carefully follow steps listed under “Inspection and Maintenance" in this manual. • Always use genuine ML150LR™/ML150LRS™ replacement parts and accessories. Never connect the flashlight to any auxiliary product that has not been approved by Mag Instrument, Inc. Doing so may damage the product and void your warranty. • Discontinue use immediately...
Open the catalog to page 3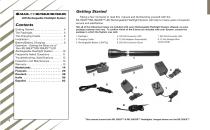
Getting Started LED Rechargeable Flashlight System Contents Getting Started. . . . . . . . . . . . . . . . . . . . . 4 The Flashlight. . . . . . . . . . . . . . . . . . . . . . 5 The Charging Cradle. . . . . . . . . . . . . . . . . 6 Installation . . . . . . . . . . . . . . . . . . . . . . . . . 7 Battery/Battery Charging . . . . . . . . . . . . . 8 Operation - Getting the Most out of Your ML150LR™/ML150LRS™ LED Rechargeable Flashlight System . . . . . . . 10 Frequently Asked Questions. . . . . . . . . 11 Troubleshooting, Specifications . . . . . . 12 Inspection and Maintenance . . . . . . ....
Open the catalog to page 4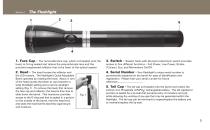
1. Face Cap - The removable face cap, which is threaded onto the head, is O-ring sealed and retains the polycarbonate lens and the precision-engineered reflector that is the heart of the optical system. 2. Head - The head houses the reflector and the LED module. The flashlight's Quick-Adjustable Beam operates by rotating the head. About % turn of the head causes the beam to vary between a wide floodlight setting and a narrow spotlight setting (Fig. 1). To remove the head, first remove the face cap and reflector; the head is then free to slide down the barrel. This maneuver provides access to...
Open the catalog to page 5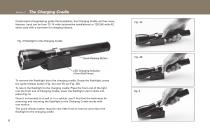
Constructed of engineering grade thermoplastics, this Charging Cradle unit has many features. Input can be from 12–14 volts (automotive installations) or 120-240 volts AC, when used with a converter for charging indoors. Fig. 3 Flashlight in the Charging Cradle Quick-Release Button LED Charging Indicator (Green/Red/Orange) To remove the flashlight from the charging cradle: Grasp the flashlight, press the quick-release button (Fig. 4A) and lift up (Fig. 4B). To return the flashlight to the charging cradle: Place the front end of the light into the front end of Charging Cradle, lower the flashlight...
Open the catalog to page 6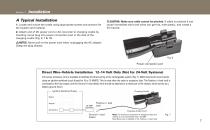
A Typical Installation 1. Locate and mount the cradle using appropriate screws and anchors for the location and material. O CAUTION: Make sure cable cannot be pinched. If cable is pinched it can cause immediate short and wires can get hot, melt plastic, and create a fire hazard. 2. Attach end of DC power cord or AC converter to charging cradle by inserting round plug into power connection port in the side of the charging cradle (Fig. 6, 7 & 10). 몇 NOTICE: Never pull on the power cord when unplugging the AC adapter. Grasp the plug directly. Power connection port Direct Wire–Vehicle Installation...
Open the catalog to page 7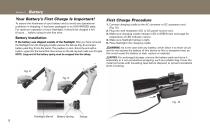
Your Battery’s First Charge Is Important! First Charge Procedure To assure the freshness of your battery and to avoid any operational problems in shipping, it has been packaged in an UNCHARGED state. For optimum operation of your flashlight, it should be charged a full 6 hours … before using for the first time. 1. Connect charging cradle to the AC converter or DC accessory cord (Fig. 10). 2. Plug into wall receptacle (AC) or DC power source cord. 3. Make sure charging cradle indicator LED is GREEN (see next page for explanation of LED indicator colors). 4. Make sure flashlight tailcap is tight....
Open the catalog to page 8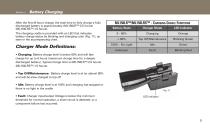
Battery Charging After the first (6-hour) charge, the total time to fully charge a fully discharged battery is approximately (ML150LR™-2.5 hours) (ML150LRS™-1.5 hours). The charging cradle is provided with an LED that indicates battery charge status by blinking and changing color (Fig. 11), as seen in the accompanying chart. • Charging: Battery charge level is below 80% and will fast charge for up to 6 hours (maximum charge time for a deeply discharged battery). Typical charge time is (ML150LR™-2.5 hours) (ML150LRS™-1.5 hours). • Top Off/Maintenance: Battery charge level is at (or above) 80%...
Open the catalog to page 9
Operation - Getting the most out of Your ML150LR™/ML150LRS™ LED Rechargeable Flashlight System Switch Operation Your Flashlight’s Function Sets and the Functions Within Each Set The ML150LR™/ML150LRS™ LED flashlight includes powerful new electronics, providing five different functions to choose from. Because not all functions are equally important to all users, the ML150LR™/ ML150LRS™ LED flashlight offers an array of USER-CONFIGURABLE FUNCTION SETS that LET YOU PERSONALIZE the settings for QUICKEST ACCESS to the FUNCTIONS YOU USE MOST. The four available Function Sets are shown in the below...
Open the catalog to page 10All MAGLITE catalogs and brochures
 ML50L
2 Pages
 ML25LT
2 Pages
 ML150LRS
76 Pages
 MagCharge
40 Pages
 MAG-TAC
92 Pages
 MAG-TAC 2 LED Plain Bezel
2 Pages
 MAG-TAC 2 LED Crowned Bezel
2 Pages