

MAG-TAC

MAG-TAC
The document is an owner's manual for the MAG-TAC® LED Rechargeable Flashlight System, focusing on safety, operation, and maintenance instructions. It emphasizes the importance of reading the manual for safe and effective use.
Safety instructions are categorized into Danger, Warning, Caution, and Notice, indicating the severity of potential hazards. Key safety measures include avoiding direct eye exposure to the light beam, preventing battery exposure to fire, and ensuring proper handling of the AC adapter to avoid electric shock.
This section provides step-by-step instructions for setting up the flashlight, including removing the battery insulator, installing the pocket clip, and connecting the charging base to a power source.
The manual details the charging process, indicating that a full charge takes approximately 2.5 hours. It advises using only the provided charging equipment and ensuring the flashlight is off before charging. The LED indicator on the charging base provides status updates on the charging process.
The flashlight operates through user input clicks, with different click sequences activating various modes such as Momentary On, Latch On, Power Save, Strobe, and Off/Charge. The manual advises against using non-provided batteries and emphasizes keeping the flashlight off when not in use.
This section offers solutions for common issues like the flashlight not lighting or the switch sticking. It also provides technical specifications, including the flashlight's material, finish, dimensions, and weight.
The manual stresses the importance of proper battery disposal to prevent environmental harm and encourages recycling through the RBRC program.
The product is not intended for children, and the manual advises keeping all components out of children's reach to prevent injury or choking hazards.
The manual concludes with warranty information and contact details for further assistance, ensuring users have access to support if needed.
1. Remove the flashlight from its packaging.
2. Unscrew the rear cap and remove the battery insulator.
3. Install the pocket clip on the cylindrical body and lock it using the lever lock tool.
4. Screw the rear cap back onto the cylindrical body.
5. Connect the charging base, USB cable, and wall adapter to a power source.
6. Place the assembled flashlight on the charging base until fully charged (indicated by a green LED).
The full recharge time for a depleted battery is approximately 2.5 hours. Use only the provided charger and adapters. Ensure the flashlight is off before placing it on the charging base. The charging process includes pre-conditioning, rapid charging, and maintenance phases.
The flashlight operates with user input clicks: 1 click for momentary on, 2 clicks for lockout, 3 clicks for power saver, 4 clicks for strobe effect, and 5 clicks for off/charge mode. Ensure the flashlight is off when not in use and during charging.
Common issues include loose rear caps, uncharged batteries, and faulty switches. Ensure all connections are secure and clean. Replace the battery if necessary.
The flashlight features a durable aluminum alloy body, a 3.2-volt battery, and a polycarbonate lens. The charging base accepts 5V DC USB input and has a multi-color LED indicator.
The flashlight system has a ten-year warranty, while the battery has a one-year warranty. The warranty covers defects in materials and workmanship but excludes LED burnout and misuse. For warranty claims, follow the troubleshooting guide and contact Mag Instrument if necessary.
- Never shine the flashlight directly into someone's face to avoid eye damage.
- Batteries can explode if exposed to fire or excessive heat. Avoid short-circuiting batteries with metal objects.
- Do not disassemble or repair the power supply or charging module to prevent electric shock.
- Avoid using non-rechargeable batteries in the flashlight.
- Store the flashlight away from flammable materials.
- Do not charge the battery in airtight spaces to prevent hydrogen gas buildup.
- Use only original MAG® rechargeable batteries and accessories.
- Avoid exposing the flashlight to temperatures above 60°C (140°F) or below -20°C (-4°F).
- Tape battery terminals before disposal to prevent short-circuiting.
- Follow local regulations for disposing of toxic household waste.
- Recycle batteries through the RBRC program to help maintain a cleaner environment.
- Unpack the flashlight and remove the battery insulator.
- Attach the clip and reassemble the flashlight.
- Connect the charging station to a power source and charge the flashlight until the LED indicator turns green.
- Charging time for a fully depleted battery is approximately 2.5 hours.
- User inputs are made through 'clicks' within 1 second intervals.
- Ensure the flashlight is off before placing it in the charging station.
- Modes include Momentary On, Lock On, Power Save, Strobe, and Off/Charging.
- Ensure the end cap is tight and the battery is charged.
- Check for defects in the battery housing or foreign particles inside.
- Verify connections to the power supply if the charging station is not functioning.
- Made from hardened aluminum alloy with a hard anodized finish.
- Length: 147.32 mm (5.8 in.), Weight: 159 grams (5.61 oz.).
- Head and barrel diameter: 26.67 mm (1.05 in.).
Catalog excerpts

the MAG TAC® Rechargeable flashlight is a trademark of Mag Instrument, Inc. Owner’s Manual • Brugervejledning • Gebruiksaanwijzing • Omistajan käsikirja Guide d’Utilisation • Handbuch • Manuale d’uso • Bruker manual Manual do Proprietário • Manual del Propietario • Användarmanual Rechargeable System (LED / LiFePO4) Genopladeligt System (LED / LiFePO4) Oplaadbaar systeem (LED / LiFePO4) Latausjärjestelmä (LED / LiFePO4) Systéme Rechargeable (LED / LiFePO4) Aufladbar (LED / LiFePO4) Sistema ricaricabile (LED / LiFePO4) Oppladdbart System (LED / LiFePO4) Sistema Recarregável (LED / LiFePO4) Sistema Recargable (LED / LiFePO4) Ladd
Open the catalog to page 1
For Your Safety Please Read Read all safety instructions in this manual before attempting to use the MAG-TAC® LED Rechargeable Flashlight System. Keep this manual for future reference. It contains important information about maintenance and safe operation of the product. SAFETY INSTRUCTIONS: The safety instructions in this manual have been classified according to the seriousness of the risk, as follows: ~DANGER: “Danger” indicates the existence of a hazard that could result in death or catastrophic bodily injury, if the safety instruction is not observed. WARNING: “Warning” indicates the existence...
Open the catalog to page 2
• Do not use non-rechargeable batteries in your Rechargeable Flashlight System. • Use only a MAG® rechargeable battery pack (Model No. AJXX065) or its technical equivalent. • Always install the battery pack with the negative (-) end facing the head end of the flashlight and the positive (+) end facing the tailcap end. • For prolonged storage, remove battery pack and store apart from flashlight. • Carefully follow steps listed under "Inspection and Maintenance" in this manual. • Never try to disassemble the flashlight, its components or accessories. For service, return the unit to a Mag Authorized...
Open the catalog to page 3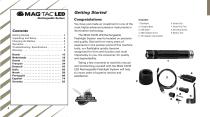
Getting Started Rechargeable System Contents Getting Started . . . . . . . . . . . . . . . . . . . . . . . . . . 4 Unpacking and Setup . . . . . . . . . . . . . . . . . . . . 5 Charging the Battery. . . . . . . . . . . . . . . . . . . . . . 6 Operation . . . . . . . . . . . . . . . . . . . . . . . . . . . . . . . 7 Troubleshooting, Specifications . . . . . . . . . . . . 8 Warranty . . . . . . . . . . . . . . . . . . . . . . . . . . . . . . . 9 Dansk . . . Nederlands Suomi . . . Français . . Deutsch . . Italia . . . . Norsk . . . . Português Español . . Svenska . . You have just made an investment...
Open the catalog to page 4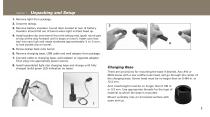
Unpacking and Setup 1. Remove light from package. 3. Remove battery insulator (round disc) located at rear of battery. Insulator should fall out of barrel when light is tilted head up. 4. Install pocket clip onto barrel from the tailcap end (push round part of clip all the way forward until it stops on knurl). Insert cam lock tool into cam lock and rotate clockwise approximately % to % turn, to lock pocket clip on barrel. 5. Screw tailcap back onto barrel. 6. Remove charging base, USB cable and wall adapter from package. 7. Connect cable to charging base, wall adapter or cigarette adapter. Then...
Open the catalog to page 5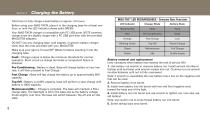
Charging the Battery MAG-TAC® LED RECHARGEABLE - Charging Base Functions Total time to fully charge a dead battery is approx. 2.5 hours. Before using your MAG-TAC®, place it in the charging base for at least one hour, or until the LED indicator shows solid GREEN. Your MAG-TAC® charger is compatible with PC USB ports. NOTE however, charge times are slightly longer with a PC USB port than with the provided MAGLITE® adapters. DO NOT use any charging base, wall adapter, or generic battery charger other than the ones provided with your MAGLITE®. Make sure your light is Turned OFF (Mode 5) before inserting...
Open the catalog to page 6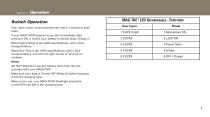
OperationSwitch Operation User input 'clicks' must be performed within 1 second of each other. If your MAG-TAC® appears to go dim immediately after turning it ON, it means your battery is almost dead. Charge it. Rated Light Output is per ANSI specifications, with a fully charged battery. Rated Run-Time is per ANSI specifications, with a fully charged battery, and with the light turned on and left on constant. DO NOT attempt to use any battery other than the one provided with your MAGLITE®. Make sure your light is Turned OFF (Mode 5) before inserting it into the charging base. When not in use,...
Open the catalog to page 7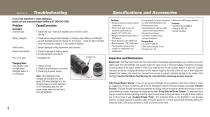
Troubleshooting Specifications and Accessories If you have questions or need assistance,please call our warranty/repair facility at 01 (909) 947-1006. Problem Flashlight: Battery charged? Switch sticks Works intermittently Charging Base: LED indicator does not light when flashlight switch is in off position. Cause/Correction 1. Tighten tail cap - make sure unplated area of barrel is clean. 1. Check battery charge: Place flashlight in charging base. Make sure LED lights up with flashlight switch off. Charge for 15 minutes ... check for light. If it lights (even momentarily) charge it, if not,...
Open the catalog to page 8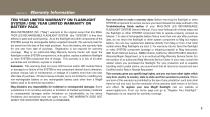
Warranty Information TEN YEAR LIMITED WARRANTY ON FLASHLIGHT SYSTEM / ONE YEAR LIMITED WARRANTY ON BATTERY PACK MAG INSTRUMENT, INC. (“Mag”) warrants to the original owner that this MAGTAC® LED RECHARGEABLE FLASHLIGHT SYSTEM (the “SYSTEM”) is free from defects in parts and workmanship. As to the flashlight and other components of the SYSTEM, except the rechargeable battery supplied herewith, this warranty lasts for ten years from the date of first retail purchase. As to the battery, this warranty lasts for one year from date of purchase. Registration is not required for warranty coverage. Mag...
Open the catalog to page 9
Læs dette af sikkerhedshensyn Læs alle sikkerhedsinstruktionerne i vejledningen, før du forsøger at bruge det genopladelige MAGTAC® LED GENOPLADELIGT STAVLYGTESYSTEM. Gem vejledningen til fremtidig brug. Vejledningen indeholder vigtige oplysninger om vedligeholdelse og sikkerhed. SIKKERHEDSINSTRUKTIONER: Sikkerhedsinstruktionerne i denne vejledning er opdelt som følger i forhold til, hvor alvorlig risikoen er: ~FARE: "Fare" betyder forekomst af en farekilde, som kan betyde død eller alvorlige legemsbeskadigelser, såfremt sikkerhedsvejledningen ikke følges. ADVARSEL: "Advarsel" betyder forekomst...
Open the catalog to page 10All MAGLITE catalogs and brochures
 ML50L
2 Pages
 ML25LT
2 Pages
 ML150LRS
76 Pages
 ML150LR
76 Pages
 MagCharge
40 Pages
 MAG-TAC 2 LED Plain Bezel
2 Pages
 MAG-TAC 2 LED Crowned Bezel
2 Pages