


- Products
- Catalogs
- News & Trends
- Exhibitions
KMC2

KMC2
Catalog excerpts

Multi-Media Receiver KMC2 Owner’s Manual | English Manual del Propietario | Español KMC2 Receptor Multi-Media Benutzerhandbuch | Deutsch KMC2 Multi-Media-Receiver Manuel d’utilisation | Française KMC2 Multi-Media Recei
Open the catalog to page 1
FCC Statement This equipment has been tested and found to comply with the limits for a Class B digital device, pursuant to part 15 of the FCC Rules. These limits are designed to provide reasonable protection against harmful interference in a residential installation. This equipment generates uses and can radiate radio frequency energy and, if not installed and used in accordance with the instructions, may cause harmful interference to radio communications. However, there is no guarantee that interference will not occur in a particular installation. If this equipment does cause harmful interference...
Open the catalog to page 2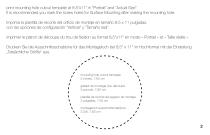
print mounting hole cutout template at 8.5”x11” in “Portrait” and “Actual Size” It is recommended you mark the screw holes for Surface Mounting after making the mounting hole. Imprima la plantilla de recorte del orificio de montaje en tamaño 8.5 x 11 pulgadas, con las opciones de configuración “Vertical” y “Tamaño real”. imprimer le patron de découpe du trou de fixation au format 8,5”x11” en mode « Portrait » et « Taille réelle ». Drucken Sie die Ausschnittsschablone für das Montageloch bei 8,5” x 11” im Hochformat mit der Einstellung „Tatsächliche Größe“ aus. mounting hole cutout template: 3...
Open the catalog to page 3
print mounting hole cutout template at 8.5”x11” in “Portrait” and “Actual Size” It is recommended you mark the screw holes for Surface Mounting after making the mounting hole. Imprima la plantilla de recorte del orificio de montaje en tamaño 8.5 x 11 pulgadas, con las opciones de configuración “Vertical” y “Tamaño real”. imprimer le patron de découpe du trou de fixation au format 8,5”x11” en mode « Portrait » et « Taille réelle ». Drucken Sie die Ausschnittsschablone für das Montageloch bei 8,5” x 11” im Hochformat mit der Einstellung „Tatsächliche Größe“ aus. mounting hole cutout template: 3...
Open the catalog to page 4
Specs 5 Overview 6 Installation 7 Operation 9 Troubleshooting 11 Warranty 33 Especificaciones 12 Descripción general 13 Instalación 14 Funcionamiento 16 Resolución de problemas 18 Garantía 33 Caractéristiques 19 Présentation 20 Installation 21 Utilisation 23 Dépannage 25 Garantie 33 Spezifikationen 26 Übersicht 27 Installation 28 Betrieb 30 Fehlerbehebung 32 Garant
Open the catalog to page 5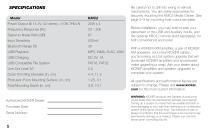
SPECIFICATIONS Model Power Output @ 14.4V, 4Ω stereo, <10% THD+N Input Sensitivity USB Compatible File System Outer Trim Ring Diameter [in, cm] Protrusion From Mounting Surface [in, cm] Total Mounting Depth [in, cm] Be careful not to drill into wiring or vehicle mechanisms. You are solely responsible for securely mounting the KMC2 Media Center. See page 2–3 for mounting hole cutout template. Authorized KICKER Dealer: Purchase Date: Serial Number: Before installation, you may wish to plan your placement of the USB and Auxiliary inputs, and the optional KRC12 remote (sold separately), for both...
Open the catalog to page 6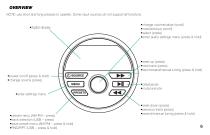
OVERVIEW NOTE: use short and long presses to operate. Some input sources do not support all functions. •change volume/value (scroll) •next/previous (scroll) •select (press) •enter audio settings menu (press & hold) •digital display •seek up (press) •next track (press) •fast forward/manual tuning (press & hold) •power on/off (press & hold) •change source (press) /SOURCE MENU •enter settings menu •preset menu (AM-FM – press) •track selection (USB – press) •save preset menu (AM-FM – press & hold) •RND/RPT (USB – press & hold) •play/pause •mute/unmute •seek down (press) •previous track (pre
Open the catalog to page 7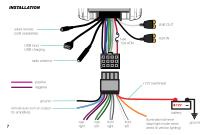
LINE OUT wired remote (sold separately) fuse 15A ATM radio antenna positive negative ground remote auto-turn on output (to amplifiers) battery rear right rear left front right front left illumination/dimmer (day/night mode when wired to vehicle lighting)
Open the catalog to page 8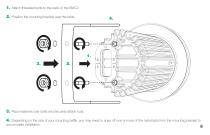
1. Attach threaded bolts to the back of the KMC2 2. Position the mounting bracket over the bolts. 3. Place washers over bolts and securely attach nuts. 4. Depending on the size of your mounting baffle, you may need to snap off one or more of the metal tabs from the mounting bracket to accomodate installation. 8
Open the catalog to page 9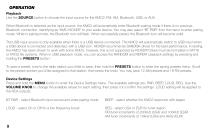
OPERATION Playback Use the SOURCE button to choose the input source for the KMC2: FM, AM, Bluetooth, USB, or AUX. When Bluetooth is selected as the input source, the KMC2 will automatically enter Bluetooth pairing mode if there is no previous Bluetooth connection, identifying as “KMC KICKER” to your audio device. You may also select “BT PAIR” from the menu to enter pairing mode. While in pairing mode, the Bluetooth icon will flash. When successfully paired, the Bluetooth icon will become solid. The USB input source is only available when there is a USB device connected. The KMC2 will automatically...
Open the catalog to page 10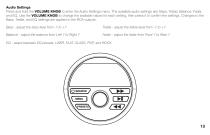
Audio Settings Press and hold the VOLUME KNOB to enter the Audio Settings menu. The available audio settings are: Bass, Treble, Balance, Fader, and EQ. Use the VOLUME KNOB to change the available values for each setting, then press it to confirm the settings. Changes to the Bass, Treble, and EQ settings are applied to the RCA outputs. Bass - adjust the bass level from -7 to +7 Treble - adjust the treble level from -7 to +7 Balance - adjust the balance from Left 7 to Right 7 Fader - adjust the fader from Front 7 to Rear 7 EQ - select between EQ presets: USER, FLAT, CLASS, POP, and ROCK /SOURCE...
Open the catalog to page 11
TROUBLESHOOTING If your KMC2 does not appear to be working, check the obvious things first such as blown fuses, poor or incorrect wiring connections etc. If you’re using an amplifier, check for incorrect setting of crossover switches and gain controls etc. No Power? Press and hold the SOURCE/POWER button and make sure the KMC2 is turned on. Check the +12V power wire, ground wire, and fuse(s) for power and proper connection. No or low output? Check the balance control on the KMC2. Check the speaker output connections. Power cycle the KMC2. Reduced volume? Reverse a speaker connection from positive...
Open the catalog to page 12


