

Replacement spreader brackets

Replacement spreader brackets
This document provides a step-by-step guide for replacing old spreader brackets with new ones on a mast. The new brackets are made of stainless steel and come with a complete set of components including relief-plates, screws, bolts, nuts, and rivets.
- Mounting the Spreader: Install a spreader in both the old and new brackets on the same side of the mast.
- Positioning the New Bracket: Place the new bracket at approximately the same height as shown in the reference photo. Ensure the front edges of the spreaders align.
- Marking and Measuring: Mark the rear edge of the new spreader bracket with a pencil. Measure the distance from the mast groove to this mark and replicate it on the opposite side of the mast.
- Removing Old Brackets: Detach the old spreader brackets and install the new thru-bolt and relief-plates. Secure the nuts and tap the bolt to ensure stability.
- Securing Relief-Plates: Fasten the relief-plates using rivets and fill the old holes with rivets.
- Installing New Brackets: Mount the new spreader brackets just above the old ones, aligning the aft edge with the pencil markings. Use Sika flex 221 to isolate the mast profile from the bracket.
- Final Steps: Once the new brackets are installed, the top and lower shrouds can be mounted, the rig trimmed, and the mooring released.
It is recommended to replace outdated cast aluminum spreader brackets with the new stainless steel ones provided in the packet solution. This ensures durability and compatibility with existing spreaders, although new spreaders can be supplied if necessary.
Catalog excerpts
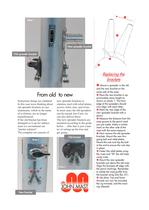
Sometimes things are outdated. In this case were thinking about old spreader brackets in cast aluminium, which in the name "packet solution". stainless steel with relief-plates, screws, bolts, nuts, and rivets. In most cases the old spreaders can also deliver these. mounted according to the guide below ... after that is just a mat- JOHN MAST same side of the mast. proximately same height as shown on photo 1. The front edge of the spreaders should now align with each other. © Mark the rear edge of the new spreader bracket with a O Measure the distance from the mast groove to the pencil mark you just made. Make a similar mark on the other side of the mast with the same measure. brackets. Mount the new thru going bolt and relief-plates. Mount the nuts and tap the bolt at the end to ensure the nuts stay © Fasten the relief-plates using the rivets and "fill" the old holes using rivets. brackets just above the old ones. Align the brackets aft edge with the pencil markings. Remember to isolate the mast profile from the bracket using Sika flex 221.
Open the catalog to page 1All John Mast catalogs and brochures
 Forestay fixtures
1 Page
 Winch consoles
2 Pages
 Wheels or Sheaves
1 Page
 Spreader inputs
1 Page
 Spinnaker pole - parking
1 Page
 Spinnaker gear - classic
1 Page
 Spar cuff's & sleeve's
1 Page
 Spar bases
1 Page
 Sea-railing or lifeline
1 Page
 Halyard exits
1 Page
 Halyard boxes
1 Page
 Deck collars
1 Page
 Clevis pins
1 Page
 Cleats
1 Page


