

JJ-CCR DiveCAN

JJ-CCR DiveCAN
- Mandatory training by a factory-approved instructor is required before using the JJ-CCR Rebreather.
- User instructions do not replace formal training or diving directions.
- An autonomous bailout system is essential for safety in case of equipment failure.
- Modifications void CE certification and warranty, potentially compromising safety.
- Repairs and maintenance should only be performed by trained individuals.
The JJ-CCR Rebreather is designed for reliability and simplicity, adhering to the KISS principle. It supports various tank sizes and includes features like redundant power supplies and manual operation capabilities.
- Robust aluminum housing supports up to four tanks.
- Features include a self-filling soda lime canister, integrated handle, and back-mounted counter lungs.
- Redundant power supply with separate batteries for different components.
- Equipped with an independent HUD displaying real-time PPO2 for oxygen sensors.
- Dimensions: 70cm x 40cm x 26cm; Weight: 34.2kg with tanks.
- Soda lime canister type: Axial, with a running time of 180 minutes under specified dive profiles.
- Maximum depth: 40m with air, 100m with trimix.
- Oxygen control with two setpoints, adjustable underwater.
- Operating temperatures range from +4°C to +34°C during dives.
- Detailed instructions for assembling the base unit, handle, stand, and other components.
- Main components include the lid, battery compartment, oxygen sensors, solenoid, and breathing hoses.
- Controller features a multi-gas decompression computer and various menu options for dive setup and monitoring.
- Regular maintenance intervals are specified, including checks before and after every dive, and periodic servicing every 12, 24, and 60 months.
- Cleaning procedures are outlined for both quick and complete cleaning.
- Storage recommendations include maintaining specific temperature conditions.
Proper maintenance and oxygen-compatible cleanliness are crucial for components exposed to high-pressure oxygen. Service and repair should be conducted by the manufacturer or an approved service center to prevent oxygen fires, which can cause serious injury or death.
The JJ-CCR operates between 4°C and 34°C. Operating outside this range may lead to unreliable function.
The oxygen setpoint range is 0.4 to 1.5 bar, with default setpoints at 0.7 and 1.3 bar. The oxygen and nitrogen fractions vary with depth and setpoint, requiring a trimix diluent for depths beyond 40 meters.
The JJ-CCR should only be used in water visibility exceeding 30 centimeters to ensure the diver can read the setpoint controller display and HUD.
Divers must be aware of CNS, OTUs, and decompression effects. Prolonged exposure to oxygen above 0.5 bar can lead to pulmonary toxicity, tracked using OTUs, with a conservative limit of 300 OTUs per day.
The JJ-CCR is delivered fully assembled. The base unit consists of a stable aluminum housing with guide rails for tank positioning. The handle and stand are attached for easy lifting and stability. Trim weights can be added without affecting overall trim.
The 1st stage with M26x2 connection is for oxygen, and the DIN 5/8” connection is for diluent. Proper hose arrangement is crucial to prevent ruptures.
The wing is tailored to the equipment, with specific hose arrangements. The counter lungs attach at various heights, and care must be taken not to damage them.
The harness must be adjusted to the diver's dimensions for comfort and proper positioning. Incorrect adjustment can negatively affect comfort during a dive.
Manual supplemental oxygen and diluent valves are connected through D-rings to maintain position during dives.
The JJ-CCR includes an axial soda lime canister, with careful filling and compacting required to prevent noise and ensure proper function. Used soda lime must not be reused.
The soda lime canister must be filled in stages, adding 5-7 cm of soda lime at a time and compacting it by knocking around the edge of the canister. Ensure a clearance of 4-5mm is visible. Used soda lime must not be reused for another dive.
Before placing the lid with the soda lime canister into the aluminum housing, check and re-grease the O-rings lightly to prevent leaks. Align the lid correctly and secure it with a quarter turn. Avoid excessive tightening.
Connect the breathing hose with the DSV, ensuring check valves are functioning. The inhalation side uses a clockwise thread, and the exhalation side uses an anti-clockwise thread. Never lift the equipment using the ADV or T-piece to avoid damage.
The JJ-CCR Rebreather includes a lid with oxygen sensors, a solenoid, and a battery compartment. The battery compartment is sealed to prevent moisture issues, and batteries should be replaced together. The solenoid is designed to minimize oxygen poisoning risks.
The rebreather is equipped with a Shearwater Petrel 2 controller and an independent HUD. The HUD displays PPO2 using a modified Smither’s code and includes features like automatic brightness control and a buddy warning light.
The HUD uses LED blink patterns to indicate PPO2 levels. Commands are entered via a mechanical button, with options to turn on/off, calibrate PPO2, and enter advanced menus. Calibration should be done at a PPO2 of 1.0 ata using pure oxygen.
The HUD displays solid red LEDs if all O2 sensors fail calibration, indicating a need for troubleshooting.
The document outlines the calibration requirements for oxygen sensors in a JJ-CCR rebreather system. Sensors must meet specific specifications to pass calibration; otherwise, they need replacement and recalibration. A failed sensor is indicated by solid red LEDs on the HUD, and diving should not proceed unless all sensors are functional.
Tables in the document detail alarm and error messages for failed oxygen sensor calibration, DiveCAN® communication issues, and low battery voltage. Troubleshooting steps include checking connections and replacing batteries.
Users can set advanced options such as PPO2 blink patterns and HUD orientation. The document provides a step-by-step guide to accessing and selecting these options.
An optional blink pattern for color-blind users is described, using LED positioning to indicate PPO2 levels.
The JJ-CCR rebreather includes components like the ADV, manual supplemental oxygen and diluent valves, and the DSV. Each component's function and operation are explained, emphasizing the importance of checking functionality before use.
The controller features a multigas decompression computer with a high-resolution display, automatic brightness adjustment, and piezo buttons for operation. It supports various gases and modes, including high altitude diving and real-time PPO2 display.
DiveCAN® is a digital communication standard used in the JJ-CCR rebreather, with independent busses for redundancy. The modular design allows for easy component removal and replacement.
The controller is operated using two piezo buttons, with specific functions for menu navigation and selection. The main display provides critical dive information, including depth, time, and decompression stops.
The device displays a yellow warning for deselected sensors and does not include them in PPO2 calculations. PPO2 values outside the safe range (below 0.4 or above 1.6) flash red. Battery warnings appear if voltage drops below specific thresholds, with critical warnings flashing red, indicating immediate replacement is necessary.
The NDL is highlighted in yellow if less than 5 minutes remain. The TTS includes ascent time and decompression stops, assuming a 10 meters per minute ascent rate and appropriate gas usage.
The current gas is displayed in white, with warnings in yellow or red if the gas is not optimal or unsafe. The system alerts users to switch gases or remove unsuitable ones from the list.
The built-in compass, available on hardware version 3.4.0 or higher, requires periodic calibration, especially after battery changes. It offers 1° resolution, ±5° accuracy, and tilt compensation. Interference from ferromagnetic materials should be avoided.
The adaptive menu hides unnecessary options based on the mode. In dive mode, only adjustable items are shown. The controller continues background functions like oxygen sensor readings and decompression calculations even when in a menu.
Calibration is crucial and should be done regularly, ideally before each dive. The process involves using 100% oxygen and following a specific sequence. Calibration accounts for ambient pressure and altitude.
The "End Dive" option allows divers to log separate dives. Setpoints can be switched between low and high values, with gases sorted by oxygen content for selection.
The document outlines the operation and configuration of a dive controller, focusing on various modes and settings. Key modes include NDL (No Decompression Limit), CEIL (Ceiling), @+5 (Time to Surface if staying at current depth for 5 more minutes), and ∆+5 (Difference in Time to Surface if staying at current depth for 5 more minutes). The document emphasizes the importance of adhering to decompression stops to allow bubbles to resorb, warning against continuous ascent.
The controller offers multiple brightness settings: Auto, Low, Med, High, and Cave, with the brightness level significantly impacting battery life.
Bluetooth is used for firmware upgrades and uploading dive logs. The dive log menu allows viewing, editing, and deleting logs, with options to recover deleted logs in case of accidental or malicious deletion.
The system setup menu, accessible only in surface mode, allows configuration of basic settings such as setpoints, salinity, and decompression parameters. The document details how to adjust low and high setpoints, salinity settings, and decompression conservatism based on gradient factors.
The decompression setup menu allows setting the last stop depth and NDL display options, which include NDL, CEIL, GF 99, @+5, and ∆+5. The document advises against altering decompression settings without understanding the underlying theories.
The manufacturer notes that the gradient theory used in decompression calculations is experimental and may not be universally accepted in the decompression research community.
This section describes the configuration of gases for the open circuit mode. Users can define up to five gases, with options identical to those in the 'Define Gas' area of the dive setup menu. Gases are displayed simultaneously, and users can edit them by navigating through gas numbers and adjusting O2 and helium content. Gases are displayed in order of O2 content, and active gases are used for Time To Surface (TTS) projections.
Similar to the open circuit mode, this section allows configuration of gases for closed circuit mode. The sequence of gas input is irrelevant, and gases are displayed by O2 content. Active gases are essential for TTS projections, and adjustments can be made underwater.
This section covers the setup of oxygen-related settings, including calibration of oxygen sensors and display size adjustments for PPO2. Calibration requires setting FO2 to 1.00 for 100% oxygen, and successful calibration is necessary for PPO2 values to display.
Users can activate or deactivate automatic setpoint switching, defining depths for switching between low and high setpoints. The switch down depth must be at least 6m less than the switch up depth to prevent oscillations. Manual switches cancel auto switches within 2m of the auto switch depth.
This section allows users to adjust display settings, including depth and temperature units, brightness, and screen orientation. Brightness affects battery life, and automatic adjustments can be made based on ambient light.
Users can calibrate the compass and adjust settings such as compass view and true north compensation. Calibration is recommended before first use and after battery replacement.
This section includes various system settings such as date and time configuration, unlocking additional functions, and resetting to factory defaults. Users can choose to reset settings, deco tissues, or both.
Users can access the 'Advanced Configuration' menu to adjust settings or reset them to default. Key options include 'System Info' for system details and 'Battery Info' for battery specifics.
The system info provides details such as the controller's serial number, activated features, firmware version, and total dive time. The battery info includes battery type, current voltage, time since last change, and last change date.
Users can customize display colors for better contrast, with options for main and title colors. The 'End Dive Delay' setting allows users to set a delay from 20 to 600 seconds before ending a dive, with a default of 60 seconds.
The battery icon can be set to display only on low battery warnings, always, or only on the surface with warnings during dives.
Users can change the style of the 'Select Gas' menu and adjust PPO2 limits with caution. Alerts are triggered if PPO2 limits are violated for over 30 seconds.
The 'Bus Devices' screen lists DiveCan® devices and allows settings adjustments on peripheral boards like the SOLO board, where solenoid speed can be set to 1 or 5 seconds.
Info screens provide data on current dive conditions, including PPO2, CNS saturation, depth, and battery voltage. The compass is a persistent info screen.
Alarms and errors must be confirmed to disappear. White text indicates normal conditions, yellow for warnings, and flashing red for critical alerts. Specific alarms include cell warnings, gas PPO2 safety, high/low PPO2, battery alerts, solenoid alerts, fast ascent, missed deco stops, and more.
After firmware updates, messages like 'Upgrade Reset' and 'Needs Cal.' indicate the need for sensor calibration.
This section discusses error messages related to internal hardware failures in the JJ-CCR controller. These errors should be recorded and reported to the nearest service center.
This procedure outlines the steps for changing the battery in the JJ-CCR controller. It includes turning off the controller, removing the battery cap, exchanging the battery, and reinstalling the battery cap. The recommended battery type is the SAFT LS 14500. It is important to ensure the O-ring is clean and lubricated to prevent damage.
The controller supports various battery types, including Saft LS 14500, 1.5 V Alkaline, 1.5 V Photo Lithium, 1.2 V NiMh, and 3.7 V Li-Ion. Each type has different operational lifetimes and characteristics.
The firmware of the controller can be updated using the Shearwater Desktop Software. The process involves connecting the controller via Bluetooth and following the software prompts. It is important not to remove the battery during the update.
Users can personalize the controller with a start-up text. This is done through the Shearwater Desktop Software.
The controller offers a new display style for gas selection during a dive. The new style shows all gases simultaneously, making it easier to visualize and understand.
The JJ-CCR controller supports multiple decompression models, including Bühlmann GF, VPM-B, and VPM-B/GFS. Users can adjust the conservatism of these models during a dive.
This section provides a checklist for preparing the JJ-CCR Rebreather before a dive. It includes steps such as checking health, analyzing tank contents, and ensuring all equipment is properly connected.
The medium pressure for the diluent should be between 9.0 to 10.0 bar, and for oxygen, it should be 7.0 to 7.5 bar. Diving is prohibited if these values are incorrect.
Ensure all valves, including manual supplemental valves, ADV, wing inflator, and DSV, are functioning correctly. Conduct positive and negative pressure tests to verify system integrity. Check the HUD and controller settings, and calibrate oxygen sensors.
Before diving, open tank valves, switch on HUD and controller, and breathe from the device to check soda lime functionality. After entering the water, perform a bubble check within the first 6 meters of descent.
Maintain awareness of PPO2 levels using HUD and controller. Optimal water position is at a 20-30 degree angle for minimal breathing effort. Keep breathing circuit volume low to reduce breathing effort and buoyancy issues.
After diving, follow steps for quick or complete cleaning of the JJ-CCR Rebreather. Quick cleaning involves rinsing and drying components, while complete cleaning includes disinfecting and thorough drying.
Store the rebreather in a dry, shaded, and ventilated area. Disinfect all parts and ensure the soda lime canister is emptied. Assemble equipment to prevent contamination.
Regular maintenance includes replacing O-rings, oxygen sensors, and checking hoses. Follow specified intervals for maintenance tasks, and use only approved care products to ensure equipment longevity.
Every 12 months, replace oxygen sensors and check hoses. Every 24 months, replace O-rings and inspect tanks. Every 60 months, return the equipment for a general service.
Catalog excerpts

Photography copyright: Sami Paakkarinen 2012 Reproduction and changes of this document and its content is prohibited without written approval from JJ-CCR ApS. All information in this document has been carefully analyzed and is believed to be accurate. However, it is not possible to guarantee its accuracy and all liability is excluded. Cited companies and/ or product names are trademarks belonging to the respective companies. 2017 JJ-CCR ApS – 2.00 / Revision 06
Open the catalog to page 1
• Never use the JJ-CCR Rebreather without receiving specific equipment training (basic course or crossover). It is essential receiving training from a factory approved instructor and from a factory approved training agency. • These user instructions do not replace training with the equipment and are not directions for diving with closed circuit equipment. • As with other equipment, it is possible that a Rebreather may fail at any time! It is therefore essential that an autonomous bailout system, independent of the equipment, be taken by the diver on every dive. The bailout system must be configured...
Open the catalog to page 2
3.2.1 Vertical head down position 11 3.2.7 Use of high oxygen content gases 12 3.2.8 Potential long term health effects 12 4.6 Back-mounted counter lungs (BMCL) 17 4.11 Soda lime canister (axial) 22 4.12 Soda lime canister (radial) 23 4.14 Breathing hose with DSV (Dive Surface Valve) 26
Open the catalog to page 3
5.4 ADV (Automatic Diluent Valve) 37 5.7 DSV (Dive Surface Valve) 37 6.11.2 Checking calibration during a dive 52 6.15 Switch CC/BO (Between Closed and Open Circuit Bailout Mode) 54 6.16.6 NDL Display (GF99, CEIL, NDL, @+5 or A+5 display) 62
Open the catalog to page 4
6.20.3 Low Setpoint (Mode Setup) 68 6.20.4 High Setpoint (Mode Setup) 69 6.20.8 NDL Display (Deco Setup) 70 6.20.16 Depth Units (Display Setup) 76 6.20.17 Temp. Units (Display Setup) 76 6.20.20 Flip Screen (Display Setup) 77 6.20.29 Reset to Defaults (System Setup) 80 6.20.31 System Info (Advanced Config) 81 6.20.32 Battery Info (Advanced Config) 81 6.20.33 Main Color (Advanced Config 1) 82 6.20.34 Title Color (Advanced Config 1) 82 6.20.35 End Dive Delay (Advanced Config 1) 82 6.20.36 Bat Icon (Advanced Config 1) 82...
Open the catalog to page 5
8 VPM-B / VPM-GFS decompression model 99 9.3 Shortly after entering the water 102
Open the catalog to page 6
Congratulations on purchasing the JJ-CCR Rebreather. We are certain that you will experience many unforgettable dives using this equipment. The development and testing of the JJ-CCR Rebreather started back in 2006. During this period the equipment was able to demonstrate exceptional reliability over more than 1500 diving hours at a wide range of locations around the world prior the first public release. The product development philosophy is aligned with the following criteria: • Strict application of the KISS principle: ”Keep It Simple Stupid”. • The Rebreather must be extremely solid, versatile...
Open the catalog to page 8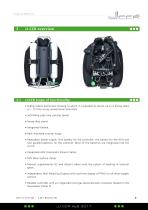
3.1 JJ-CCR Scope of functionality • Highly robust aluminium housing to which it is possible to secure up to 4 diving tanks (2 - 12 litre) using conventional tank belts. • Self-filling soda lime canister (axial). • Heavy duty stand. • Integrated handle. • Back-mounted counter lungs. • Redundant power supply: One battery for the controller, one battery for the HUD and two parallel batteries for the solenoid. None of the batteries are integrated into the circuit. • Integrated ADV (Automatic Diluent Valve). • DSV (Dive Surface Valve). • Manual supplemental O2 and diluent valves with the option of...
Open the catalog to page 9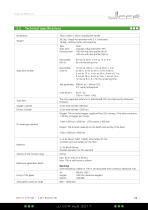
Technical specifications
Open the catalog to page 10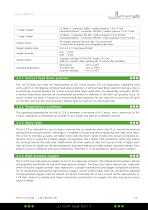
The JJ-CCR does not meet the requirements of EN 14143 section 5.6.1.4 (Hydrostatic imbalance test) with a pitch of -90 degrees (Vertical head down position). A vertical head down position during a dive is an extremely unusual position for a diver and normally never used when not absolutely necessary. Within a vertical head down position an unintentional activation or freeflow of the ADV can possibly occur. To avoid it when the diver is forced to a vertical head down position he can close the in line shut-off valve on the ADV and use the manual diluent adding valve to maintain an optimized loop....
Open the catalog to page 11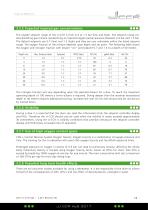
The oxygen setpoint range of the JJ-CCR is from 0.4 to 1.5 bar (low and high). The setpoint range creates breathing gas mixture representing an inspired oxygen partial pressure between 0.4 bar and 1.5 bar. The default setpoints are 0.7 (low) and 1.3 (high) and they are user selectable within the listed setpoint range. The oxygen fraction of the mixture depends upon depth and set point. The following table shows the oxygen and nitrogen fraction with diluent "Air" and setpoint 0.7 and 1.3 to a depth of 50 meters. The nitrogen fraction will vary depending upon the selected diluent for a dive. To...
Open the catalog to page 12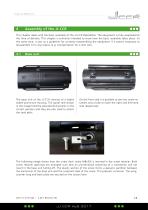
This chapter deals with the basic assembly of the JJ-CCR Rebreather. The equipment is fully assembled at the time of delivery. This chapter is primarily intended to show how the basic assembly takes place. At the same time, it acts as a guideline for correctly reassembling the equipment if it proves necessary to disassemble it for any reason (e.g. transportation for a dive trip). Base unit The base unit of the JJ-CCR consists of a highly stable aluminium housing. The guide rails shown in the image hold the selected diving tanks in the correct position and they are also used to attach the tank...
Open the catalog to page 13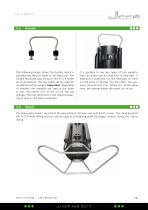
The following image shows the handle, which is screwed into the two tubes on the base unit. The handle facilitates easy lifting of the JJ-CCR under all circumstances. The two tubes can be used for an additional trim weight. Important: Regardless of whether trim weights are used in the tubes or not, the overall trim of the JJ-CCR will not change! The only difference is the required quantity of lead on the diver’s lead belt. It is possible to use two types of trim weights. One can either opt for lead shot or lead bars. If lead shot is used then it is first necessary to insert a small piece of...
Open the catalog to page 14All JJ-CCR catalogs and brochures
 JJ-CCR-2019_2020
1 Page
 2017 flyer
1 Page
 XRC product sheet
1 Page
 JJ-CCR PRICE LIST
4 Pages