


- Products
- Catalogs
- News & Trends
- Exhibitions
HDAdmiral

HDAdmiral
This document serves as the installation manual and owner's guide for the Admiral HD Series Hydraulic Boat Steering system by Hy-Drive Engineering Pty Ltd. It provides essential instructions for installation, maintenance, and troubleshooting.
The manual stresses the importance of preventing hydraulic oil from contaminating the sea and urges responsible disposal of waste materials.
- Pre-Installation: Emphasizes cleanliness, proper tools, and materials. Copper tubing is recommended, and brake fluid is prohibited.
- Autopilot Integration: Instructions for integrating autopilot systems with the hydraulic steering.
- Pump Mounting: Guidelines for mounting pumps at angles and on different rudder types.
- System Bleeding: Procedures for bleeding single and dual station systems, dual cylinders, and catamaran fluid links.
- Helm Units: Details on pressure port threads, balance line port threads, and steering wheel shaft specifications.
- Seal Kits: Part numbers and instructions for seal replacement.
- Slave Cylinders: Specifications for cylinder port threads and seal kits.
Regular maintenance includes greasing points every six months and checking the security of all bolts and nuts.
The steering units have a 24-month warranty against defects, covering repair or replacement of faulty components, excluding normal wear and tear, collision damage, and corrosion due to electrolysis.
Addresses common issues like lumpy steering, oil overflow, tight steering, and steering slipping with solutions such as re-bleeding the system and ensuring correct tubing.
Emphasizes reading the manual thoroughly before installation to avoid steering failure and potential damage or injury.
- Flaring Copper Tubing: Instructions for flaring and fitting copper tubing.
- Fitting Installation: Use supplied fittings and LOCTITE thread sealant, avoiding Teflon tape.
- Compatibility: Compatible with all brands of hydraulic autopilots.
- Bleeding Autopilots: Bleed autopilot with manual steering, ensuring no air is trapped.
- Lock Valves: Use a lock valve to ensure steering in case of autopilot pump failure.
- Angle Installation: Use a remote filler kit for angled installations.
- Bleeding Process: Detailed steps to ensure no air remains trapped.
- Regular Checks: Regularly check oil levels and secure fittings.
- Painted Components: Touch up exposed aluminum with marine paint.
- Bleeder Valves: Ensure valves are on the top side for effective air expulsion.
- Rudder Installation: Follow guidelines for standard and inclined rudders.
- Seal Replacement: Obtain correct seal kits by model number.
- Installation Examples: Provides examples of typical installations.
Follow procedures for dual or single station units, ensuring all air is purged.
Select the correct unit size for the rudder and adjust tiller length for proper feedback.
Follow procedures for dual cylinder systems, ensuring no air remains.
Ensure proper chain alignment and tension for smooth steering.
Ensure proper tools and clean oil, and follow all instructions and warnings.
Use the supplied plastic bottle cap with a bleeder hose to maintain oil level.
Test for free-play and ensure correct oil level for thermal expansion. The system is ready for use once all procedures are followed.
Catalog excerpts

WARNING Care of the ENVIRONMENT is the responsibility of all individuals and not that of someone else. If you love fishing, boating, or make your living from either, then please take good care of the sea and it's environment. HYDRAULIC OIL is NOT ENVIRONMENTALLY FRIENDLY and care should be exercised to prevent oil used during the bleeding process from running overboard, or into the bilge where it will be pumped into the sea. It only takes a little time and patience to protect the sea from further pollution. Please dispose of all waste oil, rags, plastic bags and other materials, thoughtfully and in a responsible manner. WE WISH YOU HAPPY BOATING! REVISION 2005-1 (21/03/2005) ADMIRAL HD SERIES Hydraulic Boat Steering INSTALLATION INSTRUCTIONS & OWNER'S MANUAL MANUFAC TURED BY HY-DRIVE ENGINEERING PTY LTD ABN 14 007 660 808 59 WINGFIELD ROAD, W INGFIELD, SOUTH AUSTRALIA 5013 Telephone: +61 8 8243 1633 / Fax: +61 8 8445 7938 www.hydrive.com.au Email: [email protected]
Open the catalog to page 1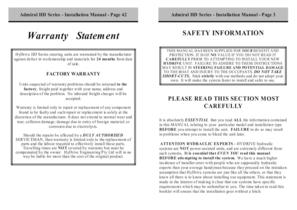
Admiral HD Series - Installation Manual - Page 42 Admiral HD Series - Installation Manual - Page 3 Warranty Statement SAFETY INFORMATION HyDrive HD Series steering units are warranted by the manufacturer against defect in workmanship and materials for 24 months from date of sale. FACTORY WARRANTY Units suspected of warranty problems should be returned to the factory, freight paid together with your name, address and description of the problem. No inbound freight charges will be accepted. Warranty is limited only to repair or replacement of any component found to be faulty and such repair or replacement...
Open the catalog to page 3
Admiral HD Series - Installation Manual - Page 4 VERY IMPORTANT PO INTS TO NOTE Before proceeding please read the following sections relating to items that are of major importance to the correct installation and selection of components. DO NOT US E BRAKE FLUID IN THIS S YSTEM - IT WILL DAMAGE S EALS AND OTHER COMPONENTS. USE ONLY HYDRIVE ULTRA-15 HYDRAULIC OIL. WARNING: Use of alternative hydraulic fluids may result in premature seal wear and possibly cause damage to your system. S uch damage is not covered under your conditions of warranty. DO NOT USE ALTERNATIVE HYDRAULIC FLUID UN LESS THE...
Open the catalog to page 4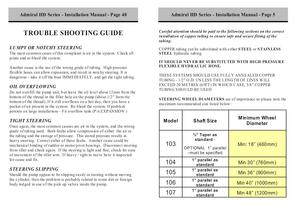
Admiral HD Series - Installation Manual - Page 40 TROUBLE SHOOTING GUIDE LUMPY OR NOTCHY STEERING The most common cause of this complaint is air in the system. C heck all joints and re-bleed the system. Another cause is the use of the wrong grade of tubing. High pressure flexible hoses can allow expansion, and result in notchy steering. It is dangerous - take it off the boat IMMEDIATELY, and get the right tubing. OIL OVERFLOWING Do not overfill the pump unit, but leave the oil level about 12mm from the bottom of the thread in the filler hole on the pump (about 1/2" from the bottom of the thread)....
Open the catalog to page 5
Admiral HD Series - Installation Manual - Page 6 RECOM M ENDED TILLER LENGTHS vary from model to model and are adjustable depending on the rudder angle required. Recommended Tiller Lengths for 70 Degree Inclusive Cylinder Type Inches Mm HD150-9 8.015 203.581 HD175-10 8.906 226.212 HD150-12 10.687 271.450 (HD175-12 & HD200-12) 10.687 271.450 HD250-12 10.687 271.450 HD250-15 13.359 339.319 HD400-12 10.687 271.450 POINTS TO WATCH PRIOR TO INSTALLATION All hydraulic equipment requires a good degree of workmanship for its installation, and this is also true of steering gear, if future performance...
Open the catalog to page 6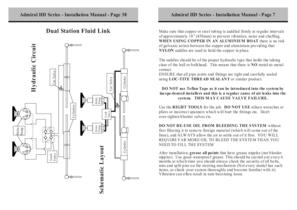
Admiral HD Series - Installation Manual - Page 38 Cylinder Make sure that copper or steel tubing is saddled firmly at regular intervals of approximately 18” (450mm) to prevent vibration, noise and chaffing. WHEN USING COPPER IN AN ALUM INIUM BOAT there is no risk of galvanic action between the copper and aluminium providing that NYLON saddles are used to hold the copper in place. Cylinder Schematic Layout Helm P ump Lock Valve Helm Pump The saddles should be of the proper hydraulic type that holds the tubing clear of the hull or bulkhead. This means that there is NO metal-to- metal contact. ENSURE...
Open the catalog to page 7
Admiral HD Series - Installation Manual - Page 37 USING COPPER TUBING Helm Pump 5) P lace the flare in position against the fitting seat and slide up the nut and screw it on squarely so as not to cross the thread. Tighten it by hand only until it becomes firm. 6) YOU MUST USE TWO SPANNERS - one on the fitting (T-piece, elbow or straight fitting) and the other on the nut. Use the two spanners against each other to take the load - not the fitting. Use only 8" or 200mm long spanners - NO LARGER. In this way you can apply much greater force without damaging the fitting itself. Cat Va lve Cylinder...
Open the catalog to page 8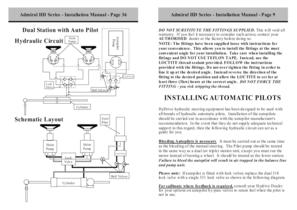
Admiral HD Series - Installation Manual - Page 36 Dual Station with Auto Pilot Autopilot Pump Hydraulic Circuit Helm Pumps Lock Valve Lock Valve Admiral HD Series - Installation Manual - Page 9 DO NOT SUBSTITUTE THE FITTINGS SUPPLIED. This will void all warranty. If you feel it necessary to consider such action, contact your AUTHORISED dealer or the factory before doing so. NOTE: The fittings have been supplied loose with instructions for your convenience. This allows you to install the fittings at the most convenient angle for your installation. Take care when installing the fittings and DO...
Open the catalog to page 9
Admiral HD Series - Installation Manual - Page 10 STANDARD AUTOPILOT STANDA RD AUTOPILOT INSTA LLATION DIA GRAM INSTALLATION DIAGRAM Admiral HD Series - Installation Manual - Page 35 Dual Station Helm Pumps Autopilot Pu mp unit. Either bi- directional OR Solonoid type unit. Ball Valves 318 Dual Lock Valve used when pilot does not have own (Do valve Lock valve lock not use if one Manual helm with vented filler cap. Balance line Hydraulic Circuit installed in p ilot pu mp already) TOptional 331 lock valve if autopilot has internally fitted lock valve. Lock Valve To Slave cylinder(s) Cylinder Ball...
Open the catalog to page 10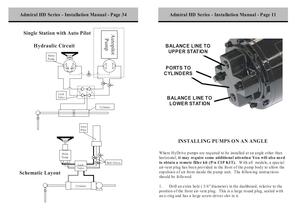
Admiral HD Series - Installation Manual - Page 34 Hydraulic Circuit Helm Pump Autopilot Pump Single Station with Auto Pilot Admiral HD Series - Installation Manual - Page 11 BALANCE LINE TO UPPER STAT ION PORTS TO CYLINDERS Lock Valve Cylinder BALANCE LINE TO LOWER STAT ION Auto Pilot INSTALLING PUMPS ON AN ANGLE Helm Pump Lock Valve Schematic Layout Cylinder Ba ll Va lves Where HyDrive pumps are required to be installed at an angle other than horizontal, it may require some additional attention You will also need to obtain a remote filler kit (P/n CIP KIT). W ith all models, a special air-vent...
Open the catalog to page 11All Hydrive catalogs and brochures
 POWER ASSISTED STEERING
12 Pages
 12 VOLT DC POWER STEERING
2 Pages
 HD Series
9 Pages
 Outboards & Sterndrives
10 Pages
 E SERIES ELECTRONIC STEERING
2 Pages


- Ship control panel
- Boat cylinder
- Ship joystick
- Steering system cylinder
- Ship monitoring and control system
- Alarm control panel
- Boat hydraulic power unit
- Electrically-powered hydraulic power unit
- Outboard motor steering
- Yacht monitoring and control system
- Motor boat cylinder
- Ship cylinder
- Electro-hydraulic steering
- Autopilot hydraulic power unit
- Rudder joystick
- Stern-drive cylinder