- Catalogs
- Hemisphere GPS
- IRONVIEW CW400 DATA COLLECTOR
IRONVIEW CW400 DATA COLLECTOR
1 /55Pages

IRONVIEW CW400 DATA COLLECTOR
1 /55Pages
Catalog excerpts

Collector User Guide Revision: A2 September 20, 2017
Open the catalog to page 1
This device complies with part 15 of the FCC Rules. Operation is subject to the following two conditions: (1) This device may not cause harmful interference, and (2) this device must accept any interference received, including interference that may cause undesired operation. This product complies with the essential requirements and other relevant provisions of Directive 2014/53/EU. The declaration of conformity may be consulted at https://hemispheregnss.com/About-Us/Quality-Commitment. Copyright Notice Copyright Hemisphere GNSS, Inc. (2017). All rights reserved. No part of this manual may be...
Open the catalog to page 2
Chapter 1: Introduction CW400 Overview Front Components Keypad Back Components Bottom Components IronView CW400 User Guide Chapter 1- Introduction Page 1 of 44
Open the catalog to page 5
CW400 This chapter introduces the external components of CW400. The front side is an LED screen, keypad and 3 indicators. The back side is a battery compartment. In the battery compartment, there are two slots, one for a SIM card (Select models only), and another for a Micro SD card. The bottom of the receiver has a power connector and serial connector. Front Components Figure 1-1. CW400 Front Components IronView CW400 User Guide
Open the catalog to page 6
Table 1-1: Components List IronView CW400 User Guide Chapter 1 - Introduction Page 3 of 44
Open the catalog to page 7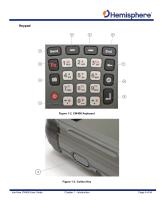
IronView CW400 User Guide
Open the catalog to page 8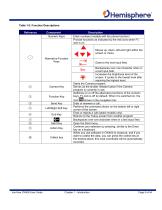
Table 1-2: Function Descriptions IronView CW400 User Guide Chapter 1 - Introduction Page 5 of 44
Open the catalog to page 9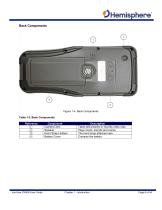
Back Components Table 1-3: Back Components IronView CW400 User Guide Chapter 1 - Introduction Page 6 of 44
Open the catalog to page 10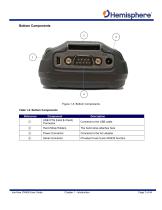
Table 1-4: Bottom Components IronView CW400 User Guide Chapter 1 - Introduction Page 7 of 44
Open the catalog to page 11
Chapter 2: Basics Powering On/Off, Resetting Installing/Uninstalling the SIM, TF Card and Battery Charging the Battery IronView CW400 User Guide Chapter 2-Basics Page 8 of 44
Open the catalog to page 12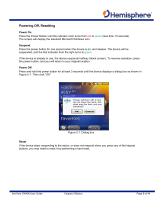
Powering Off, Resetting Power On Press the Power Button until the indicator color turns from red to green (less than 10 seconds). The screen will display the standard Microsoft Windows icon. Suspend Press the power button for one second when the device is on, and release. The device will be suspended, and the first indicator from the right turns to green. If the device is already in use, the device suspends halfway (black screen). To resume operation, press the power button, and you will return to your original location. Power Off Press and hold the power button for at least 3 seconds until the...
Open the catalog to page 13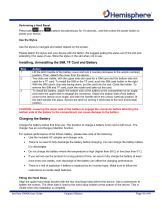
Performing a Hard Reset Press both I buttons simultaneously for 10 seconds, and then press the power button to power your device. Use the Stylus Use the stylus to navigate and select objects on the screen. Please attach the stylus and your device with the tether. We suggest pulling the stylus out of the slot and extending it for ease of use. Store the stylus in the slot when not in use. Installing, Uninstalling the SIM, TF Card and Battery CAUTION: Lowering the upper side of the battery to engage the connector before attaching the bottom side of the battery to the compartment can cause damage...
Open the catalog to page 14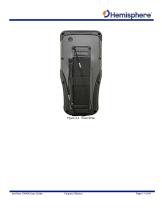
Figure 2-2. Hand Strap IronView CW400 User Guide
Open the catalog to page 15
Chapter 3: Connect and Synchronize Software Installation Connect Your Computer Managing Your Computer Connection U Disk Mode Connection OTG Connection IronView CW400 User Guide Chapter 3-Connect and Synchronize Page 12 of 44
Open the catalog to page 16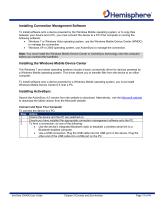
Installing Connection Management Software To install software onto a device powered by the Windows Mobile operating system, or to copy files between your device and a PC, you must connect the device to a PC if the computer is running the following software: • Windows 7 or Windows Vista operating system, use the Windows Mobile Device Center (WMDC) to manage the connection. • Windows XP or 2000 operating system, use ActiveSync to manage the connection. Note: You must install the Windows Mobile Device Center or ActiveSync technology onto the computer before you connect the handheld. Installing the...
Open the catalog to page 17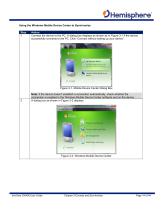
Using the Windows Mobile Device Center to SynchronizeStep Action 1 Connect the device to the PC. A dialog box displays as shown as in Figure 3-1 if the device successfully connects to the PC. Click “Connect without setting up your device”. Windows Mobile Device Cents Set upyourdevice Get Outlook contacts, calendar, e-mail and other information on your device. k. Connect without setting up your Figure 3-1. Mobile Device Center Dialog Box Note: If the device doesn’t establish a connection automatically, check whether the connection is enabled in the Windows Mobile Device Center software and...
Open the catalog to page 18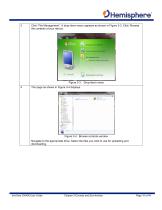
Click “File Management”. A drop-down menu appears as shown in Figure 3-3. Click “Browse the contents of your device. Figure 3-3. Drop-down menu 4 The page as shown in Figure 3-4 displays. Figure 3-4. Browse contents window Navigate to the appropriate drive. Select the files you wish to use for uploading and downloading. IronView CW400 User Guide
Open the catalog to page 19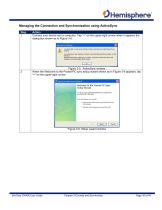
Managing the Connection and Synchronization using ActiveSync Step 1 Action Connect your device and a computer. Tap “×” on the upper-right corner when it appears the dialog box shown as in Figure 3-5. Figure 3-5. ActiveSync window When the Welcome to the Pocket PC sync setup wizard shown as in Figure 3-6 appears, tap “×” on the upper-right corner. Figure 3-6. Setup wizard window IronView CW400 User Guide
Open the catalog to page 20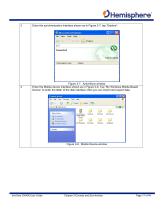
Enter the synchronization interface shown as in Figure 3-7, tap “Explore”. Figure 3-7. ActiveSync window Enter the Mobile device interface shown as in Figure 3-8. Tap “My Windows Mobile-Based Device” to enter the letter of the disk interface, then you can import and export data. Figure 3-8. Mobile Device window IronView CW400 User Guide
Open the catalog to page 21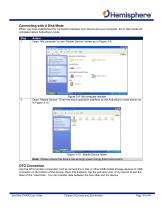
Connecting with U Disk Mode When you have established the connection between your device and your computer, the U disk mode will complete before ActiveSync mode. Step 1 Action Open “My computer” to see “Mobile Device” shown as in Figure 3-9. Figure 3-9. My computer window Open “Mobile Device”. Enter the same operation interface as the ActiveSync mode shown as in Figure 3-10. Figure 3-10. Mobile Device folder Note: Please ensure the device has enough power during data transmission. OTG Connection Use the OTG function connection cord to connect the U disk or other USB mobile storage devices to...
Open the catalog to page 22All Hemisphere GPS catalogs and brochures
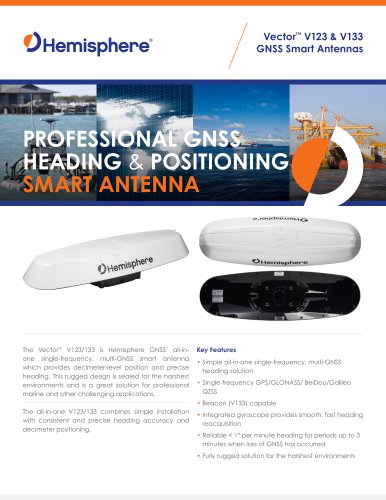 Vector™ V123 & V133
2 Pages
 VS1000
2 Pages
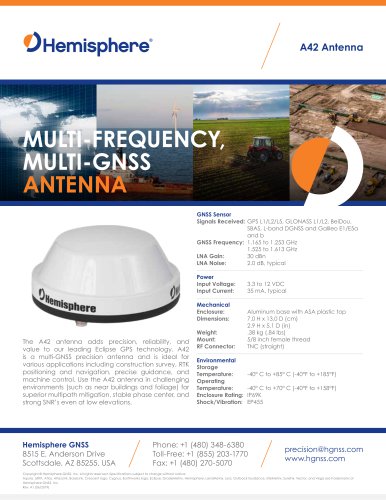 A42
A421 Page
 A43
A431 Page
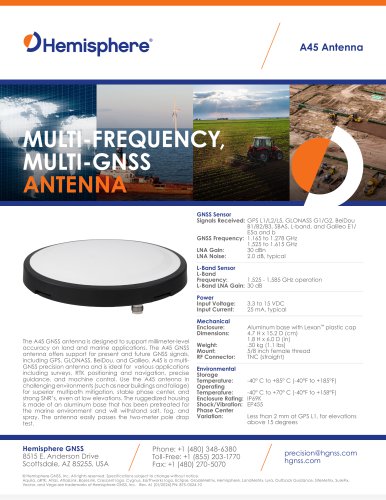 A45
A451 Page
Archived catalogs
 R330? GNSS RECEIVER
2 Pages
 S321
S3212 Pages
 Atlas Brochure
6 Pages
 HemisphereGNSS AtlasLink
2 Pages
 GNSS OEM Modules Brochure
2 Pages
 HemisphereGNSS V320
2 Pages
 S320? GNSS SURVEY RECEIVER
2 Pages
 HemisphereGNSS XF3
2 Pages
 A21? ANTENNA
1 Page
 A325™ GNSS Smart Antenna
2 Pages
 S321+ GNSS SMART ANTENNA
2 Pages
 A222™ Smart Antenna
29 Pages
 CRESCENT P102/P103 OEM BOARDS
50 Pages
 A101 Smart Antenna
34 Pages
 A325
A32533 Pages
 POCKETMAX4
43 Pages
 S320 Product Brochure
6 Pages


- Boat antenna
- Radome antenna
- Ship antenna
- GPS antenna
- Inertial navigation system
- WiFi antenna
- Ship inertial navigation system
- Boat receiver
- Professional antenna
- IMU inertial navigation system
- GNSS antenna
- GNSS inertial navigation system
- IP66 antenna
- IP69K antenna
- GPS receiver
- High-accuracy inertial navigation system
- UHF antenna
- IP67 antenna
- Boat inertial navigation system
- GNSS receiver