streamline pvalve 08web

streamline pvalve 08web
The Halcyon Streamline P-Valve is a balanced diving system designed for reliability in various conditions. It features a Delrin® construction with a threaded cap for watertight integrity, allowing for venting through a condom catheter and flexible tubing.
Specifications
The P-Valve includes a one-way check valve to prevent water entry and a second valve for gas equalization. It is suitable for extreme dives and can be used by women with an external female catheter.
Installation Procedure
- Tools Required: Halcyon P-Valve, Aquaseal, installation wrench, hole-making device, sandpaper, isopropyl alcohol, gloves.
- Location Selection: Typically on the inner thigh, considering personal preferences for tube direction.
- Creating a Hole: Use a 3⁄4” punch or soldering iron, ensuring not to damage the suit.
- Valve Installation: Sand and clean surfaces, apply Aquaseal, and assemble using the installation wrench. Allow two hours for drying.
Operation
The valve operates by turning the cap counterclockwise to open. It is designed to remain open during dives unless a failure occurs.
Failure Modes
Potential issues include kinked hoses, blocked catheters, and check valve failures. Regular maintenance and proper installation can mitigate these risks.
Maintenance and Cleaning
Regular cleaning with a vinegar/water solution is recommended to prevent deposits and bacterial growth. Check valves should be inspected and replaced as needed.
Parts and Pricing
Replacement parts include set screws, umbrella valves, duckbill check valves, hoses, connectors, and catheters, with prices ranging from $1.00 to $7.00.
Warranty Information
The P-Valve is warranted for one year against defects in materials and craftsmanship, with certain limitations and exclusions. Proof of purchase is required for warranty claims.
Catalog excerpts

STREAMLINE P-VALVE HALCYON D S IVE YSTEMS Installation Manual 1
Open the catalog to page 1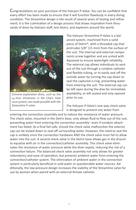
Congratulations on your purchase of the Halcyon P-Valve. You can be confident that every effort has been made to ensure that it will function flawlessly in every diving condition. The Streamline design is the result of several years of testing and refine- ment; it is the culmination of a design process that draws inspiration from thou- sands of dives by Halcyon staff, test divers, and explorers around the world. The Halcyon Streamline P-Valve is a bal- anced system, machined from a solid piece of Delrin®, with a threaded cap that protrudes 5/8" (15 mm) from the surface of the suit. The internal...
Open the catalog to page 3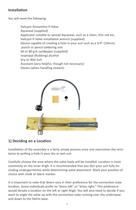
You will need the following: Halcyon Streamline P-Valve Aquaseal (supplied) Applicator suitable to spread Aquaseal, such as a clean, thin rod etc. Halcyon P-Valve installation wrench (supplied) Device capable of creating a hole in your suit such as a 3/4" (19mm) punch or pencil soldering iron 60 or 80 grit sandpaper (supplied) Isopropyl (Rubbing) alcohol Assistant (very helpful, though not necessary) Gloves (when handling sealant) Installation of the assembly is a fairly simple process once one overcomes the resis- tance to putting a hole in your dry or wet suit. Carefully choose the area where...
Open the catalog to page 4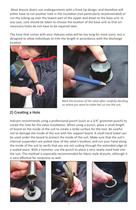
Most drysuit divers use undergarments with a front zip design, and therefore will either have to cut another hole in the insulation (not particularly recommended) or run the tubing up over the lowest part of the zipper and down to the base unit. In any case, care should be taken to choose the location of the base unit so that un- necessary holes do not have to be repaired later. The hose that comes with your Halcyon valve will be too long for most users, but is designed to allow individuals to trim the length in accordance with the discharge Halcyon recommends using a professional punch (such...
Open the catalog to page 5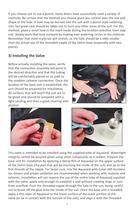
If you choose not to use a punch, many divers have successfully used a variety of methods. Be certain that the method you choose gives you control over the size and shape of the hole. A hole may be burned into the suit with a pencil-style soldering iron, but great care should be taken not to burn any other areas of the suit. For this method, place a small hole in the mark made during the location selection from step one. Slowly work that hole outward by making ever-widening circles in the material. Remember that most materials will stretch, so the hole should be a little smaller than the actual...
Open the catalog to page 6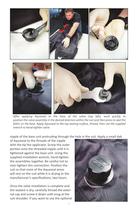
After applying Aquaseal to the base of the valve (top left), work quickly to position the valve assembly in the desired direction within the suit and then press to seal the fabric on the base. Apply Aquaseal to the top seating surface, thread, then use the supplied wrench to hand-tighten valve. nipple of the base unit protruding through the hole in the suit. Apply a small dab of Aquaseal to the threads of the nipple with the tip the applicator. Screw the outer portion onto the threaded nipple until it is tightened against the base unit. Using the supplied installation wrench, hand-tighten the...
Open the catalog to page 7
set screw to make sure that the external cap cannot be removed from the valve, gently tighten the set screw with an Allen wrench until the head almost touches the cap body. Test to ensure that the external cap is able to be loosened approximately two full turns and then stops. If the cap seems to bind, back the set screw out slightly until the movement is unimpeded. Use of the set screw is optional- however it can prevent accidental loss of the cap. Valve Operation When the cap is turned clockwise and snug against the suit shoulder, the valve is completely closed and inoperable. No fluids can...
Open the catalog to page 8
bacterial growth that could contribute to a urinary tract infection. Several careful rinses of the p-valve with a mild vinegar/water solution are recom- mended after each dive. Many users have found that a standard restaurant style squeeze bottle or large bore medical syringe work well to introduce the solution through the catheter interface, and flush the valves thoroughly. Check valve replacement To inspect or replace the main umbrella valve, unscrew the button cap set screw (if used) and remove the threaded cap. Lift the edges of the umbrella valve to expose the center stem. Grasp the stem...
Open the catalog to page 9
Warranty Information All warranty requests must be accompanied by proof of original purchase from an Authorized Halcyon Dealer. Be sure to save your sales receipt, and present it whenever returning your Halcyon gear for warranty service. HALCYON warrants, to the original purchaser only, that the HALCYON Streamline P-Valve will be free of defects in materials and/or craftsmanship under normal diving use for one year from the date of purchase, provided proper care is performed on all materials as described within this manual. Should your P-valve prove to be defective for any reason it will be repaired...
Open the catalog to page 10
Find out more about Halcyon... Halcyon Dealer Network: www.halcyon.net/dealers/ Fair Trade Pricing: www.halcyon.net/ftp/ Product Information: www.halcyon.net/ DIR Gear FAQs: www.halcyon.net/dir/ Manuals: www.halcyon.net/manuals/ Halcyon DIR Dive Systems 1110 South Main St • High Springs
Open the catalog to page 12All HALCYON catalogs and brochures
 Product Guide
48 Pages
 Springheel Halcyon
2 Pages
 Halcyon tankbands
2 Pages
 Helios proteus webmanual
28 Pages
 Halcyon inflator
8 Pages
 explorer proteus manual 2008
28 Pages
 Explorer Eos manual 2010
28 Pages
 Halcyon Regulators 2010
16 Pages
 Halcyon BC2009
24 Pages