
- Catalogs
- Gemini Marine Products
- Gemlock folding strut assembly guide

Gemlock folding strut assembly guide

Gemlock folding strut assembly guide
Gemini Marine Canvas & Marine Products offers custom canvas solutions and a range of marine products, including the Gemlock folding struts. This guide provides instructions for assembling Gemlock folding struts, with an option to purchase fully assembled struts.
Required Components
To assemble one complete strut, the following components are needed:
- 1 x hinge (stainless steel or ABS plastic)
- 2 x pieces of tubing (7/8” or 1” outside diameter, with specific wall thickness for aluminum and stainless steel)
- 1 x sleeve tubing (.049 wall thickness, with specific outside diameter based on tubing size)
- 2 ¼” / 28 stainless steel set screws
- 2 x stainless steel spring balls
Assembly Procedure
- Cut the tubing to the desired lengths, noting that the hinge adds 1 ½” to the overall length. Clean burrs from the tubing ends.
- Drill holes for set screws ½” from the tube end using a 13/64” cobalt drill bit and cutting fluid.
- Position the spring balls in relation to the sleeve, ensuring they protrude fully to lock the strut open. Drill 9/32” holes aligned with the set screws, adjusting the distance based on sleeve length.
- Install the spring balls, insert the hinge into the tubing, align the hinge hole with the tubing hole, and install the set screws.
Additional Information
For further advice on installation, refer to the folding strut installation guide. Contact Gemini Marine Canvas for pricing and additional support.
Catalog excerpts

Gemini Marine Canvas & Marine Products Custom canvas • DrillSteady • Gemlock struts & hinges Simply elegant. Simply effective. Simply better. Gemlock folding strut assembly guide Please remember that in addition to selling all the components to make your own folding struts, we also sell fully assembled Gemlock folding struts – just cut to length and install. Please contact us for current pricing. If you choose to assemble your own struts, this guide will help. See also our folding strut installation guide for further advice. You will need: One complete strut will require the following parts (remember you may require a pair or more of struts for you application). • • • • • 1 x hinge (either stainless steel or ABS plastic, depending on your application) 2 x pieces of tubing - 7/8” or 1” outside diameter (aluminum should be .058 wall thickness, stainless steel should be .065 wall thickness) 1 x piece of .049 wall thickness sleeve tubing - 1” outside diameter if you are using 7/8” tubing or 1 1/8” outside diameter if you are using 1” tubing. 2 ¼” / 28 stainless steel set screws (or those provided with stainless hinges) 2 x stainless steel spring balls Strut assembly: 1. Cut tubing to desired lengths. IMPORTANT: the hinge will add 1 ½” to the strut’s overall length. Clean burrs from inside of tubing ends using a round file or rotary rasp. 2. Drill for set screws ½” from the tube end. Use 13/64” cobalt drill bit and cutting fluid. Quality and service since 1994 50 Tillson Avenue, Rockland, ME 04841 USA Phone/Fax: +1 207 596 7705 • US toll free 855 596 7705 www.ge
Open the catalog to page 1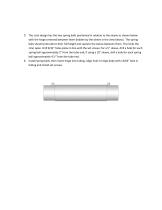
3. The strut design has the two spring balls positioned in relation to the sleeve as shown below with the hinge centered between them (hidden by the sleeve in the view below). The spring balls should protrude to their full height and capture the sleeve between them. This locks the strut open. Drill 9/32” holes place in line with the set screws: for a 5” sleeve, drill a hole for each spring ball approximately 2” from the tube end; if using a 10” sleeve, drill a hole for each spring ball approximately 4 ½” from the tube end. 4. Install spring balls, then insert hinge into tubing. Align hole in...
Open the catalog to page 2All Gemini Marine Products catalogs and brochures
 Our shipping policy
1 Page
 Returns and refunds
2 Pages
 Why shop with us?
1 Page
 Product specifications
1 Page

