Isiteek installation instructions

Isiteek installation instructions
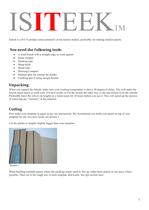
Isiteek is a DIY product designed for the marine market, particularly for creating smaller panels. This guide provides detailed instructions on the tools required, unpacking, cutting, joining planks, and creating panels with or without margin boards.
Tools Required
- Workbench with a straight edge
- Weights
- Masking tape
- Sharp knife
- Metal ruler
- Drawing compass
- Stelmax glue
- Caulking gun (if using margin boards)
Unpacking
Ensure the working temperature is above 20°C for ease of use. Re-roll the Isiteek with the top surface outside and leave it in a warm room for 24 hours to remove material memory.
Cutting
Create a paper template and build the panel on top for best results. Cut planks slightly larger than the template.
Joining the Planks
Align the first plank against a straight edge, apply Stelmax glue, and join the next plank with pressure. Use masking tape and weights to secure the planks. Remove excess glue after drying and sand the residue.
Creating Panels with Margin Boards
Trim the rough panel, align it on the template, and mark 60mm from the edges. Cut and sand the panel for an even edge. Glue margin boards, ensuring proper corner marking.
Caulking at Installation
Install the panel, leaving a 5mm seam for caulking. Use SABA 751 caulking compound and smooth it with a tool. Allow it to cure before removing masking tape and sanding excess.
Deck Designing Tips
- For decks based on the boat's centerline, ensure the panel is large enough to avoid slivers on edges.
- For decks without a centerline, start from the inside edge with a full plank.
- For decks leading from one area to another, align templates and mark caulking lines.
For further assistance, consult Isiteek/Flexiteek distributors.
Catalog excerpts
Isiteek is a D-I-Y product aimed primarily at the marine market, preferably for making smaller panels. You need the following tools: • • • • • • • • A work bench with a straight edge to work against Some weights Masking tape Sharp knife Metal ruler Drawing Compass Stelmax glue for joining the planks Caulking gun if using margin boards Unpacking When you unpack the Isiteek, make sure your working temperature is above 20 degrees Celsius. This will make the Isiteek much easier to work with. For best results re-roll the Isiteek the other way so the top surface is on the outside. Preferably leave the roll or cut lengths in a warm room for 24 hours before you use it. This will speed up the process of removing any “memory” in the material. Cutting First make your template in paper as per our instructions. We recommend you build your panel on top of your template for the very best result, see picture 1. Cut the planks to lengths slightly bigger than your template. Picture 1 When building multiple panels where the caulking seams need to line up, make these panels in one piece where possible. Then cut to the rough size of each template afterwards. See tips section later. 1
Open the catalog to page 1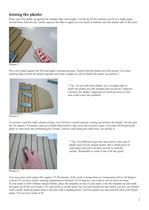
Joining the planks Place your first plank up against the straight edge and weight. Cut the tip off the stelmax nozzle at a slight angle around 8mm from the tip. Gently squeeze the tube to apply an even bead of Stelmax into the female side of the joint. Picture 2 Put a new plank against the first and apply constant pressure. Ensure that the planks are well joined. Use some masking tape to hold the planks together and some weights as well to flatten the panel, see picture 3. * Tip: As you add more planks, use a straight edge to check the planks are still straight and you haven’t induced a bend...
Open the catalog to page 2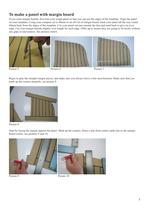
To make a panel with margin board If you want margin boards, first trim your rough panel so that you can see the edges of the template. Align the panel on your template. Using your compass set to 60mm or an off cut of margin board, mark your panel all the way round 60mm back from the edges of the template. Cut your panel out just outside the line and sand back to give an even edge. Cut your margin boards slightly over length for each edge. Offer up to ensure they are going to fit nicely without any gaps or unevenness. See pictures below. Picture 5 Picture 6 Picture 7 Begin to glue the straight...
Open the catalog to page 3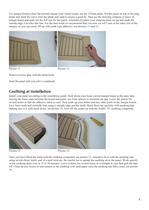
For margin boards where the normal margin won’t bend round, use the 125mm plank. Put the panel on top of the king plank and mark the curve, trim the plank and sand to ensure a good fit. Then use the drawing compass or piece of margin board and mark out the full size for the panel. Alternatively place your template back on top and mark the outside edge. Cut after this line. For the best result we recommend that you now cut off 5 mm of the inner line of the margin, so you can easily fill up with caulk type adhesive, see pictures 11 and 12. Picture 11 Picture 12 Remove excess glue with the sharp...
Open the catalog to page 4
Picture 15 Picture 16 Congratulations! You are now finished. You can now go boating, admire your handy work and start planning your next project! Deck designing Tips from the experts: Building a deck that is based on the centre line of the boat: i.e. a swim platform, cockpit sole, RIB deck. Fold your template in half to find the centre line and mark this carefully on the template. Build your rough sized panel out from this mark. You may need to have either the black seam on the centre line or the centre of a plank. You will know which once the panel is built so bear this in mind and make sure...
Open the catalog to page 5All Flexiteek catalogs and brochures
 Flexiteek-Flyer-GB
2 Pages
 Global Brochure
2 Pages
Archived catalogs
 Brochure
4 Pages