Catalog excerpts

Filippi Engineering SUMMARY: - BLADE OVERVIEW - VORTEX - OAR SETTING - OAR ADJUSTMENT - OAR DAMAGE ALL DATA AND DESIGN ARE DOWNLOADED FROM www.concept2.com OARS NAPOLI
Open the catalog to page 2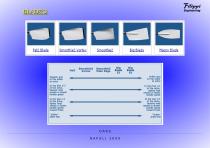
Sliarper grip heavier load handle speed llgliter load handle speed toward finish sliaft feel Fat2 Vortex Plain Edge Softer grip llgliter load handle speed lieavler load handle speed toward finish sliaft feel
Open the catalog to page 3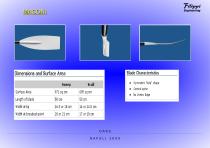
OARS NAPOLI
Open the catalog to page 4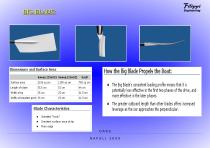
Blade Characteristics Greatest "hook" Greatest surface area at tip Plain edge How the Big Blade Propels the Boat: ■ The Big Blade's consistent loading profile means that it is potentially less effective in the first two phases of the drive, and more effective in the later phases, ■ The greater outboard length than other blades offers increased leverage as the oar approaches the perpendicular,
Open the catalog to page 5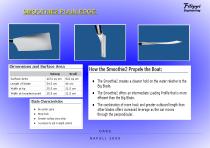
SMOOTH IE2 PLAIN EDGE: Dimensions and Surface Area Blade Characteristics More hook Greater surface area at tip Curvature to aid in depth control ■ The Srnoothie2 creates a cleaner hold on the water relative to the ■ The Srnoothie2 offers an intermediate Loading Profile that is more efficient than the Big Blade, ■ The combination of more hook and greater outboard length than other blades offers increased leverage as the oar moves
Open the catalog to page 6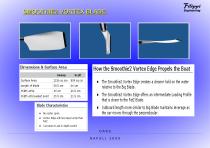
Dimensions & Surface Area Blade Characteristics Vortex Edge with less taper at tip than Curvature to aid in depth control
Open the catalog to page 7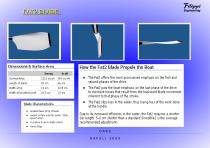
Dimensions & Surface Area Blade Characteristics Greatest taper at tip of blade Largest surface area for Vortex "sticky spoon" action Curvature to aid in depth control Vortex Edge How the Fat2 Blade Propels the Boat ■ The Fat2 offers the most pronounced emphasis on the first and second phases of the drive, ■ The Fat2 puts the least emphasis on the last phase of the drive to minimize losses that result from the backward blade movement inherent to that phase of the stroke, ■ The Fat2 slips less in the water, thus losing less of the work done Due to its increased efficiency in the water, the...
Open the catalog to page 8
VORTEX EDGE: OARS NAPOLI
Open the catalog to page 9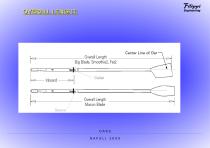
OVERALL LENGHT: OARS NAPOLI
Open the catalog to page 10
SETTING INBOARD: OARS NAPOLI
Open the catalog to page 11
SETTING INBOARD: OARS NAPOLI
Open the catalog to page 12
HANDLES ADJUSTING: OARS NAPOLI
Open the catalog to page 13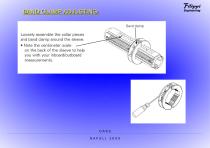
BAND CLAMP ADJUSTING: OARS NAPOLI
Open the catalog to page 14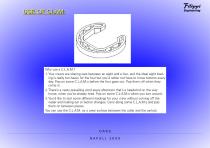
LYour crews are sharing oars between an eight and a four, and the ideal eight load- ing is really too heavy for the four but you'd rather not have to move buttons every day. Pop on some C.LAM.s before the four goes out. Pop them off when they 2. There's a nasty prevailing wind every afternoon that's a headwind on the way home, when you're already tired. Pop on some C.L.A.M.s when you turn around. 3. You'd like to test some different loadings for your crew without coming off the water and making oar or button changes. Carry along some C.L.A.M.s and pop them on between pieces. You can use the...
Open the catalog to page 15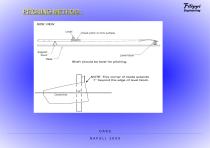
PITCHING METHOD : OARS NAPOLI
Open the catalog to page 16
PITCHING METHOD FOR OLDER SMOOTHIE AND FAT BLADES (all blades made from the older 1 996-2006 Smoothie mold) with or without Vortex Edge, When measuring these blades, we do not include the curved portion at the top edge Shaft must be level for pitching. End support Pitch meter Square sided level ■ or a leveled block of wood' IMPORTANT! [ Note that this edge Our standard procedure is to ship Smoothies with the pitch set so adjustment required. The Smoothie performs best with the flat surface of the blade pitched at 2 degrees during the drive. With our standard oars, this surface will be set...
Open the catalog to page 17
THE BUSHINGS TO ADJUST PITCH Adjust oarlock pitch from 1 to 7 degrees by selecting two bushings with the desired pitch (which is imprinted on the bushing) and inserting them in opposite directions as shown in the drawing. (If replacing existing oarlocks, keep in mind that most non-adjustable oarlocks have a built-in pitch of 4 degrees.)
Open the catalog to page 18
SHAFT DEFORMATION: OARS NAPOLI
Open the catalog to page 19
Shaft Damage_ Shaft damage should be treated if the damaged area becomes soft or crackles when squeezed by hand; or if there is visible sign of damage covering more than 1/4 of the shaft diameter. Minor damage; such as longitudinal cracks, can be repaired with fiberglass by you, the customer, These instructions are available above in the Online Oar Repair Sheets, In most cases of shaft damage, it is advisable to return the oars to Concept2 for repair, A shaft that has completely broken into two or more parts cannot be satisfactorily repaired, A "green stick fracture/' where the oar pieces...
Open the catalog to page 20
REPAIRING A DENT IN A EDGE OF BLADE: OARS NAPOLI Filippi Engineering
Open the catalog to page 21
kis possible for a portion of the fiberglass, and carbon fiber "skin" of the blade Lo separate due Lo impact at certain angles. The delaminated portion appears as a "tongue," usually at the Lip from I !A" to 1" wide, which may extend toward the center of the blade. See photo A, This type of damage can easily be repaired with no loss of blade integrity. Prepare blade: a. Clean the affected area with alcolol and dry Apply the epoxy Kith a knife, making su re the entire area under the delaminated "tongue" is covered. a. Clamp the "tongue" in its original position with the spring clamps or...
Open the catalog to page 22
REPLACING A VORTEX EDGE: l. Remove old vortex edge and scrape off al L old glue. 2. Check Lhat the vortex edge fits over the lip of the blade, NoLe thai the smooth side of the vortex edge is on the same side as the blade face. See photo C. 3. Deposit several dollops of glue in the vortex edge. Use no more than 1 tablespoon CIS ml) of glue per vortex 4. Install vortex edge on the blade. Al Lo w ho U r to dry. You mav want to use masking tape to hold the vortex edge in place while the glue dries.
Open the catalog to page 23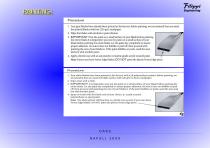
1. Tfbur gray blades have already been primed al the factory.1 So fore pair Ling, we recommend thaLyou sand the primed blades with fine (220 grit) sandpaper, 2. Wipe the blades with alcohol or paint thinner 3, IM PORTANT! Test the paint on a small surface of your blade before painting the entire blade. It is imperative you Lest the paint on a small surface of your blade before painting the entire blade, [jet the paint dry completely to assure proper adhesion, lie sure it does not bubble or pool off, then proceed with painting the rest of yourblade(s), [f the paint bubbles or peels, sand the...
Open the catalog to page 24All Filippi catalogs and brochures
-
FILIPPI MOULDS
1 Pages
-
Filippi catalog 2019
36 Pages
-
Filippi_Boats_Calendar_2018
38 Pages
-
RACING ROWING BOATS
27 Pages
-
The blade pitching
24 Pages
-
The stroke
30 Pages

