
- Catalogs
- EWOL Sailboat Propellers
- Libretto_Istruzioni_EWOL


Libretto_Istruzioni_EWOL
Libretto_Istruzioni_EWOL
- Sail-Drive Versions: Lock the propeller shaft, clean and grease the shaft thread, engage the propeller, tighten the lock nut with specified torque, and secure with a safety bolt. Use threadlocker if installed out of water.
- Shaft-Drive Versions: Conduct a pre-assembly check without the key, mark the shaft for alignment, adjust key height if needed, and drill a threaded hole for a safety bolt if desired.
- Align dot symbols on the ring nut and body for factory settings. Adjust pitch by turning the ring nut, aligning notches with the symbol. Each notch changes the blade angle by 0.25°, affecting engine RPM.
- Ensure the engine reaches the manufacturer's maximum speed by adjusting the blade angle.
- Feathering Position: For mechanical gearboxes, lock the shaft by engaging the gear at 3-4 knots. For hydraulic gearboxes, reduce engine speed and switch off with the gear engaged.
Catalog excerpts

PROPELLER EVOLUTION
Open the catalog to page 1
The EWOL E3 and E4 propellers are designed to be easily installed, adjusted and removed from the propeller shaft. These operations can be carried out both in or out of the water in just a few minutes, without the need to use a puller. Carefully follow the standard assembly, disassembly and maintenance instructions given below. Note: This booklet shows the layout of the three-blade propeller, but indiscriminately refers also to all 3- and 4-blade versions. Propeller assembly • Assembly for Sail-Drive versions • Assembly for Shaft-Drive versions Tightening torques Installation of the galvanic anode...
Open the catalog to page 2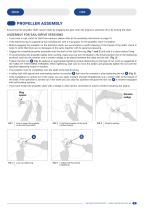
PROPELLER ASSEMBLY Ensure that the propeller shaft cannot rotate by engaging the gear when the engine is switched off or by locking the shaft. ASSEMBLY FOR SAIL-DRIVE VERSIONS • If you have a rope cutter for Sail-Drive versions, please refer to the assembly instructions on page 10. • If the Sail-Drive leg is supplied by the manufacturer with a ring spacer for the propeller, leave it installed. • Before engaging the propeller on the Sail-Drive shaft, we recommend a careful cleaning of the thread of the shaft, check in order to verify that there are no damages on the same together with its generous...
Open the catalog to page 3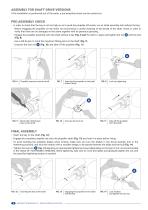
ASSEMBLY FOR SHAFT-DRIVE VERSIONS If the installation is performed out of the water, a pre-assembly check can be carried out. PRE-ASSEMBLY CHECK • In order to check that the key is not too high so as to push the propeller off-centre, run an initial assembly test without the key: - Before engaging the propeller on the shaft, we recommend a careful cleaning of the thread of the shaft, check in order to verify that there are no damages on the same together with its generous greasing. -E ngage the propeller assembly onto the shaft without a key (Fig. 6 and 7), hold it in place and tighten the nut...
Open the catalog to page 4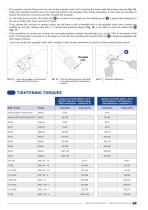
• The propeller must be fitted onto the cone of the propeller shaft until it reaches the mark made before key insertion (Fig. 15); failing this indicates that the key is too high and prevents the propeller from fitting completely. In this case you will have to reduce the thickness of the key and then reinstall the propeller. • For the shaft-drive versions, the safety bolt is included in the supply and the tightening nut ^aBis specifically designed for the use of safety bolt, upon customer's choice. • I f you choose this solution for greater safety, you will have to drill a threaded hole in the...
Open the catalog to page 5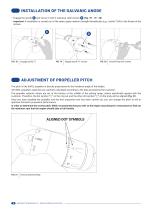
INSTALLATION OF THE GALVANIC ANODE • Engage the anode C and secure it with 3 stainless steel screws D (Fig. 18 - 19 - 20). • Important: if installation is carried out of the water, apply medium strength threadlocker (e.g. Loctite® 243) to the thread of the screws. Engage anode “D” screws Anode fixing with screws ADJUSTMENT OF PROPELLER PITCH The pitch of the EWOL propeller is directly proportional to the incidence angle of the blades. All EWOL propellers setpoints are carefully calculated according to the data provided by the customer. The propeller setpoint values are set at the factory at the...
Open the catalog to page 6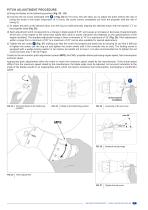
PITCH ADJUSTMENT PROCEDURE: a) Bring the blades to the feathering position (Fig. 22 - 23). b) Unscrew the set screw (indicated with F in Fig. 24) by 5-6 turns; this will allow you to adjust the pitch without the risk of losing the screw in the water (important: at 10 turns, the screw comes completely out from the propeller with the risk of losing it). c) To adjust the pitch at the desired value, turn the ring nut while precisely aligning the selected notch with the symbol “ the propeller body (Fig. 25). d) Each adjustment notch corresponds to a change in blade angle of 0.25° and causes an increase...
Open the catalog to page 7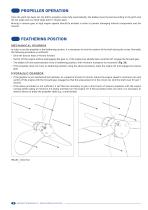
PROPELLER OPERATION Once the pitch has been set, the EWOL propeller works fully automatically: the blades move forward according to the pitch and the set angle and at a fixed angle pitch in reverse gear. Moving in reverse gear at high engine speeds should be avoided in order to prevent damaging internal components and the inverter. FEATHERING POSITION MECHANICAL GEARBOX In order to set the propeller in the feathering position, it is necessary to lock the rotation of the shaft during the cruise. Normally, the following procedure is sufficient: • Drive the boat at least 3-4 knots forward. • Switch...
Open the catalog to page 8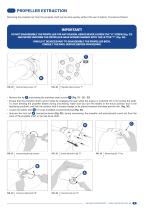
PROPELLER EXTRACTION Removing the propeller set from the propeller shaft can be done quickly without the use of pullers. Proceed as follows: IMPORTANT! DO NOT DISASSEMBLE THE PROPELLER FOR ANY REASON, HENCE NEVER LOOSEN THE “H” SCREW (Fig. 29) AND NEVER UNSCREW THE PROPELLER HEAD SCREWS MARKED WITH THE LETTER “T” (Fig. 30). SHOULD IT BE NECESSARY TO DISASSEMBLE THE PROPELLER BODY, CONSULT THE EWOL SERVICE BEFORE PROCEEDING. Spring clamp screw “H” Propeller head screws “T” • Remove the tip C unscrewing the stainless steel screws D (Fig. 31 - 32 - 33). • Ensure that the propeller shaft cannot rotate...
Open the catalog to page 9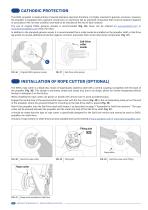
CATHODIC PROTECTION The EWOL propeller is made entirely of special stainless steel and, therefore, it is highly resistant to galvanic corrosion. However, the propeller is equipped with a galvanic anode (zinc or aluminium tip) as standard component that must be replaced regularly in accordance with its wear condition (normally to be checked at the end of each season). The use of original EWOL galvanic anodes is recommended (Fig. 36), these can be ordered on www.ewoltech.com or www.ewol-propellers.com (from the USA). In addition to the standard galvanic anode, it is recommended that a collar anode...
Open the catalog to page 10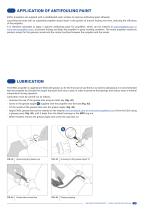
APPLICATION OF ANTIFOULING PAINT EWOL propellers are supplied with a sandblasted outer surface to improve antifouling paint adhesion. Launching the boat with an unpainted propeller would result in the growth of marine fouling over time, reducing the efficiency of the propeller. It is therefore advisable to apply a specific antifouling paint for propellers, which can be ordered at www.ewoltech.com or www.ewol-propellers.com, to prevent fouling and keep the propeller in good working condition. The entire propeller should be painted, except for the galvanic anode and the contact surface between...
Open the catalog to page 11All EWOL Sailboat Propellers catalogs and brochures
 schede
1 Page
 ORION
1 Page
 English brochure
2 Pages
 E-cubed propellers
8 Pages
Archived catalogs
 Brochure
8 Pages
- Shaft drive propeller
- Nautical boat propeller
- 4-blade propeller
- 3-blade propeller
- Bronze propeller
- 5-blade propeller
- Sailboat propeller
- Folding propeller
- Variable-pitch propeller
- Stainless steel propeller
- Sail-drive propeller
- Yacht propeller
- Custom-made propeller
- Controllable pitch propeller
- Adjustable pitch propeller
- Heavy-duty propeller