- Catalogs
- COUSIN TRESTEC
- Splicing guide
Splicing guide

Splicing guide
Catalog excerpts

RiOPE INNOVATION
Open the catalog to page 1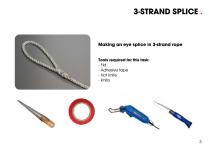
3-STRAND SPLICE Making an eye splice in 3-strand rope Tools required for this task: - Fid - Adhesive tape - Hot knife - Knife
Open the catalog to page 5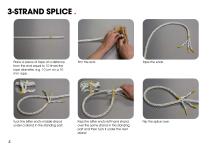
Place a piece of tape at a distance from the end equal to 10 times the rope diameter, e.g. 10 cm on a 10 mm rope. Tuck the bitter end’s middle strand under a strand in the standing part. Pass the bitter end’s left-hand strand over the same strand in the standing part and then tuck it under the next strand. Flip the splice over
Open the catalog to page 6
Tuck the bitter end’s remaining strand under the standing part’s remaining strand, continuing to work counter to the lay of the rope. You have completed the first set of tucks. Make three more sets of tucks, continuing to work against the lay of the standing part. This is what your splice should look like. Trim the remaining ends. Your splice is finished.
Open the catalog to page 7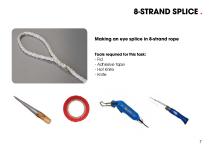
8-STRAND SPLICE . Making an eye splice in 8-strand rope Tools required for this task: - Fid - Adhesive tape - Hot Knife - Knife
Open the catalog to page 9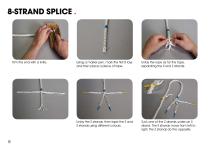
Trim the end with a knife. Unlay the rope as far the tape, separating the S and Z strands. Unlay the S strands, then tape the Z and S strands using different colours. Using a marker pen, mark the first 8 lays and then place a piece of tape. Tuck one of the Z strands under an S strand. The S strands move from left to right, the Z strands do the opposite.
Open the catalog to page 10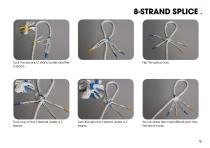
Tuck the second Z strand under another S strand. Tuck one of the S strands under a Z strand. Flip the splice over. Tuck the second S strand under a Z strand. You’ve done the most difficult part, the first set of tucks.
Open the catalog to page 11
Tuck the Z strands under the S strands, following the lay. Tuck the S strands under the Z strands, following the lay. You’ve completed the second set of tucks. Flip the splice over. Following the same procedure, make two more sets of tucks, giving a total of four sets. Trim the remaining ends and remove the tape.
Open the catalog to page 12
LOCK SPLICE . Making an eye splice in hollow-braided rope Tools required for this task: - Hollow needle - Marker - Knife
Open the catalog to page 13
LOCK SPLICE . From the end, make a first mark at a distance of 100 times the diameter, e.g. 60 cm for a 6 mm rope. Insert the end into a hollow needle and then push it through the braid at the second mark. The first mark must be pulled through. Determine the circumference of the eye and then make a second mark. At the first mark, pass the eye through the braid. Use the hollow needle to help. Pull the eye to put the splice in place.
Open the catalog to page 14
LOCK SPLICE . Insert the end into the hollow needle and bury the braid over a distance equal to 100 times its diameter. To do it right, we’re now going to make a rat’s tail. Make 8 marks: Alternate strands for the first three and last three marks and two juxtaposed strands for the two central marks. Using your needle, pull out the marked strands. This is what it should look like.
Open the catalog to page 15
LOCK SPLICE . Trim the ends of the strands. Your splice is finished. You now have a tapered end (rat’s tail). In order to reinsert the end, compact the splice.
Open the catalog to page 16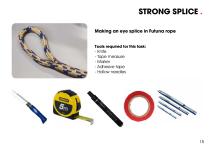
STRONG SPLICE Making an eye splice in Futuna rope Tools required for this task: - Knife - Tape measure - Marker - Adhesive tape - Hollow needles
Open the catalog to page 17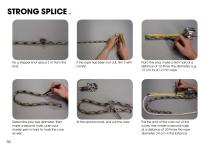
STRONG SPLICE . Tie a stopper knot about 3 m from the end. From the end, make a first mark at a distance of 10 times the diameter, e.g. 12 cm for a 12 mm rope. Determine your eye diameter, then make a second mark, push your marker pen in hard to mark the core as well. If the rope has been hot cut, trim it with a knife. At the second mark, pull out the core. Pull the end of the core out of the cover, then make a second mark at a distance of 20 times the rope diameter, 24 cm in this instance.
Open the catalog to page 18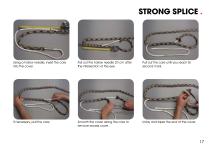
STRONG SPLICE . Using a hollow needle, insert the core into the cover. Pull out the hollow needle 20 cm after the intersection of the eye. Pull out the core until you reach its second mark. If necessary, pull the core. Smooth the cover along the core to remove excess cover. Unlay and taper the end of the cover.
Open the catalog to page 19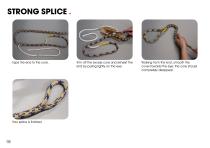
STRONG SPLICE . Your splice is finished. Trim off the excess core and reinsert the end by pulling lightly on the eye. Working from the knot, smooth the cover towards the eye; the core should completely disappear.
Open the catalog to page 20
TUCK SPLICE Making an eye splice in rope with an exotic fibre core (Dyneema, Aramid) Tools required for this task: - Knife - Scissors - Tape measure - Marker - Adhesive tape - Hollow needle
Open the catalog to page 21
TUCK SPLICE . If your rope has an intermediate sheath, remove it from the first three metres. To do this, pull back the cover, cut the cover threads and then slide off the intermediate sheath. Retain the intermediate sheath, which we will use later. If the rope has been hot cut, trim the end with a knife. Expose a length of core equal to 20 times the rope diameter, e.g. 20 cm on a 10 mm rope. Make a first mark at a distance of 40 times the rope diameter, e.g. 40 cm for a 10 mm rope. Ensure that you also mark the rope core.
Open the catalog to page 22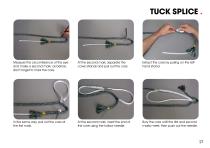
TUCK SPLICE . Measure the circumference of the eye and make a second mark; as before, don’t forget to mark the core. At the second mark, separate the cover strands and pull out the core. Extract the core by pulling on the lefthand strand. In the same way, pull out the core at the first mark. At the second mark, insert the end of the core using the hollow needle. Bury the core until the first and second marks meet, then push out the needle.
Open the catalog to page 23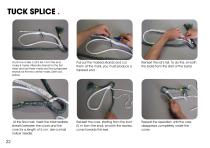
TUCK SPLICE . You’ll now make a rat’s tail. From the end, make 8 marks: Alternate strands for the first three and last three marks and two juxtaposed strands for the two central marks. (See lock splice) Reinsert the rat’s tail. To do this, smooth the braid from the start of the burial. At the first mark, insert the intermediate sheath between the cover and the core for a length of 5 cm. Use a small hollow needle. Pull out the marked strands and cut them at the mark; you must produce a tapered end. Reinsert the core; starting from the knot (5 m from the end), smooth the excess cover towards the...
Open the catalog to page 24
TUCK SPLICE . Using a hollow needle, insert the remaining core into the intermediate sheath. Pull the intermediate sheath towards you in order to insert the end of the cover beneath the rope cover. To facilitate the operation, secure your eye to a fixed point. Once this is done, trim off the excess cover. Your splice is finished.
Open the catalog to page 25All COUSIN TRESTEC catalogs and brochures
 gamme Elagage
12 Pages
 « Lignes pour Kitesurf »
2 Pages
 CATALOGUE_YACHTING
52 Pages
 Safety ropes for PPE catalog
32 Pages
 Yatching Ropes Catalogue
28 Pages
 Constrictor UK
8 Pages


Archived catalogs
 Yachting Catalogue
32 Pages
 Mooring & Anchoring
2 Pages
 Racing
3 Pages
 Rigging technical
3 Pages
 Dinghies & Cruising
2 Pages
 Yacht 3D
2 Pages
- Marine rope
- Yachtwerft Meyer cleat
- Double-braid line
- Single braid line
- Marine sailboat rope
- Polyester core line
- Multipurpose cordage
- Mooring cordage
- Polyester sheath cordage
- Dyneema® core cordage
- Nautical shackle
- Boat rope
- Sheet cordage
- Halyard rope
- Shackle for sailboats
- Twisted rope
- Towing cordage
- Floating line
- Polypropylene core line
- Racing sailboat cordage