
- Catalogs
- CMS Marine
- PLUS INstallation and Operation Guide

PLUS INstallation and Operation Guide

PLUS INstallation and Operation Guide
This document provides guidance for the installation and operation of the SonicShield PLUS system, excluding the antifouling system which is covered separately. It is divided into two main sections: Installation Guide and Operation Manual.
- Kit Contents: The kit includes a GSM Modem, PIR, Sound Bomb, Float Switch, and a SIM Card (UK only).
- PIR Installation: Install the PIR in the main cabin area, avoiding direct sunlight and obstructions, ensuring the cable reaches the control unit.
- Float Switch Installation: Attach the float switch to the bilge area bulkhead to detect water presence and send alerts via SMS.
- Sound Bomb Installation: Install the sound bomb, which emits 111Db, in the saloon area.
- GSM Modem Installation: Insert the SIM card into the modem and ensure strong signal reception for sending/receiving messages.
- Control Box Connections: Connect cables to the control unit as per instructions, ensuring no power is connected during this process.
- Setting Up Master and Secondary Numbers: Program N1 (mandatory) and N2 (optional) for system control and alerts.
- Table of Commands: Includes commands for programming numbers, arming/disarming the alarm, and setting entry/exit times.
- Visual List of Commands: Screenshots demonstrate command inputs and system responses.
- Alerts and Warnings: Describes messages sent for entry detection, alarm status, and other alerts.
- Alarm Tripped: An 'Alarm Tripped' message is sent when the alarm is activated due to inaction after an 'Entry Detected' alert, triggering the sound bomb. Reset by sending an 'Alarm On' command or allow automatic reset if 'ReArm' is enabled.
- False Alarm: A 'False Alarm' message is sent when movement is detected by the PIR sensor without activating the alarm, linked to the PIR COUNT sensitivity setting.
- Float Alarm - HI: Sent when the bilge float switch is activated, indicating potential excess water, changing FLOAT status to 'HI'.
- Last Error Reset - Float: Sent when the float switch returns to normal, changing FLOAT status to 'OK'.
- Low Voltage Alert: Sent when battery voltage drops below specified levels (VB12 < 11.60 or VB24 < 23.20).
- Last Error Reset - Battery: Sent when battery voltage recovers above specified levels (VB12 > 11.60 or VB24 > 23.20).
Catalog excerpts

SonicShield PLUS Installation and Operation Manual SonicShield II PLUS SonicShield III PLUS Issue 3 CMS Marine 4 St Albans Road Gloucester GL2 5FW +44 (0) 1452 380100 www.cmsmarine.co.uk [email protected]
Open the catalog to page 1
SonicShield PLUS Installation Page 3 - Kit Contents+ PIR Installation Page 4 - Float Switch Installation Page 5 - Sound Bomb Installation Page 6 - GSM Modem Installation Page 7 - Control Box connections Operation Manual Page 8 - Operation Manual Summary Page 9 - Table of commands Page 10 to 18 - Visual list of commands Page 18 to 20 - Visual list of alerts / warnings
Open the catalog to page 2
Welcome Thank you for choosing CMS Marine to supply your SonicShield Plus. This guide will support you through the installation of the PLUS option you have added to your SonicShield product. The guide is split into 2 sections. The 1 st section is an installation guide and the 2nd section is the operation manual for your unit. Installation of the antifouling system (control box location, transducer installation etc) is covered in a separate manual. We would advise you follow the Installation manual before adding the alarm system. If you have already installed your system please continue to follow...
Open the catalog to page 3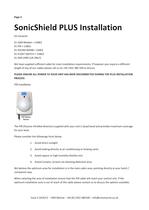
SonicShield PLUS Installation Kit Contents X1 GSM Modem + CABLE X1 PIR + CABLE X1 SOUND BOMB + CABLE X1 FLOAT SWITCH + CABLE X1 SIM CARD (UK ONLY) We have supplied sufficient cable for most installation requirements. If however you require a different length of any of our cables please call us on +44 1452 380 100 to discuss PLEASE ENSURE ALL POWER TO YOUR UNIT HAS BEEN DISCONNECTED DURING THE PLUS INSTALLATION PROCESS. PIR installation The PIR (Passive InfraRed detector) supplied with your unit is Quad band and provides maximum coverage for your boat. Please consider the followings hints below...
Open the catalog to page 4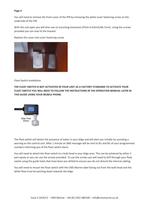
Page 4 You will need to remove the front cover of the PIR by removing the white cover fastening screw on the underside of the PIR. With the unit open you will then see x2 mounting knockouts (Pitch=2.63inch/66.7mm). Using the screws provided you can now fix the bracket. Replace the cover and cover fastening screw. Float Switch Installation THE FLOAT SWITCH IS NOT ACTIVATED IN YOUR UNIT AS A FACTORY STANDARD TO ACTIVATE YOUR FLOAT SWITCH YOU WILL NEED TO FOLLOW THE INSTRUCTIONS IN THE OPERATION MANUAL LATER IN THIS GUIDE USING YOUR MOBILE PHONE. The float switch will detect the presence of water...
Open the catalog to page 5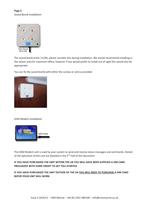
Page 5 Sound Bomb Installation The sound bomb emits 111Db, please consider this during installation. We would recommend installing in the saloon area for maximum effect, however if you would prefer to install out of sight this would also be appropriate. You can fix the sound bomb with either the screws or velcro provided. The GSM Modem unit is used by your system to send and receive status messages and commands. Details of the operation of this unit are detailed in the 2nd half of this document. IF YOU HAVE PURCHASED THE UNIT WITHIN THE UK YOU WILL HAVE BEEN SUPPLIED A SIM CARD PRELOADED WITH...
Open the catalog to page 6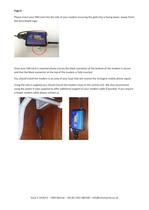
Page 6 Please insert your SIM Card into the side of your modem ensuring the gold chip is facing down. (away from) the SonicShield Logo. Once your SIM Card is inserted please ensure the black connector at the bottom of the modem is secure and that the black connector at the top of the modem is fully inserted. You should install the modem in an area of your boat that will receive the strongest mobile phone signal. Using the velcro supplied you should mount the modem close to the control unit. We also recommend using the plastic P-clips supplied to offer additional support to your modem cable if...
Open the catalog to page 7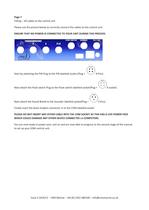
Page 7 Fitting – All cables to the control unit Please use the picture below to correctly connect the cables to the control unit. ENSURE THAT NO POWER IS CONNECTED TO YOUR UNIT DURING THIS PROCESS. Start by attaching the PIR Plug to the PIR labelled socket (Plug = Next attach the Float switch Plug to the Float switch labelled socket(Plug = Next attach the Sound Bomb to the Sounder labelled socket(Plug = Finally insert the black modem connector in to the COM labelled socket. PLEASE DO NOT INSERT ANY OTHER CABLE INTO THE COM SOCKET AS THIS HAS A LIVE POWER FEED WHICH COULD DAMAGE ANY OTHER DEVICE...
Open the catalog to page 8
Operation Manual PLEASE ENSURE YOU SET UP YOUR MASTER NUMBER (N1) AND YOUR SECONDARY NUMBER (N2) FOLLOWING THE STEPS BELOW. The telephone number for your GSM unit can be found on the card that was supplied with your Pay as you Go Sim card (UK ONLY). We advise that you store this number in your phone as a contact to aid set up and also to identify your unit in the future. In our screen shots below you will see that we have named the contact SonicShield Plus GSM. N1 = Master Number e.g (N1=+441234111111) Mandatory N2 = Secondary Number e.g (N2=+441234222222) Optional / Advised PLEASE NOTE THAT...
Open the catalog to page 9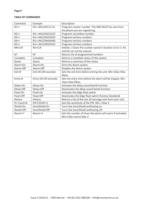
Page 9 TABLE OF COMMANDS Command N1=+ N? Complete Query Alarm=On Alarm=Off Exit=# N? Complete Query Alarm=On Alarm=Off Exit=30 (30 seconds) Delay=On Delay=Off Float=On Float=Off History Pir Count=# Shield=On Shield=Off Rearm=? Delay=On Delay=Off Float=On Float=Off History PIR COUNT=2 SonicShield On SonicShield Off Rearm=3 Description Programs master number. The SMS MUST be sent from the phone you are registering. Programs secondary number. Programs tertiary numbers Programs tertiary numbers Programs tertiary numbers Deletes / Clears the number saved in location 3,4 or 5. N1 and N2 can not be...
Open the catalog to page 10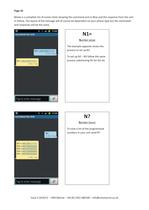
Page 10 Below is a complete list of screen shots showing the command sent in Blue and the response from the unit in Yellow. The layout of the message will of course be dependent on your phone type but the commands and responses will be the same. N1= Number setup The example opposite shows the process to set up N1. To set up N2 – N5 follow the same process substituting N1 for N2 etc. N? Number Query To view a list of the programmed numbers in your unit send N?
Open the catalog to page 11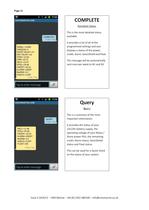
COMPLETE Complete Status This is the most detailed status available. It provides a list of all of the programmed settings and also displays a status of the power, credit, alarm, SonicShield and float. This message will be automatically sent once per week to N1 and N2 Query Query This is a summary of the most important information. It provides the status of your 12v/24v battery supply, the operating voltage of your Mains / Shore power PSU, the remaining credit, Alarm status, SonicShield status and Float status. This can be used for a Quick check on the status of your system
Open the catalog to page 12All CMS Marine catalogs and brochures
 Installation Manual
15 Pages
