Operation & Maintenance Manual Model 0625-G
1 /15Pages

Operation & Maintenance Manual Model 0625-G
1 /15Pages
Catalog excerpts
Operation & Maintenance Manual
Open the catalog to page 1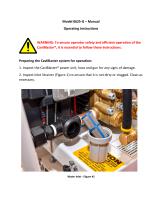
Model 0625-G – Manual Operating Instructions WARNING: To ensure operator safety and efficient operation of the CaviBlaster®, it is essential to follow these instructions. Preparing the CaviBlaster system for operation: 1. Inspect the CaviBlaster® power unit, hose and gun for any signs of damage. 2. Inspect Inlet Strainer (Figure-1) to ensure that it is not dirty or clogged. Clean as necessary. Water Inlet - Figure #
Open the catalog to page 2
3. Check lubricating oil(s) and fuel levels: Assure proper oil level in engine crankcase, pressure pump and fuel level in fuel tank (gasoline). Figures 2, 3, 4. Engine Oil Level - Figure #2 Pump Oil Level - Figure #3 Fuel Level - Figure #4 4. Fill lubricating oil(s) to proper level(s) in the pressure pump (Yellow cap on pump) (Figure-5) and engine (Yellow cap on head cover) (Figure-6) per manufacturers’ operating manuals. Pump Oil Yellow Cap - Figure #5 Yellow Cap on head cover - Figure #6 NOTE: Pressure Pump Oil (SAE 30W-Non-Detergent) Figure-7; Engine Oil (SAE 10W 30) Figure-8 Pressure Pump...
Open the catalog to page 3
5. To provide water to the Model 0625-G CaviBlaster® power unit, connect feed pump to the water inlet connection on the power unit (Figure-9). Connect Feed Pump to Water Inlet - Figure #9 Inspect inlet connection (Figure-10) to ensure that it is not clogged. Clean if necessary Connect Feed Pump to Water Inlet - Figure #10
Open the catalog to page 4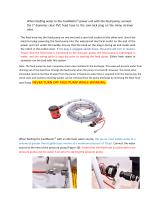
When feeding water to the CaviBlaster® power unit with the feed pump, connect the 1″ diameter clear PVC feed hose to the cam-lock plug on the inline strainer inlet. The feed hose has the feed pump on one end and a cam-lock socket on the other end. Insert the electrical plug powering the feed pump into the waterproof electrical outlet on the end of the power unit cart under the handle. Ensure that the knob on the plug is facing up and mates with the notch in the outlet cover. If the plug is engaged upside down, the pump will turn in reverse. Ensure that the feed hose is connected to the pressure...
Open the catalog to page 5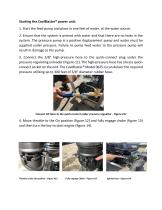
Starting the CaviBlaster® power unit: 1. Start the feed pump and place in one feet of water, at the water source. 2. Ensure that the system is primed with water and that there are no leaks in the system. The pressure pump is a positive displacement pump and water must be supplied under pressure. Failure to pump feed water to the pressure pump will result in damage to the pump. 3. Connect the 3/8″ high-pressure hose to the quick-connect plug under the pressure-regulating unloader (Figure-11). The high-pressure hose has a brass quickconnect socket on the end. The CaviBlaster® Model 0625-G can deliver...
Open the catalog to page 6
5. Connect the gun to the high-pressure hose (Figure-15) and submerge the gun in water. Connecting the gun to the High Presure Hose - Figure #15 6. It is recommended that the gun trigger be in the open or “ON” position when starting the engine. This will prevent a pressure shock wave from damaging the pump in the instant that the engine is started. 7. Divers and nearby personnel must use appropriate hearing protection prior to starting the engine. 8. Be sure the engine run switch is on (figure 12). Set the choke knob to close the choke if the engine is cold or has not been running (figure 13)....
Open the catalog to page 7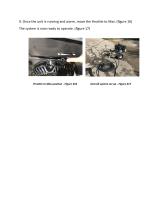
9. Once the unit is running and warm, move the throttle to Max. (figure 16) The system is now ready to operate. (figure 17) Throttle to Max position - Figure #16 Overall system set up - Figure #17
Open the catalog to page 8
Recommendations for Effective Results. Once the engine is throttled up to operating speed and the water trigger is pulled, the diver should find the most effective distance between the gun nozzle and the surface being cleaned. When the diver is ready to commence cleaning operations, ensure that the gun trigger is in the open or “ON” position, the gun is submerged in the water and the water source is on, prior to throttling up the engine. Ensure that the power unit operator and other people working in the vicinity of the power unit wear appropriate hearing protection when the engine is running....
Open the catalog to page 9
efficient cavitation performance and will degrade the cleaning capability of the CaviBlaster® system. 2. Follow all safety regulations that may be applicable to the work being performed. 3. If the diver operating the CaviBlaster® unit must be replaced or the cleaning operation must be terminated, disengage the pressure pump by pulling down the throttle lever in to the idle position and release the water pressure remaining in the hose(s) by moving the gun trigger to the open or “ON” position while under water. Revert to step 1 of the operating instructions when the diver or replacement is ready...
Open the catalog to page 10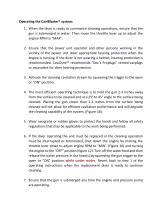
Operating the CaviBlaster® system: 1. When the diver is ready to commence cleaning operations, ensure that the gun is submerged in water. Then move the throttle lever up to adjust the engine RPM to “MAX”. 2. Ensure that the power unit operator and other persons working in the vicinity of the power unit wear appropriate hearing protection when the engine is running. If the diver is not wearing a helmet, hearing protection is recommended. CaviDyne™ recommends “Doc’s Proplugs” vented earplugs or equivalent for diver hearing protection. 3. Activate the cleaning cavitation stream by squeezing the...
Open the catalog to page 11
Adjusting the CaviBlaster® system for maximum performance: Recommended Calibration Method 1. Using the optional calibration pressure gauge set, situated between the pressure hose and the CaviBlaster® gun, the output water pressure should be adjusted to 2,500 PSI, with the gun submerged and the gun trigger in the open or “ON” position. The pressure is adjusted by turning the black knob on the end of the pressure-regulating unloader (Figure 19). This adjustment increases or decreases the flow of water through the bypass hose when the CaviBlaster® gun trigger is in the open or “on” position. The...
Open the catalog to page 12
Shutting down the CaviBlaster® power unit: 1. Adjust engine RPM to “MIN” (Figure 16). 2. Shut off the engine by turning the run switch to the “OFF” position (Figure 12). 3. Squeeze the gun trigger to the open or “ON” position to release the water pressure remaining in the hose(s) while the gun is submerged. 4. It is now safe to remove the gun from the water. 5. Flush the system and rinse the power unit with fresh water at the end of the day. Maintenance of the CaviBlaster® unit: 1. Check the oil level and consistency in the engine and pressure pump every day. 2. Flush the system and rinse the...
Open the catalog to page 13All CaviDyne catalogs and brochures
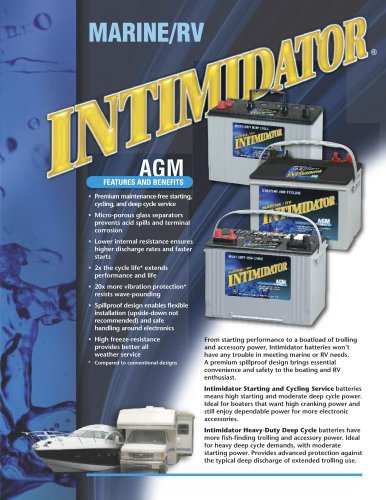 AGMIntimidator Battery
2 Pages
 Plunger Pumps
20 Pages
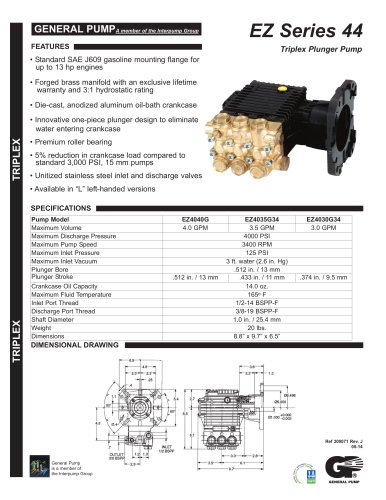 T RIP L E X
2 Pages
 CH260-CH440
100 Pages
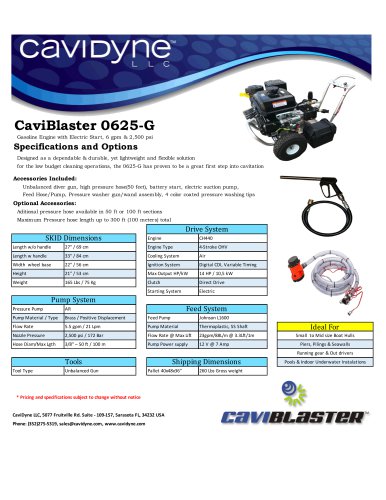 CaviBlaster 0625-G
1 Page
 CaviBlaster 1030-ROV
1 Page


