MODEL 30 AUTOMATIC HIGH FLOW GLASS BEAD DISPENSING GUN
1 /4Pages

MODEL 30 AUTOMATIC HIGH FLOW GLASS BEAD DISPENSING GUN
1 /4Pages
Catalog excerpts

MODEL 30 AUTOMATIC HIGH FLOW GLASS BEAD DISPENSING GUN 6277-3522-5 and 6277-3525-7 The Model 30 High Flow Glass Bead Dispensing Gun delivers glass beads at the rate of up to 60 lbs./min. (A pressure tank with follower plate and bottom outlet is recommended for supply of glass beads to the gun.) Air for atomization is not required. “On-off” of the gun is provided by the air cylinder. It is located at the rear of the gun body. The minimum recommended air pressure to the cylinder is 50 PSIG. ASSEMBLY INSTRUCTIONS The gun should never be operated without having the guard (25) installed. All threads, including the hose connections, should be clean of beads before mating. The needle (12) should always be kept clean. Failure to follow these precautions may result in damage to components. Mount the Model 30 gun on a 1/2" diameter steel rod. (Not furnished with gun. Please order separately, Model 54-380.) The rod should have a flat area to receive the mounting screw (16) for locking the gun to the rod. Attach the air hose to the 1/4" NPS(m) nipple (18) and attach the glass bead supply hose to the 3/4" NPS(m) inlet on the gun head (13). NOTE Be sure mating threads are clean of beads. DISASSEMBLY INSTRUCTIONS Read entire disassembly instructions before attempting repairs. Do only that which is required to repair a specific trouble. Complete disassembly may not be required. 1. Remove screw (24) and guard (25). 2. Remove cap (3), control screw (1) and lock-nut (2). Remove springs (4) and (5). 3. Remove deflection nozzle (29) and nozzle insert (28) by unscrewing retainer ring (10). 4. Using a 11/16" socket, hold piston rod (6) and loosen nut (19) with a 7/16" wrench. 5. Unscrew needle (12) from piston rod (6) and nut (19). Remove take-up screw (20) from gun head (13). Since o-ring (21) and take-up screw (20) offer resistance to removal from needle (12), unscrew take-up screw (20) from needle (12), rather than pulling forcefully. Remove needle (12) from front of gun head (13). 6. Remove wiper (22) and retainer (23) from gun head (13). 7. Remove piston rod (6) and piston (8) by feeding air into the air inlet (18) at 5-10 PSIG. 8. Remove screw (14) and lockwasher (15) and separate gun body (17) from gun head (13). Before assembling gun, clean off all mating surfaces and remove any beads clinging to them. 1. Attach gun head (13) to gun body (17) with screw (14) and lockwasher (15). 2. Insert needle (12) through front of gun head (13). Check wiper (22) and retainer (23) and replace if worn or damaged. Install retainer (23) and wiper (22) through rear of gun head (13) onto needle (12). 3. Check o-ring (21) and replace if worn or damaged. Seat o-ring (21) correctly into take-up screw (20). Screw take-up screw o-ring assembly (20, 21) over needle threads (12) and into gun head (13) to finger tightness and tighten additionally 1/8 to 1/4 turn by wrench. 4. Screw nut (19) onto needle (12). 5. Check u-cup (9) and two o-rings (7) and replace if worn or damaged. Seat two o-rings (7) correctly onto piston rod (6) and seat u-cup (9) correctly onto piston (8). Insert piston rod (6) through piston (8) and insert piston rod/piston assembly (6, 8) into gun body (17). 6. Push piston rod (6) all the way into gun body (17) and hold it there with 11/16" socket wrench. Screw needle (12) deep into piston rod (6) while, at same time, turning nut (19), as required, to avoid “lockup”. 7. Hold gun with nozzle end up. Insert nozzle insert (28) and deflection nozzle (29). Do not install retainer ring (10). 8. Unscrew piston rod (6) with socket wrench, while pushing on piston rod (6) and allow needle (12) to “lift” nozzle insert (29) and deflection nozzle (29) 3/32" off gun head (16). 9. While preventing needle (12) from turning, and while pushing on piston rod (6), screw nut (19) forward so as to lock against take-up screw (20). Tighten nut (19) securely with 7/16" wrench. 1 0. Install spring (4) and cap (3). 1 1. Install spring (5), lock-nut (2) and control screw (1). 1 Insert nozzle insert (28) and deflection nozzle (29) into gun 2. head (13). 1 Check o-ring (11) and replace if worn or damaged. Seat 3. o-ring (11) correctly onto gun head (13). 1 Screw retainer ring (10) onto gun head (13) and make hand 4. tight. 15. Attach guard (25) with screw (24) and nut (26).
Open the catalog to page 1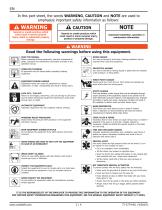
EN In this part sheet, the words WARNING, CAUTION and NOTE are used to emphasize important safety information as follows: Hazards or unsafe practices which could result in severe personal injury, death or substantial property damage. ! CAUTION Hazards or unsafe practices which could result in minor personal injury, product or property damage. Important installation, operation or maintenance information. Read the following warnings before using this equipment. READ THE MANUAL Before operating finishing equipment, read and understand all safety, operation and maintenance information provided in...
Open the catalog to page 2
EN BINKS MODEL 30 AUTOMATIC HIGH-FLOW GLASS BEAD DISPENSING GUN NOTE O-ring (21) fits in groove inside item (20). ▲ Also available in 6-271 Repair Kit. Please order separately. • Also available in 6-1287 Big Bore Kit. Please order separately. * Also available in 54-3116 Wiper Kit. Please order separately. ■ or Standard Nozzle set-ups, see Part Sheet 2151 or order F optional 45-101 Assembly.
Open the catalog to page 3
EN WARRANTY POLICY This product is covered by Carlisle Fluid Technologies’ materials and workmanship limited warranty. The use of any parts or accessories, from a source other than Carlisle Fluid Technologies, will void all warranties. Failure to reasonably follow any maintenance guidance provided may invalidate any warranty. For specific warranty information please contact Carlisle Fluid Technologies. Carlisle Fluid Technologies is a global leader in innovative finishing technologies. Carlisle Fluid Technologies reserves the right to modify equipment specifications without prior notice. DeVilbiss®,...
Open the catalog to page 4All Binks catalogs and brochures
 HVLP Spray Guns
20 Pages
 FRP
FRP2 Pages
 TROPHY SERIES
10 Pages
 Model 21 Automatic Spray Gun
2 Pages
- Taylor Made boat pump
- Taylor Made transfer pump
- Taylor Made positive-displacement pump
- Shipyard gun
- Paint spraying machine
- Shipyard paint spraying machine
- Stainless steel pump
- Spraying gun
- Shipyard pump
- Lubrication pump
- Mobile paint spraying machine
- Piston pump
- Paint pump
- ATEX pump
- Automatic gun
- HVLP gun
- Chop gun
- Shipyard tank
- Internal mixing gun
- External mixing gun