Catalog excerpts

WAROO 07: THE BEST JUST GOT BETTER
Open the catalog to page 1
BEST KITEBOARDING USERS MANUAL Thank you for purchasing a Best kite. Please read this manual carefully and in its entirety before using your new Best kite. Kiteboarding/kitesurfing is an extreme sport, has numerous inherent risks and dangers, and poses substantial risk of cuts, scrapes, bruises, broken bones, loss of limbs, loss of vision, paralysis, and other serious, permanent and disabling injuries and death to the rider and others. Some of the sources of these risks include but are not limited to: • Being lifted by the kite and then dropped or slammed into the ground, trees, rocks,...
Open the catalog to page 2
BestKiteboarding thanks you for making the decision to purchase a new Waroo 07 SLE 'supported leading edge' inflatable kite, we are sure that this kite will repay your decision to purchase Best by providing you with faultless service for many seasons. In fact, we are so sure of this that we guarantee it, if for any reason at all, you are not satisfied with your purchase simply send it back to the retailer you bought it from or BestKiteboarding.com and we will refund you the purchase price of your kite, this is in addition to our industry standard 90 day materials and manufacture guarantee....
Open the catalog to page 3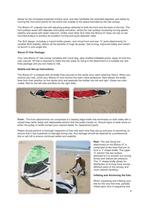
allows for the Increased projected surface area, and also facilitates the extended depower and safety by moving the front pivot points for the entire kite outside of the space bounded by the kite canopy. The Waroo 07 uniquely has self adjusting pulleys attached to both the front and the back of the kite. The front pulleys assist with depower and safety activation, whilst the rear pulleys Increasing turning speed, stability and assist with faster relaunch. Unlike most other SLE kites the Waroo 07 does not rely on bar mounted pulleys to achieve its excellent turning and quick depower rates....
Open the catalog to page 4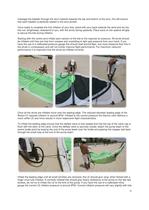
massage the bladder through the strut material towards the top and bottom of the strut, this will ensure that each bladder Is perfectly seated In the strut pocket. Once ready to complete the first Inflation of your kite, stand with your back towards the wind and lay the kite out, lengthways, downwind of you, with the struts facing upwards. Place sand on the upwind wingtlp to secure the kite during inflation. Starting with the centre strut inflate each section of the kite to the required air pressure. All struts should be Inflated until they are free from creases and unyielding to light grip...
Open the catalog to page 5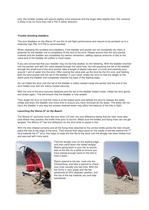
size, the smaller models will require slightly more pressure and the larger kites slightly less; this variance Is likely to be no more than half a PSI In either direction. Trouble shooting bladders: The strut bladders on the Waroo 07 are thin to aid flight performance and require to be pumped up to a relatively high PSI, 8.5 PSI Is recommended. When reseating the smallest strut bladders, If the bladder and pocket are not completely dry there Is potential for the bladder not to completely fill the end of the strut. Please ensure that the strut pocket material and the bladder are completely...
Open the catalog to page 6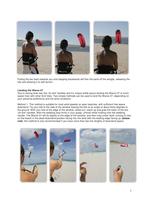
Pulling the bar back towards you and stepping backwards will flick the sand off the wlngtip, releasing the kite and allowing it to self launch. Due to having dual rear line 'oh-shlf handles and It's unique bridle layout landing the Waroo 07 Is much easier than with other SLE kites. Two simple methods can be used to land the Waroo 07, depending on your personal preference and the wind conditions. Method 1 : This method is suitable for most wind speeds on open beaches, with sufficient free space downwind. Fly your kite to the side of the window leaving the kite at an angle of about thirty...
Open the catalog to page 7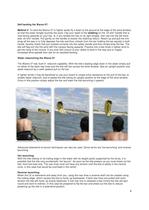
Method 2: To land the Waroo 07 in higher winds fly it down to the ground at the edge of the wind window, so that the lower wingtip touches the sand. Clip your leash to the webbing on the 'oh-shit' handle that is now facing upwards on your bar. ie. if you landed the kite on its right wingtip, then clip into the left hand side 'oh-shit' handle. Pull gently on the handle to loosen the retaining Velcro. Reach up and pull the trim strap all the way in to fully depower the kite and then unhook from the bar holding the bar equally in both hands. Quickly check that you hooked correctly into the...
Open the catalog to page 8
Assisted Landing the Kite When landing your kite with an assistant simply fly the kite to the edge of the window and down to ground level slowly. Have your assistant the take hold of the kite firmly in the middle of the leading edge, and then walk towards your assistant to remove all flying line tension. You can either have you assistant lay the kite down and sand the upper canopy, or have them hold the kite until you are unhooked from the bar and safely able to have them hand the kite over. What pre-flight checks should I perform before I first fly my Waroo 07? Your Waroo 07 kite is...
Open the catalog to page 9
Removing Bladder Undo the LE access zip; make sure that the zip is clean and free from sand before proceeding. If the zip is jammed with sand flush it out with a small amount of water or blow the zip clean using the pump. Once the zip is open push both the inflate and deflate valve stems inside the LE. Unfold the wingtip pockets, the black ABC-cloth flap is retained with a small Velcro tab, undo the Velcro and pull the end of the pocket out from the end of the sleeve. Gently pull 10-15cm of bladder out from the sleeve. All bladders are oversized so there will be suitable excess material at...
Open the catalog to page 10
Before you attempt to reinsert the bladder it is essential that the bladder and the LE sleeve are both completely dry. Sprinkling the bladder with copious quantities of 'talc' will make refitting the bladder much Lay the folded bladder on the LE next to the open zip, the bladder should be laid out so that the two valve stems are facing upwards with no twists being visible in the bladder. Carefully taking one end of the bladder attach the end to one of the lines that you previously drew through the LE. Then attach the other end of the bladder to the remaining line. Carefully feed the bladder...
Open the catalog to page 11All Best Kiteboarding catalogs and brochures
-
2010_Product_Catalog
21 Pages
-
best_bar_bypass_stopper
1 Pages
Archived catalogs
-
Waroo Pro Manual
15 Pages
-
best bar manual
8 Pages
-
Swivel Bar "04
3 Pages
-
Kite setup
32 Pages
-
5th Line
3 Pages
-
Carbon Bar w/ Grenade
4 Pages
-
Yarga Hybrid 5th Line Manual
5 Pages
-
Bularoo Manual
16 Pages
-
Yarga user manual
16 Pages


