Catalog excerpts
Contents 1.) Introduction 2.) Safety First 3.) The Wind – terminology, wind window 4.) Kite setup 5.) Attaching the flying lines to the kite 6.) Tuning the kite 7.) Quick release 8.) Maintenance 9.) Repairs 10.) Self rescue 11.) Warranty policy 1.) Introduction Congratulations! You have just purchased a Best kite with an excellent warranty. We at Best Kiteboarding appreciate your confidence in our products and services. Great care has been taken to get this kite and all of its parts to you in perfect order. Please contact us immediately if your order does not meet your satisfaction. With...
Open the catalog to page 2
2.) Safety first General Kiteboarding is a dangerous sport. Always check the local wind conditions prior to launching any kite. Use the international kiteboarding signs; spoken words could be confusing. Be sure to keep a safe distance from all downwind objects and stay clear of all obstructions such as trees, power lines and seawalls. A high degree of physical conditioning is necessary when participating in this sport, so practice with extreme caution. Improper, incorrect or careless use of this equipment can cause serious injury or death. Best kites are not parachutes, paragliders or...
Open the catalog to page 3
• • pull you into road traffic hit power lines and electrocute you Weather conditions • • • • Do not kite in an offshore wind. Never ride in conditions that are too extreme or winds that are too strong for your skill level or your equipment. Never kiteboard if you can not handle the power of the kite. Use a smaller kite or wait for lighter wind. Do not kiteboard in thunderstorms or at night. Equipment • • • • • • Always check your equipment for wear and tear before going out onto the water. Never fly your kite with damanged lines or equipment. Replace or repair damaged equipment...
Open the catalog to page 4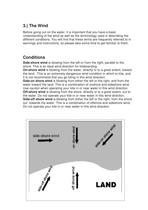
3.) The Wind Before going out on the water, it is important that you have a basic understanding of the wind as well as the terminology used in describing the different conditions. You will find that these terms are frequently referred to in warnings and instructions, so please take some time to get familiar to them. Conditions Side-shore wind is blowing from the left or from the right, parallel to the shore. This is an ideal wind direction for kiteboarding. On-shore wind is blowing from the water, directly or to a great extent, toward the land. This is an extremely dangerous wind condition...
Open the catalog to page 5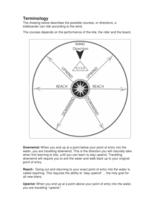
Terminology The drawing below describes the possible courses, or directions, a kiteboarder can ride according to the wind. The courses depends on the performance of the kite, the rider and the board. Downwind: When you end up at a point below your point of entry into the water, you are travelling downwind. This is the direction you will naturally take when first learning to kite, until you can learn to stay upwind. Travelling downwind will require you to exit the water and walk back up to your original point of entry. Reach: Going out and returning to your exact point of entry into the...
Open the catalog to page 6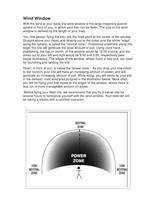
Wind Window With the wind at your back, the wind window is the large imaginary quarter sphere in front of you, in which your kite can be flown. The size of the wind window is defined by the length of your lines. You (the person flying the kite) are the fixed point at the center of the window. Straight above your head, and directly out to the sides (and the entire “edge“ along the sphere) is called the “neutral zone.“ Positioned anywhere along this edge, the kite will generate the least amount of pull. Using clock hand positioning, the top, or zenith, of the window would be 12:00 o’clock,...
Open the catalog to page 7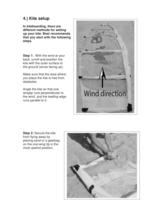
4.) Kite setup In kiteboarding, there are different methods for setting up your kite. Best recommends that you start with the following steps. Step 1: With the wind at your back, unroll and position the kite with the outer surface to the ground (struts facing up). Make sure that the area where you place the kite is free from obstacles. Angle the kite so that one wingtip runs perpendicular to the wind, and the leading edge runs parallel to it. Step 2: Secure the kite from flying away by placing sand or a gearbag on the one wing tip in the most upwind position.
Open the catalog to page 9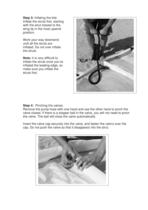
Step 3: Inflating the kite. Inflate the struts first, starting with the strut closest to the wing tip in the most upwind position. Work your way downwind until all the struts are inflated. Do not over inflate the struts. Note: it is very difficult to inflate the struts once you’ve inflated the leading edge, so make sure you inflate the struts first. Step 4: Pinching the valves. Remove the pump hose with one hand and use the other hand to pinch the valve closed. If there is a stopper ball in the valve, you will not need to pinch the valve. The ball will close the valve automatically. Insert...
Open the catalog to page 10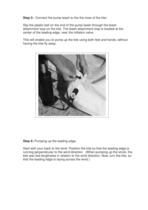
Step 5: Connect the pump leash to the the nose of the kite: Slip the plastic ball on the end of the pump leash through the leash attachment loop on the kite. The leash attachment loop is located at the center of the leading edge, near the inflation valve. This will enable you to pump up the kite using both feet and hands, without having the kite fly away. Step 6: Pumping up the leading edge. Start with your back to the wind. Position the kite so that the leading edge is running perpendicular to the wind direction. (When pumping up the struts, the kite was laid lengthwise in relation to the...
Open the catalog to page 11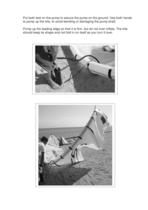
Put both feet on the pump to secure the pump on the ground. Use both hands to pump up the kite, to avoid bending or damaging the pump shaft. Pump up the leading edge so that it is firm, but do not over inflate. The kite should keep its shape and not fold in on itself as you turn it over.
Open the catalog to page 12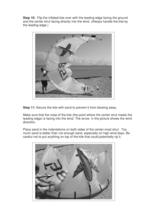
Step 10: Flip the inflated kite over with the leading edge facing the ground and the center strut facing directly into the wind. (Always handle the kite by the leading edge.) Step 11: Secure the kite with sand to prevent it from blowing away. Make sure that the nose of the kite (the point where the center strut meets the leading edge) is facing into the wind. The arrow in the picture shows the wind direction. Place sand in the indentations on both sides of the center-most strut. Too much sand is better than not enough sand, especially on high wind days. Be careful not to put anything on top...
Open the catalog to page 13All Best Kiteboarding catalogs and brochures
-
2010_Product_Catalog
21 Pages
-
best_bar_bypass_stopper
1 Pages
Archived catalogs
-
Waroo 07 manual
16 Pages
-
Waroo Pro Manual
15 Pages
-
best bar manual
8 Pages
-
Swivel Bar "04
3 Pages
-
5th Line
3 Pages
-
Carbon Bar w/ Grenade
4 Pages
-
Yarga Hybrid 5th Line Manual
5 Pages
-
Bularoo Manual
16 Pages
-
Yarga user manual
16 Pages


