

OXR-TIOO Manual V l.l.pdf
OXR-TIOO Manual V l.l.pdf
The main unit includes a steering mechanism, button switch, light strip, handle, and fixing screw. The light strip indicates the status: green flashing means powered on but not connected, blue flashing indicates connection in neutral gear, and red flashing shows the motor is running. Specifications include dimensions (60cm x 15.5cm x 49cm), materials (aluminum alloy, carbon fiber, ABS plastic), weight (12.7kg), speed (4-7 knots), power (4000w/6000w), battery voltage (48V~70V), and waterproof grade (IPX7).
Remote Control Structure
The remote control features a communication antenna, display screen, indicator, control rocker, emergency stop/return button, and switch button. Specifications include dimensions (14.5cm x 6.2cm x 7.2cm), weight (250g), communication distance (1000 meters), and waterproof grade (IPX6). It supports wireless charging.
Packaging
The package includes a remote control, battery charger, thruster main unit, and remote control charger.
Use Instructions
Before use, ensure the battery is at least 80% charged. For installation, mount the thruster at the stern, adjust the height, and secure with screws. Connect the battery and power on. The remote control should be worn securely and used within 1000 meters. After use, turn off the power, disconnect cables, and clean the thruster.
Charging Instructions
Place the remote control on the wireless charger. A blinking yellow light indicates charging, and a steady yellow light means fully charged. Charge regularly to prevent battery depletion.
Maintenance Instructions
Rinse the thruster with fresh water after use, charge the remote control, and check for damage quarterly. Ensure the remote control battery is above 50% and verify normal operation.
Precautions
Avoid stepping on the host, do not let the thruster rotate in the air for more than 10 seconds, and store components indoors after use. If submerged in water, contact the manufacturer.
Troubleshooting
Common issues include foreign objects entangling the thruster, poor connections, and low battery. Solutions involve cleaning, restarting, and checking connections.
Catalog excerpts
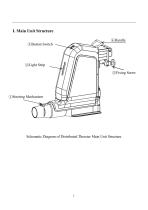
I. Main Unit Structure ④Handle ③Button Switch ②Light Strip ⑤Fixing Screw ①Steering Mechanism Schematic Diagram of Distributed Thruster Main Unit Struc
Open the catalog to page 3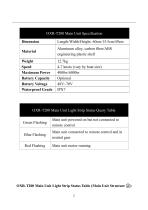
OXR-T200 Main Unit Specification OXR-T200 Main Unit Light Strip Status Table (Main Unit Structure ©)
Open the catalog to page 4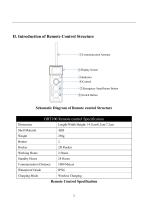
II. Introduction of Remote Control Structure ①Communication Antenna ②Display Screen ③Indicator ④Control Rocker ⑤ Emergency Stop/Return Button ⑥Switch Button Schematic Diagram of Remote control Structure ORT100 Remote control Specification Dimension Shell Material Working Hours Standby Hours Communication Distance Waterproof Grade Charging Mode Wireless Charging Remote Control Specifi
Open the catalog to page 5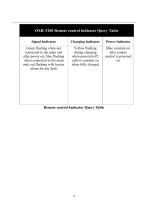
OXR-T200 Remote control Indicator Query Table Remote control Indicator Query Table
Open the catalog to page 6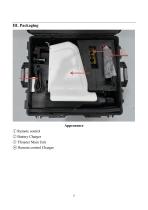
Appearance ① Remote control ② Battery Charger ③ Thruster Main Unit ④ Remote control Ch
Open the catalog to page 7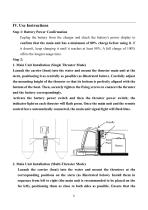
IV. Use Instructions Step 1: Battery Power Confirmation Unplug the battery from the charger and check the battery's power display to confirm that the main unit has a minimum of 80% charge before using it. If it doesn't, keep charging it until it reaches at least 80%. A full charge of 100% offers the longest usage time. Step 2: 1. Main Unit Installation (Single Thruster Mode) Launch the carrier (boat) into the water and mount the thruster main unit at the stern, positioning it as centrally as possible (as illustrated below). Carefully adjust the mounting height of the thruster so that its bottom...
Open the catalog to page 8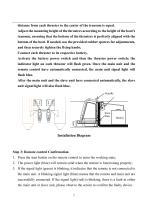
distance from each thruster to the center of the transom is equal. Adjust the mounting height of the thrusters according to the height of the boat's transom, ensuring that the bottom of the thrusters is perfectly aligned with the bottom of the boat. If needed, use the provided rubber spacers for adjustments, and then securely tighten the fixing knobs. Connect each thruster to its respective battery. Activate the battery power switch and then the thruster power switch; the indicator light on each thruster will flash green. Once the main unit and the remote control have automatically connected,...
Open the catalog to page 9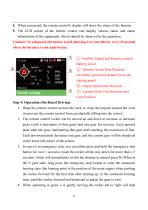
4. When connected, the remote control's display will show the status of the thruster. 5. The LCD screen of the remote control can display various status and alarm information of the equipment, which should be observed in the operation. Caution: To safeguard the motor, avoid allowing it to run idle for over 10 seconds when the thruster is not underwater. Normal running © Satellite Signal and Remote control Battery Level @ Thruster Status Data Rotation (including speed and distance from the starting point) @ Alarm Information Rotation © Current Main Unit Direction and Gear Position Step 4: Operation...
Open the catalog to page 10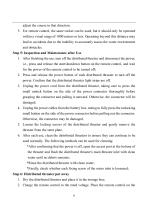
adjust the course in that direction. 5. For remote control, the same rocker can be used, but it should only be operated within a visual range of 1000 meters or less. Operating beyond this distance may lead to accidents due to the inability to accurately assess the water environment and obstacles. Step 5: Inspection and Maintenance after Use 1. After finishing the use, turn off the distributed thruster and disconnect the power, i.e., press and release the start/shutdown button on the remote control, and wait for the power of the remote control to be turned off; 2. Press and release the power button...
Open the catalog to page 11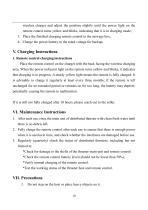
wireless charger and adjust the position slightly until the power light on the remote control turns yellow and blinks, indicating that it is in charging mode; 3. Place the finished charging remote control in the stowage box; 4. Charge the power battery to the rated voltage for backup; 1. Remote control charging instructions Place the remote control on the charger with the back facing the wireless charging area. When the power indicator light on the remote turns yellow and blinks, it indicates that charging is in progress. A steady yellow light means the remote is fully charged. It is advisable...
Open the catalog to page 12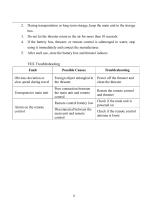
2. During transportation or long-term storage, keep the main unit in the storage box. 3. Do not let the thruster rotate in the air for more than 10 seconds. 4. If the battery box, thruster, or remote control is submerged in water, stop using it immediately and contact the manufacturer. 5. After each use, store the battery box and thruster indoors VIII. Troubleshooting
Open the catalog to page 13Archived catalogs
 Remote Control Rescue Drone
2 Pages
 AGISTAR CLEANER S1 Flyer
3 Pages
 USVSTAR Flyer
1 Page
 BX-USV II Flyer
1 Page
- Outboard engine
- Electric engine
- Unmanned surface vehicle
- Boat engine
- Autonomous unmanned surface vehicle
- Remote-controlled marine drone
- Hydrographic survey marine drone
- Electric unmanned surface vehicle
- Tender engine
- Patrol USV
- Man overboard rescue system
- Environmental measurement marine drone
- Oceanographic survey marine drone
- Transportable marine drone
- Man overboard rescue system for boat
- Catamaran marine drone
- Bathymetry survey marine drone
- Rescue USV
- Waste collection marine drone
- Compact marine drone