- Catalogs
- Advance Kites
- User manual 2006 Kobra - Skorpio
- Products
- Catalogs
- News & Trends
- Exhibitions
User manual 2006 Kobra - Skorpio

User manual 2006 Kobra - Skorpio
This manual provides technical information about ADVANCE KITES products, specifically the KOBRA and SKORPIO models. It is intended for users with basic kiting knowledge and emphasizes the importance of safety and adherence to kiting rules. The manual is not a substitute for professional training.
Technical Details
The KOBRA and SKORPIO kites feature the "Repower system," which enhances piloting smoothness and power control. The system allows for steady power during turns and provides a power boost when needed. The kites are designed with a "3D smooth profile" for optimal aerodynamics and include features like "strut pockets" for bladder protection.
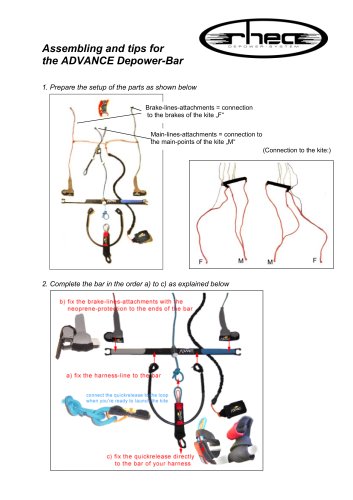
Bar Set-Up and Line Settings
The ADVANCE bar is designed for simplicity and functionality, featuring components like a stopper ball, power trimmer, and quick release system. The bar setup includes specific instructions for line tension adjustments and offers options for different riding styles by altering line lengths.
Quick Release System
The quick release system allows for emergency detachment from the kite. Proper resetting of the system is crucial to ensure safety. The manual provides detailed instructions and error samples to avoid common mistakes.
5th Line Use and Safety
The 5th line is an additional safety feature that can be attached to the kite for enhanced control and safety. The manual explains how to adjust the tension of the 5th line both on the ground and while riding.
Safety Rings
Various safety rings are available for different attachment points on the bar, providing options for safety system configurations. The manual advises on the use of these rings based on the rider's skill level.
Maintenance and Accessories
Regular maintenance, such as applying depower wax, is recommended to reduce friction and wear on lines. The manual also suggests storing the kite dry and avoiding prolonged sun exposure to extend its lifespan. Accessories include a big pump with an air pressure gauge.
Range of the Kites
The wind range for KOBRA and SKORPIO kites varies based on the rider's weight, skill, and the kite board used. Specific wind range values are provided in the manual.
Catalog excerpts

You have chosen an ADVANCE KITES product - we are delighted of your vote of ADVANCE KITES offers you products inspired by great enthusiasm, innovation and top Aimed at customers with a basic knowledge of kiting, this manual principally provides technical information about KOBRA and SKORPIO. This manual cannot replace training from an approved kite school. Kiting is a magnificent sport, although certain rules apply, which must never be neglected. As an "ambassador" of our sport, please respect these rules and always keep The manufacturer of ADVANCE KITES as well as the distributors of ADVANCE...
Open the catalog to page 2
6. Extrados (outer surface) 7. Intrados (inner surface)
Open the catalog to page 3
Resulting from the development of foil kites with variable angle of attack, the "Repower system" provides new piloting sensations for bladder kites. As they wanted to transfer the piloting smoothness of foil kites to the KOBRA and SKORPIO, the ADVANCE KITES development team designed the "Repower system". This enabled them to maintain the specific character of all ADVANCE paragliders and kites. In a turn, the KOBRA and the SKORPIO benefits from steady power with a minimum of variation, unlike a normal bladder kite, which slows down and loses power. The "Repower system" allows a real power boost....
Open the catalog to page 4
TECHNICAL DETAILS After careful study, the ideal pressure of each bladder of the KOBRA and SKORPIO has been determined and is indicated on the kite. A pump equipped with a pressure gauge will enable you to obtain a precise and effective inflation. All T2, T3, T4, T5 have been designed with a "3D smooth profile": the struts are shaped with 4 fabric panels, which enables them to benefit from a section that is close to a perfect circle. The absence of segments along the struts makes it possible to respect the profile chosen as well as possible, without the disturbances created by additional seams....
Open the catalog to page 5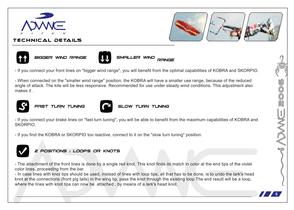
TECHNICAL DETAILS WIND UMM SMRLLER WIND - If you connect your front lines on "bigger wind range", you will benefit from the optimal capabilities of KOBRA and SKORPIO - When connected on the "smaller wind range" position, the KOBRA will have a smaller use range, because of the reduced angle of attack. The kite will be less responsive. Recommended for use under steady wind conditions. This adjustment also RHST TURN TUNING SLOW TURN TUNING - If you connect your brake lines on "fast turn tuning", you will be able to benefit from the maximum capabilities of KOBRA and - If you find the KOBRA or SKORPIO...
Open the catalog to page 6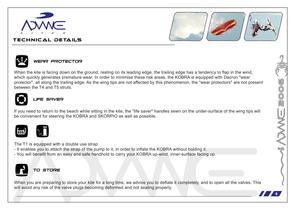
TECHNICAL DETAILS When the kite is facing down on the ground, resting on its leading edge, the trailing edge has a tendency to flap in the wind, which quickly generates premature wear. In order to minimise these risk areas, the KOBRA is equipped with Dacron "wear protector", all along the trailing edge. As the wing tips are not affected by this phenomenon, the "wear protectors" are not present If you need to return to the beach while sitting in the kite, the "life saver" handles sewn on the under-surface of the wing tips will be convenient for steering the KOBRA and SKORPIO as well as possible....
Open the catalog to page 7
Kobra and skorpio on snow - For single-handed relaunch on snow, the T4 struts are equipped with connection point for a 5th line on the trailing edge. Choose the connection point on the side that suits you and equip it with a 5th line. Then, fix the other end of the 5th line to your bar, beside the corresponding brake line. The 5th line should not be under tension, once the other 4 lines are fully extended. 5th line - Snow and ice are more abrasive than water. Beware of dropping the KOBRA or SKORPIO on ice or snow! Avoid letting the kite slide on snow. 7
Open the catalog to page 8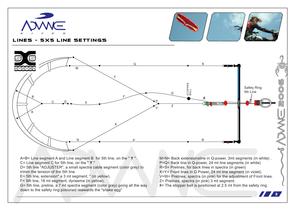
LINES - 5X5 LINE SETTING* A=B= Line segment A and Line segment B for 5th line, on the " Y ". C= Line segment C for 5th line, on the " Y " D= 5th line "ADJUSTER", a small spectra cable segment (color grey) to trimm the tension of the 5th line E= 5th line, extension" a 3 mt segment, " (in yellow). F= 5th line, 18 mt segment, dyneema (in yellow). G= 5th line, preline, a 7 mt spectra segment (color grey) going all the way down to the safety ring posioned reawards the "snake egg" M=N= Back extensionsline in Q-power, 3mt segments (in white) . P=Q= Back line in Q-power, 24 mt line segments (in white)...
Open the catalog to page 9
It is the result of some years of testing, use and fine tuning . Accessories, solutions, modifications, sugestions from riders, schools, personal modifications, all put together to create a more comfortable ride. The ADVANCE bar is simple, safe, comfortable, durable and ready to be connected to the kite. Stopper ball. Power Trimmer. Strap to depower (reduce power). Strap to power up (increase power). Clam cleat Snake eggs. Easy tune lefthand side. Easy tune righthand side. Safety ring on 5th line. ADVANCE quick release. J Safety ring on chicken loop. Depower rope. Back line ring.
Open the catalog to page 10
1) Attach all 4 fly lines to a commom attachment point. 2) Set the Power Trimmer, to Max Power (totally distended). 3) Pul I the bar towards you (low position) till it stops on the bottom snake egg (red oval ball) With this set up, all 4 fly lines should have exactly the same tension as well as lenght, any eventual adjustments must be done on the adjusting knots as follows: Back Lines, on segments R and S, at the adjusting knots. Front Lines, on segments V and W at the adjusting knots The bar is equiped with segmented fly lines with a total length of 27 mt, if your option is a more wake style...
Open the catalog to page 11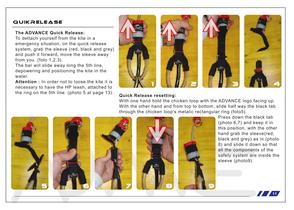
The ADVANCE Quick Release: To dettach yourself from the kite in a emergency situation, on the quick release system, grab the sleeve (red, black and grey) and push it forward, move the sleeve away The bar will slide away long the 5th line, depowering and positioning the kite in the Attention : In order not to loose the kite it is necessary to have the HP leash, attached to the ring on the 5th line, (photo 5 at page 13). Quick Release resetting: With one hand hold the chicken loop with the ADVANCE logo facing up. With the other hand and from top to bottom, slide half way the black tab through the...
Open the catalog to page 12All Advance Kites catalogs and brochures
 Catalogue 2012
9 Pages
Archived catalogs
 RHEA depower system
2 Pages
 User Manual 2007
1 Page
 ADVANCE KITES 2006
6 Pages
 Offroad User manual
12 Pages
 Rhea User manual
40 Pages