
カタログの抜粋
© 1999 GROSS MECHANICAL LABORATORIES, INC. ALL RIGHTS RESERVED. The Concept: Both aerobic and anaerobic bacteria exist naturally in raw sewage, but only the anaerobic cause unpleasant holding tank odors. Sweettank® upsets the balance between aerobic and anaerobic bacteria by inducing a continuous flow of air into the holding tank through a submerged bubbler. The process establishes an oxygen-rich environment in which anaerobic bacteria cannot survive. When the anaerobic bacteria are gone, so is the odor. Before you Begin: * Decide whether the installation will be into the top of the tank or through the side. * Determine the holding tank depth at the chosen installation location. * Confirm there is adequate unrestricted tank venting (5/8” ID minimum). * Determine the location of the Sweettank® air pump. The pump makes an audible humming sound, so choose a location that is not adjacent to sleeping quarters, or on a hollow wall or bulkhead. IMPORTANT INSTALLATION NOTE: Several Push-to-Lock fittings are included. When assembling the bubbler, rigid tubes or air hose to the push-to-lock fittings, the component must be inserted FIRMLY into the push-to-lock fitting to assure proper air flow. Test the assembly in a glass of water to assure the bubbler produces a generous supply of bubbles BEFORE installing into the holding tank. Tank-Top Installation (see Figure-1): * The 1-1/2” PVC Plug Assembly screws hand-tight into a 1-1/2” NPT threaded opening. A threaded adaptor and rubber tank seal (fits into a 2-1/2” hole cut with a hole saw) are provided if you do not have a threaded opening available. * Measure tank depth * Assemble bubbler assembly to rigid tubes and sleeves, and then cut to suit tank depth. Tank-Side Installation (see Figure-2): * The 1-1/2” PVC Plug Assembly screws hand-tight into a 1-1/2” NPT threaded opening. A threaded adaptor and rubber tank seal (fits into a 2-1/2” hole cut with a hole saw) are provided if you do not have a threaded opening available. * Assemble Push-to-Lock Elbow onto 1-1/2” PVC Plug Assembly, and bubbler assembly to rigid tubes and sleeves. You may cut to suit tank depth, or leave full-length. Air Pump Installation: * Ten feet of air hose is included. Always install the air pump higher than the holding tank, and on a solid, smooth, flat and dry surface. If you choose to install the air pump more than ten feet from the tank, use 3/16” ID x 5/16” OD flexible air tube (available from GROCO). Avoid sharp bends and sags in the air-line. * Choose a solid mount surface to minimize audible air pump vibration. * The back of the pump has “hook and loop” tape already in place. Clean the mount surface with alcohol to assure good adhesion. Peel off the backing and press the pump enclosure firmly onto the mount surface. * Connect the air hose to the air pump nipple, and to the tank-mounted PVC plug assembly. Remember to push the hose FIRMLY into the Push-to-Lock fitting. Electrical, DC Models: Sweettank® uses just 3-watts of power at 12VDC. Provide 18-gauge marine grade wire from the electrical distribution panel to the terminal block on the air pump. Use ring connectors aN electrical connections. A 1-amp fuse is provided. Electrical, AC Models: Sweettank® uses just 5-watts of power at 120VAC. MAKE POWER CONNECTION WITH AC POWER OFF. Remove the air pump cover and feed 3-conductor 18-gauge marine grade wire from the elec-trical distribution panel to the terminal block inside the air pump enclosure. Use ring connectors for all electrical connections. A 1-amp fuse is provided. Operation: Apply power by turning on the circuit breaker at the power distribution panel. Sweettank® will run and begin the odor neutralization process -within a few hours the holding tank will be odor-free. Allow Sweettank® to operate continuously, even when the tank is empty. Maintenance: Two types of bubblers have been used. Annual cleaning of the bubbler assembly is recommended. The multicolored bubbler is sectional and can be unscrewed for cleaning. If you have a black U-shaped tube bubbler, rinse it thoroughly while squeezing in warm running water. Winterization: Freezing conditions will not damage any of the Sweettank® components. Winterization is not required. Figures on Reverse Side For service assistance/information call 410.604.3800 and ask for MSD Service Department. After hours, go to www.groco.
カタログの1ページ目を開く
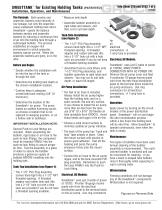
SWEETTANK for Existing Holding Tanks Installation, Operation, and Maintenance Parts Included with Sweettanky Kit © 1999 GROSS MECHANICAL LABORATORIES, INC. ALL RIGHTS RESERVED. Tank-Top Installation Tank-Side Installation For service assistance/information call 410.604.3800 and ask for MSD Service Department. After hours, go to www.groco.net.
カタログの2ページ目を開くGrocoのすべてのカタログとパンフレット
-
 Thermopure-2
6 ページ
-
 CP-20-S SERIES
1 ページ
-
 CP-20-BB, BBC, BBWA
1 ページ
-
 200 SERIES
1 ページ
-
 G SERIES
2 ページ
-
 GP SERIES
1 ページ
-
 AS-100 SERIES
1 ページ
-
 PSR SERIES
2 ページ
-
 PSR AC
1 ページ
-
 PARAGON JR SEREIS
2 ページ
-
 PARAGON JR-B SERIES
2 ページ
-
 C-60/80 SERIES
1 ページ
-
 K SERIES
1 ページ
-
 HF SERIES
1 ページ
-
 THERMOPURE SERIES
6 ページ
-
 ZDS WASTE SERIES
1 ページ
-
 TLM SERIES
1 ページ
-
 155 SERIES
1 ページ
-
 VL-1504 REPAIR
1 ページ
-
 HVL SERIES
1 ページ
-
 2016 GROCO CATALOG
58 ページ