
Catalog excerpts
1. Activate your account 3 6. Install your sensors 14 2. Activate your satcom 4 7. Pair your keyfob 24 4. Pair your sensors 10 9. Disclaimer 1. Activez votre compte 29 6. Positionnement des 40 communication satellite 7 Appairez votre 50 capteurs non-responsabilite
Open the catalog to page 2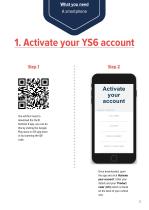
1. Activate your YS6 account Step 1 Activate your account You will first need to download the Yacht Sentinel 6 app, you can do this by visiting the Google Play store or iOS app store or by scanning the QR code. FULL NAME MOBILE NUMBER Once downloaded, open the app and click 'Activate your account'. Enter your details and your 'Product code1 (IMEI) which is found on the back of your central unit.
Open the catalog to page 3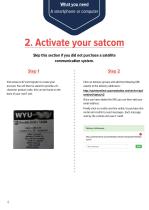
2. Activate your satcom Skip this section if you did not purchase a satellite communication system. Visit www.rock7.com/register to create your account. You will then be asked to provide a 6-character product code, this can be found on the back of your rock7 unit. Click on delivery groups and add the following URL exactly to the delivery addresses: http://yachtsentinel.azurewebsites.net/service/api/ sentinel/status/v2 Once you have added the URL you can then add your email address. Finally click on credits and line rental, to purchase line rental and credits to send messages. Each...
Open the catalog to page 4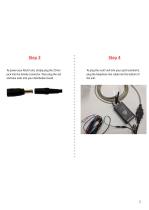
Step 4 To power your Rock7 unit, simply plug the 2.1mm jack into the female connector. Then plug the red and blue ends into your distribution board. To plug the rock7 unit into your yacht sentinel 6, plug the telephone line cable into the bottom of the unit.
Open the catalog to page 5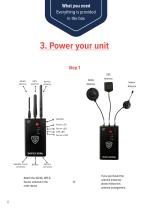
3. Power your unitStep 1 Attach the 3G/4G, GPS & Sensor antenna in the Or order above. If you purchased the external antennas, please follow this antenna arrangement.
Open the catalog to page 6
Bow of the boat ^■X Be sure to place your unit on a flat surface and position the antennas towards the bow of the boat. To give power to your unit you need to plug one end of your power cable into the central unit. Then plug the positive and negative wires into your distribution board.
Open the catalog to page 7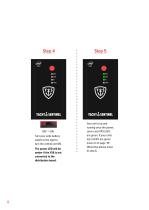
Step 4 Turn your units battery switch to the right to turn the central unit ON. The power LED will be amber if the YS6 is not connected to the distribution board. Your unit is up and running once the power, server and GPS LED's are green. If your units top 3 LED's are green move on to page '10'. Otherwise please move to step 6.
Open the catalog to page 8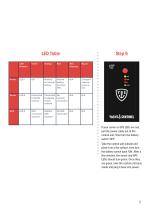
If your server or GPS LEDs are red, pull the power cable out of the central unit. Then turn the battery switch 'OFF'. Take the central unit outside and place it on a flat surface, then turn the battery switch back 'ON'. After a few minutes, the server and GPS LEDs should turn green. Once they are green, take the central unit back inside and plug it back into power.
Open the catalog to page 9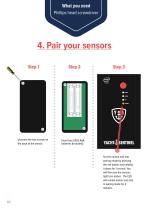
4. Pair your sensors Step 1 Unscrew the two screws on the back of the sensor. Set the central unit into pairing mode by pressing the red button and holding it down for 1 second. You will then see the sensors light turn amber. The LED will remain amber and stay in pairing mode for 3 minutes.
Open the catalog to page 10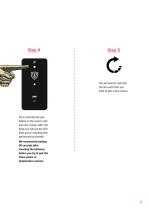
Step 5 You will need to redo this process each time you want to pair a new sensor. Press and hold the pair button on the sensor until you hear a beep. After the beep you will see the LED flash green, indicating the pairing was successful. We recommend waiting 30 seconds after inserting the batteries before you try to pair the shore power or temperature sensors.
Open the catalog to page 11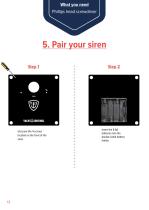
5. Pair your siren Step 2 Unscrew the 4 screws located on the front of the siren. Insert the 8 AA batteries into the double-sided battery holder.
Open the catalog to page 12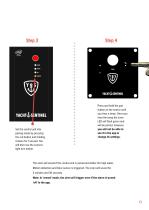
Set the central unit into pairing mode by pressing the red button and holding it down for 1 second. You will then see the sensors light turn amber. Step 4 Press and hold the pair button on the sensor until you hear a beep. Once you hear the beep the siren LED will flash green and will be paired, however, you will not be able to see it in the app or change its settings. The siren will sound if the central unit is armed and either the high water, Motion detection and Door sensor is triggered. The siren will sound for 3 minutes and 30 seconds. Note: In 'armed' mode, the siren will trigger even...
Open the catalog to page 13
6. Install your sensors
Open the catalog to page 14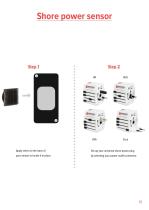
Step 2 Set up your universal shore power plug by selecting your power outlet connector. Apply velcro to the back of your sensor to locate it in place.
Open the catalog to page 15
Step 4 Connect your micro USB cable to both the universal plug and your shore power sensor. Now you can connect your universal power adapter to whichever power outlet you wish to monitor.
Open the catalog to page 16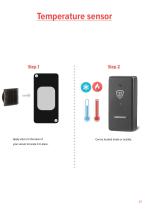
Step 2 Apply velcro to the back of your sensor to locate it in place.
Open the catalog to page 17
High water sensorStep 2 Apply velcro to the back of your sensor and locate it in place. Connect the high water extension cable, then place the sensor above the automatic cut off of the bilge pump.
Open the catalog to page 18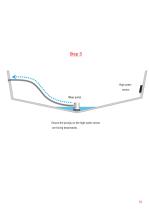
Ensure the prongs on the high water sensor are facing downwards.
Open the catalog to page 19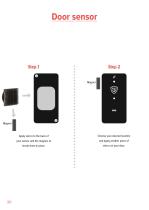
Step 2 Apply velcro to the back of your sensor and the magnet, to locate them in place. Choose your desired location and apply another piece of velcro on your door.
Open the catalog to page 20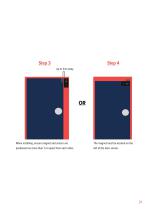
Step 4 When installing, ensure magnet and sensor are positioned no more than 1 cm apart from each other. The magnet must be located on the left of the door sensor.
Open the catalog to page 21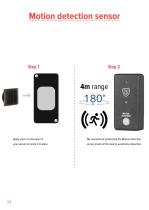
Step 2 Apply velcro to the back of your sensor to locate it in place. We recommend positioning the Motion detection sensor inside of the boat to avoid false detection.
Open the catalog to page 22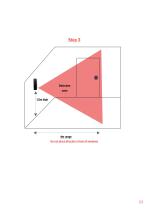
◄-► 4m range Do not place directly in front of windows
Open the catalog to page 23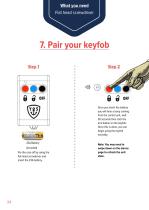
7. Pair your keyfob Step 2 Step 1 6 d °FF Once you insert the battery you will hear a beep coming from the central unit, wait 30 seconds then click the arm button on the keyfob. Once this is done, you can begin using the keyfob normally. 23A Battery (Included) Pry the case off by using the flat head screwdriver and insert the 23A battery. Note: You may need to swipe down on the alarms page to refresh the unit state.
Open the catalog to page 24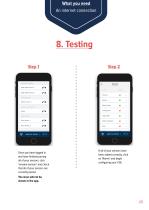
8. TestingStep 1 • Step 2 If all of your sensors have been added correctly, click on 'Alarms' and begin configuring your YS6. Once you have logged in and have finished pairing all of your sensors, click 'rename sensors' and check that all of your sensors are correctly paired. The siren will not be shown in the app.
Open the catalog to page 25All Yacht Sentinel Limited catalogs and brochures
-
 YS6 Product Overview
11 Pages
-
 Sentinel Point 2 Overview
9 Pages
-
 YS5_manual1
19 Pages