Group: The Seldén Group

Catalog excerpts
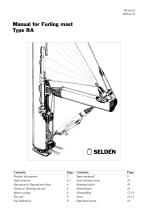
Manual for Furling mast Contents: Page: Contents: Page: Product description 2 Spare mainsail 9 Luff extrusion 4-5 Anti-vibration strip 10 Operation & Operational hints 6 Running cables 10 Fitting & Hoisting the sail 8 Maintenance 10 Before sailing 8 Dismantling 12-13 Sail dimension 9 Important points 16
Open the catalog to page 1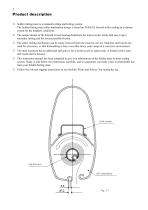
Product description Seldén furling mast is a mainsail reeng and furling system. The Seldén furling mast roller mechanism design is based on FURLEX foresail roller reeng an is dimensioned for the toughest conditions. The unique design of the halyard swivel bearing distributes the load over the whole ball-race to give smoother furling and the lowest possible friction. The entire reeng mechanism can be easily removed from the mast for service. Stainless steel inserts are used for all screws, so that dismantling is easy even after many years usage in a corrosive environment. The mast extrusion...
Open the catalog to page 2
Masthead bearing Extra sheave box for furling jib halyard Halyard swivel Topping lift, 2:1 ratio Sail feeder Inspection hole for sail intake Access to tack hook and halyard swivel Clew outhaul Upper greasing hole Lower greasing hole Roller mechanism Clew outhaul car Reeng winch Turning blocks
Open the catalog to page 3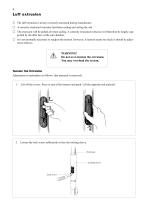
Luff extrusion The luff extrusion is always correctly tensioned during manufacture. A correctly tensioned extrusion facilitates reeng and setting the sail. The extrusion will be pulled aft when sailing. A correctly tensioned extrusion will therefore be largely supported by the after face of the sail chamber. It is not normally necessary to readjust the tension. However, if tension seems too slack it should be adjusted as follows. WARNING! Do not over-tension the extrusion. You may overload the system. Tension the Extrusion Adjustment is undertaken as follows: (the mainsail is removed). 1....
Open the catalog to page 4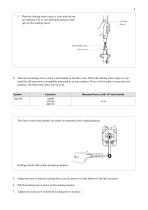
5 3. Push the locking sleeve up to a level with the upper opening. Put in your left hand and get a rm grip on the locking sleeve. Locking sleeve Tensioning screw Lock screw 4. Turn the tensioning screw with a winch handle in the drive unit. When the locking sleeve slips in your hand the luff extrusion is acceptably tensioned in an easy manner. If you wish to make a more exact adjustment, the following values can be used. System Measured force p with 10”winch handle The force in the winch handle can easily be measured with a spring balance. Reeng winch with handle and spring balance. 5....
Open the catalog to page 5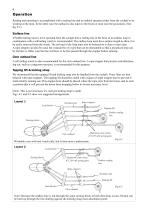
Operation Reeng and unreeng is accomplished with a reeng line and an outhaul operated either from the cockpit or by working at the mast. In the latter case the outhaul is also taken to the boom or mast near the gooseneck. (See g. 5:1). Endless line If Seldén furling mast is to be operated from the cockpit then a reeng line in the form of an endless loop in combination with a self-tailing winch is recommended. The endless loop must have surplus length to allow it to be easily removed from the winch. The tail-end of the loop must also be belayed on a cleat or clam cleat. A rope-stopper can...
Open the catalog to page 6
Alternative clew outhaul arrangement. When reeng from the cockpit the reeng winch must be set to ”free”.(See g. 5:2). Use 10 mm diameter double plaited line for the endless loop. The mast turning block has removable sheaves and a slit to allow the endless loop to be tted even when pre-spliced. N.B. These turning blocks must be used for reeng system control lines only! If deck lead blocks are used we recommend those with removable sheaves from seldén mast. (Part no. 538-809-01, Three sheaves; or 538-810-01, 4 sheaves). A pre-spliced endless loop can be threaded through them. If ttings from...
Open the catalog to page 7
Fitting and hoisting sail 1. Check that the tack and head of the sail are made as illustrated on page 7. An incorrectly made tack can cause wrinkles in the sail and make smooth furling difficult. 2. Remove the covers. Depress one button and push. Lift the opposite end and remove. 3. Join the head to the halyard swivel. 4. Join the outhaul block to the clew of the sail. 5. Hoist the sail until there is about 700 mm (2’3”) between the sail foot and the upper edge of the sail feed. Keep a check at the sail feed that the luff is being correctly fed into the luff extrusion. 6. Feed the bottom...
Open the catalog to page 8
The sail The luff should be easy to fold around the luff extrusion for reduced rolling resistance when starting to roll in the sail. Do not use too heavy a cloth in the luff area. To improve sail shape when reefed and to reduce draft, ”luff foam” may be used along the luff. The foam should not be placed closer than 50 mm (2”) from the front edge of the luff as it would then increase initial reeng resistance. Sail dimensions We recommend maximum 5 mm (13/64”) luff tape. (Maximum 4 mm hard line). Dimensions for the luff groove are shown in g. 7.1. Head and tack tapes should be of soft quality...
Open the catalog to page 9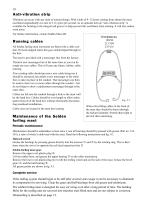
Anti-vibration strip Vibration can occur with any mast of normal design. With winds of 4–12 knots coming from abeam the mast oscillates longitudinally at a rate of 3–6 cycles per second. As an optional item an ”anti-vibration strip” is available for hoisting in the integral sail groove to help prevent this oscillation from starting. It will also reduce wind noise. For further information, contact Seldén Mast AB. Running cables All Seldén furling mast extrusions are tted with a cable conduit. On keel-stepped masts this goes uninterrupted through to the foot. The mast is provided with a...
Open the catalog to page 10
Removal of the Seldén furling mast gear from the mast 1. Lay the mast horizontally. 2. Remove the upper plug . Free the extrusion from the reeng unit through the greasing aperture by removing the lower split-pin and clevis pin . 3. Unbolt the reeng unit (4 bolts), and remove it from the mast. (The reeng unit can be removed while the mast is rigged). 4. Remove the nuts on the top of the head-box and lift off the head-box. 5. Pull the luff extrusion a short way out of the mast and remove the split-pins holding the plastic bushing in place. 6. The halyard swivel can then be removed from the...
Open the catalog to page 12All Seldén Mast AB catalogs and brochures
-
 Seldén CXe45
7 Pages
-
 Furlex TD
4 Pages
-
 Downwind Furlers
12 Pages
-
 Soft Attachment Blocks
3 Pages
-
 Cam Cleats
3 Pages
-
 Ratchet Blocks
4 Pages
-
 Furlex 104S-404S
8 Pages
-
 Carbon Spars
11 Pages
-
 Hydraulic Cylinders
9 Pages
-
 Deck Hardware Catalogue, Version 12
114 Pages
-
 Spreaders
8 Pages
-
 Mast feet and heel
2 Pages
-
 spinnaker poles
9 Pages
-
 Sail entry
3 Pages
-
 MASTHEAD LIGHTS
6 Pages
-
 CARBON MASTS
4 Pages
-
 CARBON BOOMS
2 Pages
-
 FURLING MASTS
8 Pages
-
 Selecting the right pole
2 Pages
-
 Rodkicker
6 Pages
-
 Booms with a strong profile
2 Pages
-
 Furlex Electric
8 Pages
-
 FURLEX 20S 30S 40S
4 Pages
-
 YACHT PRODUCT CATALOGUE
194 Pages
-
 Seldén carbon spars
2 Pages
-
 FURLEX POUR DÉRIVEURS
3 Pages
-
 Furlex 50S
2 Pages
-
 Gennaker bowsprit
4 Pages
-
 Cross beams for catamarans
1 Pages
-
 Dinghy product catalogue
52 Pages
-
 Keelboat product catalogue A4
72 Pages
-
 Mast bases & Deck rings
15 Pages
-
 Keelboat masts
28 Pages
-
 hydraulic cruise contro
4 Pages
-
 furling masts
6 Pages
-
 Dinghy carbon masts
1 Pages
-
 mast section
3 Pages
-
 FURLEX 20S
2 Pages


Archived catalogs
-
 Yacht Product Catalogue version 6 A4
200 Pages
-
 Gennaker bowsprit
2 Pages
-
 Mats
Mats19 Pages