SD FORMER RANGE
1 /10Pages

SD FORMER RANGE
1 /10Pages
Catalog excerpts
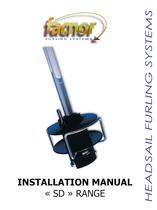
FURLING SYSTEMS INSTALLATION MANUAL
Open the catalog to page 1
The FACNOR model SD is the easiest Reefing System in the world to install. You will see, it is designed for a quick and simple installation. It can be fitted without precise measurement of the forestay, AND WITHOUT CUTTING ANY SECTIONS, because of the unique and patented, telescopic lower section. This provides all the length adjustment necessary. The FACNOR system slides over the forestay and turnbuckle. In this way, the integrity of the rig is maintained and allows full adjustment of the forestay. The halyard swivel ensures an efficient sail shape for ideal furling. The swivel and the drum...
Open the catalog to page 2
B- FITTING OF THE HALYARD DEFLECTOR WHEEL: — Slide the halyard deflector onto the forestay. — Fit the two red bearings* (dwg. A) onto the wire with their flat side opposite the screw (dwg. B) as shown on the drawing. Then, insert the two red bearings fully into (* bearings are split to allow them to be placed around the head stay below terminal end fitting). — Secure with screw (dwg. B). — Slide the top cap onto the forestay. — Place two bearings onto forestay and slide on top section. (Note that this section has a stop (dwg. D) — To fix the cap to the top section, tap with a soft head Note :...
Open the catalog to page 3
sections except the top section (section with When you fix the connectors, please fix it at the head of the section. ( Please note, that the distance between last hole and end of — Put the wire into the top section. — Place a black bearing (dwg. B) around the — Insert the bearing into the top part of the threaded holes. — Now fasten with two screws and gradually — Continue the operation for the next section, not forgetting to insert a black bearing inside each connector. On the last section, insert a bearing inside the telescopic — Do not fix anything on the last section. If your forestay length...
Open the catalog to page 4
E- FITTING THE TELESCOPIC SECTION: — Slide on halyard swivel in position if you have — Use a halyard attached to the swivel to hoist the system as far up the forestay as possible. ~- Slide the telescopic section (dwg. H) into the bottom section and insert a bearing into the top of the telescopic section. Slide on the black sail — Slide the drum onto the forestay terminal. F- FITTING OF THE DRUM UNIT: terminal*link plates: (drawing 1) — Insert the two link plates into the lower part — Fasten the set (eye terminal + link plates) with the pin (dwg. D) and both nylon bushings. Note: If the link plates...
Open the catalog to page 5
G- FINAL ADJUSTMENT OF THE SECTIONS: Tension backstay slightly. Allow the sail feeder (dwg. E) to sit on the drum. Ensure foil assembly (dwg. B) is hoisted fully using the halyard swivel. The halyard deflector needs to touch the top terminal (dwg. C). Lower the foil section assembly by about 50 mm. Drill two Ø 5 mm holes (dwg. L) through pre-drilled guide holes into the telescopic section. CAUTION: DO NOT DRILL THE FORESTAY WIRE. Fit and pull two (5x10 mm) rivets into these holes using a rivet gun. E). Slide sail feeder up to the bottom of the foil (dwg. Drill a Ø 3 mm hole into the front of...
Open the catalog to page 6
I- RAISING SAIL AND FURLING: The hoisting of the sail does not present any difficulties, however you should remember that it will require slightly more effort than with jib hanks on sail. This is due to the extra friction — Shackle the tack of genoa to drum using shackle provided. — Attach the head of sail to halyard swivel using shackle provided. — Attach the halyard to the top of the halyard swivel. — Feed sail through feeder and into groove of bottom section. — Hoist sail slowly. (Sail with luff tape have more friction than those with jib hanks). — It is not necessary to have as much halyard...
Open the catalog to page 7
FURLING - REEFING TIPS (next): When unfurling, restrain the reefing line so that it doesn’t jerk out of hand. Keep line under control as you furl and mind that it does not overlap. When you reef, do not forget to move your genoa car to insure the right tension on the genoa leach and foot and that the genoa sheet lead is correct. Check that the forestay is tight and clear of other halyards. Never slacken the genoa halyard when furling. Cleat the furling line and secure jib sheets when you reach the desired reef. Do not force the reefing system if the reefing lines get blocked. It is recommended...
Open the catalog to page 8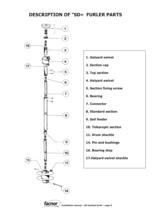
DESCRIPTION OF "SD« FURLER PARTS 1. Halyard swivel 2. Section cap 3. Top section 4. Halyard swivel 5. Section fixing screw 6. Bearing 7. Connector 8. Standard section 9. Sail feeder 10. Telescopic section 11. Drum shackle 14. Pin and bushings 16. Bearing stop 17.Halyard swivel shackle Installation manual – SD headsail furler – page 8
Open the catalog to page 9
APPENDIX INSTALLATION OF AN « SD » DRUM ON A FORESTAY FITTED WITH TUNBUCKLE RIGGING SCREW Facnor provides a « turnbuckle kit » designed for the installation of « SD » drums on forestay that is fitted with turnbuckle rigging screw at the bottom. For your information, « turnbuckle kits » are available in various lengths according to the desired heigth of the drum above the deck. LIST OF « TURNBUCKLE KIT » COMPONENTS : (drawing 1) 2 stainless link plates (dwg. A) 1 pin (dwg. D) 2 short screws (dwg. E) Drawing1 INSTALLATION INSTRUCTIONS: (drawing 2) Slide the link plates into the notches situated...
Open the catalog to page 10All Facnor catalogs and brochures
 November 2020 Facnor NEWS
2 Pages
 Electric Furlers
1 Page
 FACNOR CATALOGUE 2016
50 Pages
 FACNOR CUSTOM CATALOGUE
12 Pages
 2015 Facnor catalogue
51 Pages
 STG 3T Wire furler
1 Page
 Commercial brochure
5 Pages
 2013 Facnor Catalogue
50 Pages


Archived catalogs
 Gennaker & Code 0 Furler
2 Pages
 Asymfx Furlers
2 Pages
